利用服务器剩余的磁盘空间的小方法

前言:随着服务器越来越多,我们在部署服务后可能服务器硬盘存在许多空间,现在我就教大家如何优秀地利用(榨干)服务器硬盘。

服务器这里我选用了腾讯云轻量应用服务器,现在有无忧计划哦!续费超便宜,大家可以试试!

先介绍一下本次所利用的开源项目

Minio

MinIO 是一个基于 Apache License v2.0 开源协议的对象存储服务。它兼容亚马逊 S3 云存储服务接口,非常适合于存储大容量非结构化的数据,例如图片、视频、日志文件、备份数据和容器 /虚拟机镜像等,而一个对象文件可以是任意大小,从几 kb 到*大 5T 不等。MinIO 是一个非常轻量的服务,可以很简单的和其他应用的结合,类似 NodeJS, Redis 或者 MySQL

引用自官网介绍链接为 http://docs.minio.org.cn/docs/

minio 官网 现在我们来部署一下 minio (其实这东西可以集群啦但是没有必要,官方的集群方法太麻烦啦,也太耗费资源!

推荐使用 docker 部署的方法!

docker 部署

安装 docker (这里可以选择腾讯云轻量应用服务器 docker 镜像,已经默认安装了 docker 并且已经更换为腾讯云的源了)

1.宝塔版本

应用商店-docker 管理器

宝塔安装 docker 2.自行安装(若服务器基于 LXC,openvz 虚拟化无法安装 docker 哦,请看下一种安装方法!

推荐使用 daocloud 一键脚本安装

curl -sSL https://get.daocloud.io/docker | sh

docker 如果提示 curl command not found

请使用 apt-get install curl ( unbutu,debian

centos 使用 yum install curl -y

下面开始部署 minio

docker pull minio/minio (pull 镜像) docker run -p 9000:9000 minio/minio server /data. (可以部署其他端口修改前面的 9000 即可,后面这个命令是数据持久化储存的命令)

注意:防火墙开放 9000 端口!!!!

接下来就可以访问 server-ip:9000 来进入啦!

minio 界面 默认用户名密码为 minioadmin

手动拉取部署

wget https://dl.min.io/server/minio/release/linux-amd64/minio chmod +x minio ./minio server /data ( data 可以改为服务器任意目录) 配置守护(不然 ssh 断掉网页端也会断开!) nohup /opt/minio/minio server –address “${MINIO_HOST}:${MINIO_PORT}” /opt/minio-data > /opt/minio/minio.log 2>&1 & 部署完后我们进入 server-ip:9000

进入 minio

这里和云服务厂商一样点击➕号

1.创建自己的储存桶

2.创建好后点击上传可以上传自己的文件

3.点击可以获取临时访问链接

4.修改可见性使用公共可见

创建好后*关键的来啦!我们可以 s3fs 让另一个服务器挂载这一台服务器的 minio,也可以使用支持 s3 通用协议的储存!

sudo yum install epel-releasesudo

yum install s3fs-fuse (安装 s3fs centos )

ubuntu,debian

1

curl https://downloads.plex.tv/plex-keys/PlexSign.key | apt-key add -echo deb https://downloads.plex.tv/repo/deb public main | tee /etc/apt/sources.list.d/plexmediaserver.list

2.apt update && apt install -y plexmediaserver s3fs echo “你的访问 key:你的密钥” > /root/.passwd-s3fs && chmod 600 /root/.passwd-s3fs

3.挂载到本地磁盘

s3fs -o passwd_file=/root/.passwd-s3fs -o url=http://server-ip:9000 -o allow_other -o nonempty -o no_check_certificate -o use_path_request_style -o umask=000 pic /pic

现在使用

df -h 查看是否挂载成功

minio Docker 服务器 curl5 条回复 • 2021-06-18 15:31:43 +08:00
FreeEx 1
FreeEx 5 天前 via iPhone
学习了
fkname 2
fkname 5 天前
国内服务器带宽都很小,意义不大
aiz 3
aiz 5 天前 via Android
@fkname 国内服务器下行网带宽都很大的,这个在利用 cos 还是有一定可行性的
u011631336 4
u011631336 5 天前
对生产环境要有敬畏之心
aiz 5
aiz 4 天前
@u011631336 不会用在生产环境的,这个是因为纯属想折腾

有什么可以经过 HTTP 代理来反代网站的工具?

用于反代的机器需要通过一个 HTTP 代理服务器才能连接反代的目标服务器,有什么可以经过 HTTP 代理来反代网站的工具?
反代 代理 服务器 工具11 条回复 • 2021-06-23 10:04:19 +08:00
wengych 1
wengych 15 小时 6 分钟前 via iPhone
nginx….
wengych 2
wengych 15 小时 6 分钟前 via iPhone
privoxy
Rocketer 3
Rocketer 15 小时 3 分钟前 via iPhone
nginx,还能附加 ssl
est 4
est 15 小时 1 分钟前
cloudflared (旧称 argo ) 试试
theklf4 5
theklf4 13 小时 12 分钟前 via iPhone
@wengych
@Rocketer
nginx 文档看了很多遍,没找到使用 HTTP 代理服务器连接目标的方法
hongdaworks 6
hongdaworks 10 小时 31 分钟前
nginx ssl 。
谷歌 Http 反向代理 Https 反向代理
NSAgold 7
NSAgold 9 小时 35 分钟前 via Android
B 在一个需要 http 代理才能访问 A 的环境下
现在希望 C 通过直接访问 B 的反代来实现访问 A

是不是这个意思
theklf4 8
theklf4 5 小时 11 分钟前 via iPhone
@NSAgold 是的
lx0758 9
lx0758 5 小时 8 分钟前 via Android
fd or charles
no1xsyzy 10
no1xsyzy 4 小时 25 分钟前
https://stackoverflow.com/q/46803431/6202760
其实你想要的东西叫做『 HTTP 代理转换成(特定目标的)透明代理』

如果该网站有 HTTPS,而你不需要解包的话甚至可以直接做「 SNI 代理」

lbp0200 11
lbp0200 3 小时 49 分钟前
你搜一下,NGINX 配合 Tomcat

阿里云合作伙伴有人了解吗

*近在买阿里云 ECS 服务器,公司财务让我加了一个微信,原来发现是什么阿里云合作伙伴项目,买完服务器之后,可以在官网的优惠基础上可以返还 20 个点,这个来去也太大了吧!只需要在合作伙伴加上那家公司即可,用了几天也没发现服务器有啥问题。 有需求的同学可以跟我说,我可以把这个推荐给你们,哈哈哈哈~ 服务器 伙伴 阿里 ecs14 条回复 • 2021-06-23 13:42:57 +08:00 lostSoul 1 lostSoul 4 小时 12 分钟前 现在广告都是这么打的嘛 zhaodahongshuai 2 zhaodahongshuai 4 小时 8 分钟前 @lostSoul 我认真的读了一遍,确实有打广告的嫌疑啊。。。 表达能力不好,见谅,我就是分享一下没见识过的东西 lostSoul 3 lostSoul 4 小时 4 分钟前 @zhaodahongshuai 其实可以发广告节点的 v2 本身就支持打广告 janxin 4 janxin 4 小时 4 分钟前 v2 就有的 kaikai5601 5 kaikai5601 3 小时 54 分钟前 via iPhone 返到什么账户下面? echo1937 6 echo1937 3 小时 53 分钟前 其实就是代理商。 zoharSoul 7 zoharSoul 3 小时 10 分钟前 不就是代理商么…. akira 8 akira 3 小时 9 分钟前 看起来是新入行的代理商 zhaodahongshuai 9 zhaodahongshuai 2 小时 50 分钟前 @kaikai5601 返到我们公司的对公账户了 cookgo 10 cookgo 2 小时 41 分钟前 代理商模式就是把你的阿里云账号变成他们的子账号,财务模块的权限都在他们那里 zibber 11 zibber 2 小时 8 分钟前 靠谱么 代理跑路了,账号会被封么 Jessica8821 12 Jessica8821 2 小时 5 分钟前 @cookgo 作为一个资深的阿里云和腾讯云代理商,客户的账号都是自己管理的,而且财务这块怎么可能权限在代理商那里呢,真有这样的权限,那客户还愿意和代理商合作吗?所以,你们找我吧~~腾讯云和阿里云都可以哦,VX: x365888211 shanghai1998 13 shanghai1998 37 分钟前 额。。。我手边的代理是 25% 你不厚道 QGabriel 14 QGabriel 4 分钟前 @shanghai1998 2H4G 云主机多钱一年啊 老用户

android布局之 GridLayout的使用

本文重点讲述了自android4.0版本后新增的GridLayout网格布局的一些基本内容,并在此基础上实现了一个简单的计算器布局框架。通过本文,您可以了解到一些android UI开发的新特性,并能够实现相关应用。

在android4.0版本之前,如果想要达到网格布局的效果,首先可以考虑使用*常见的LinearLayout布局,但是这样的排布会产生如下几点问题:

1、不能同时在X,Y轴方向上进行控件的对齐。

2、当多层布局嵌套时会有性能问题。

3、不能稳定地支持一些支持自由编辑布局的工具。

其次考虑使用表格布局TabelLayout,这种方式会把包含的元素以行和列的形式进行排列,每行为一个TableRow对象,也可以是一个View对象,而在TableRow中还可以继续添加其他的控件,每添加一个子控件就成为一列。但是使用这种布局可能会出现不能将控件占据多个行或列的问题,而且渲染速度也不能得到很好的保证。

android4.0以上版本出现的GridLayout布局解决了以上问题。GridLayout布局使用虚细线将布局划分为行、列和单元格,也支持一个控件在行、列上都有交错排列。而GridLayout使用的其实是跟LinearLayout类似的API,只不过是修改了一下相关的标签而已,所以对于开发者来说,掌握GridLayout还是很容易的事情。GridLayout的布局策略简单分为以下三个部分:

首先它与LinearLayout布局一样,也分为水平和垂直两种方式,默认是水平布局,一个控件挨着一个控件从左到右依次排列,但是通过指定android:columnCount设置列数的属性后,控件会自动换行进行排列。另一方面,对于GridLayout布局中的子控件,默认按照wrap_content的方式设置其显示,这只需要在GridLayout布局中显式声明即可。


其次,若要指定某控件显示在固定的行或列,只需设置该子控件的android:layout_row和android:layout_column属性即可,但是需要注意:android:layout_row=”0”表示从*行开始,android:layout_column=”0”表示从*列开始,这与编程语言中一维数组的赋值情况类似。

*后,如果需要设置某控件跨越多行或多列,只需将该子控件的android:layout_rowSpan或者layout_columnSpan属性设置为数值,再设置其layout_gravity属性为fill即可,前一个设置表明该控件跨越的行数或列数,后一个设置表明该控件填满所跨越的整行或整列。

利用GridLayout布局编写的简易计算器代码如下(注意:仅限于android4.0及以上的版本):

[html]  view plain copy

  1. <?xml version=“1.0” encoding=“utf-8”?>
  2. <GridLayout xmlns:android=“http://schemas.android.com/apk/res/android”
  3.     android:layout_width=“wrap_content”
  4.     android:layout_height=“wrap_content”
  5.     android:orientation=“horizontal”
  6.     android:rowCount=“5”
  7.     android:columnCount=“4” >
  8.   <Button
  9.         android:id=“@+id/one”
  10.         android:text=“1”/>
  11.   <Button
  12.         android:id=“@+id/two”
  13.         android:text=“2”/>
  14.    <Button
  15.         android:id=“@+id/three”
  16.         android:text=“3”/>
  17.   <Button
  18.         android:id=“@+id/devide”
  19.         android:text=“/”/>
  20.   <Button
  21.         android:id=“@+id/four”
  22.         android:text=“4”/>
  23.   <Button
  24.         android:id=“@+id/five”
  25.         android:text=“5”/>
  26.   <Button
  27.         android:id=“@+id/six”
  28.         android:text=“6”/>
  29.   <Button
  30.         android:id=“@+id/multiply”
  31.         android:text=“×”/>
  32.   <Button
  33.         android:id=“@+id/seven”
  34.         android:text=“7”/>
  35.   <Button
  36.         android:id=“@+id/eight”
  37.         android:text=“8”/>
  38.   <Button
  39.         android:id=“@+id/nine”
  40.         android:text=“9”/>
  41.     <Button
  42.         android:id=“@+id/minus”
  43.         android:text=“-“/>
  44.     <Button
  45.         android:id=“@+id/zero”
  46.         android:layout_columnSpan=“2”
  47.         android:layout_gravity=“fill”
  48.         android:text=“0”/>
  49.   <Button
  50.         android:id=“@+id/point”
  51.         android:text=“.”/>
  52.     <Button
  53.         android:id=“@+id/plus”
  54.         android:layout_rowSpan=“2”
  55.         android:layout_gravity=“fill”
  56.         android:text=“+”/>
  57.     <Button
  58.         android:id=“@+id/equal”
  59.         android:layout_columnSpan=“3”
  60.         android:layout_gravity=“fill”
  61.         android:text=“=”/>
  62.   </GridLayout>


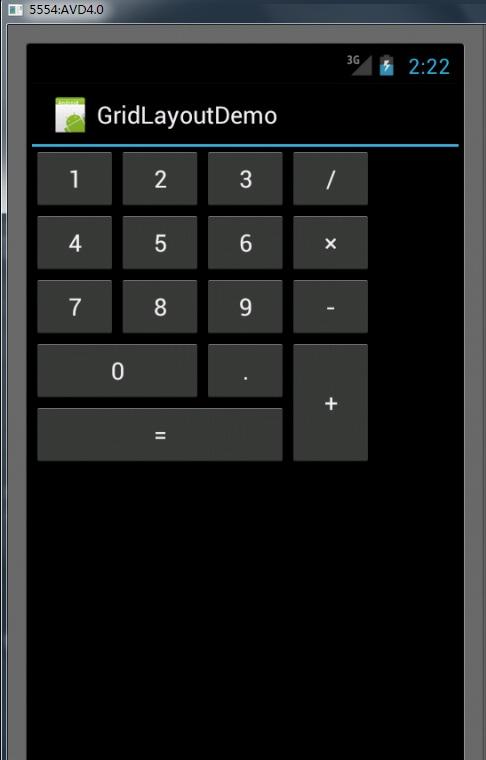
*终实现的界面如下所示:

%title插图%num

关于使用 CardView 开发过程中要注意的细节

随着 Google 推出了全新的设计语言 Material Design,还迎来了新的 Android 支持库 v7,其中就包含了 Material Design 设计语言中关于 Card 卡片概念的实现 —— CardView。经历了相当长的一段时间相信许多 Android 开发者都已经应用了这个控件,现在才写这篇文章可能有点晚,但对于刚刚开始使用的开发者以及其他已经使用了一段时间但做出来效果不好的同学应该能帮上点小忙。

1445743597932111.png

正题开始~

◆ 注意不同 SDK 版本(低于 Lollipop 21)上的边距(Margin)效果

Google 在 Android Lollipop 中引入了 Material Design 设计中的阴影(Elevation)和 Z 轴位移,其目的就是突出界面中不同元素之间的层次关系。为了统一不同系统版本的视觉效果,Google 针对 SDK 21 以下的系统给 CardView 加入一个 Elevation 兼容(即 XML 中的 app:cardElevation 和 Java 代码中的 setCardElevation)。
然而,在低版本中设置了 CardElevation 之后 CardView 会自动留出空间供阴影显示,而 Lollipop 之后则需要手动设置 Margin 边距来预留空间,导致我在设置 Margin 在 Android 5.x 机器上调试好后,在 Kitkat 机器调试时发现边距非常大,严重地浪费了屏幕控件。
因此,我们需要自定义一个 dimen 作为 CardView 的 Margin 值:

  1. 创建 /res/values 和 /res/values-v21 资源文件夹于项目对应 Module 目录下,前者放置旧版本/通用的资源文件(了解的可以跳过),后者放置 21 及更高 SDK 版本的资源文件。
  2. 在 values 内的 dimen.xml 创建一个 Dimension (<dimen> 属性),随便命个名(如 xxx_card_margin)并填入数值 0dp。
  3. 接着在 values-v21 文件夹内的 dimen.xml 创建名字相同的 Dimension,并填入你期望的预留边距(一般和 CardElevation 阴影大小相同)
  4. *后,在你布局中的 CardView 中设置 android:layout_margin="@dimen/xxx_card_margin"

这样依赖就解决了低版本中边距过大或者视觉效果不统一的问题了。

◆ 为你的 Card 添加点击效果

当使用 CardView 的场合是作为列表中的一个 Item 且直接单击 Item 有相应的操作,那么就有必要加上视觉反馈来告诉用户这个 Card 是可点击的。

%title插图%num

(此处用其他例子代替 CardView 演示)

如果你是用了 AppCompat v7 支持库:
那么你可以直接给 CardView 加上 android:foreground="?attr/selectableItemBackground" 这个属性会在 Lollipop 上自动加上 Ripple 效果,在旧版本则是一个变深/变亮的效果。

如果你没使用这个支持库或者觉得这个效果在旧版本显得有点僵硬:
你可以尝试自定义一个 Drawable,和上一条一样根据不同 SDK 版本分别编写不同的效果,在此就不多介绍自定义 Drawable 的方法。

◆ 让点击效果更加贴近 Material Design

上面曾提到过一个概念:Z 轴位移,即决定元素层次的深度,与 Elevation 大小相加构成实际显示的阴影深度。
在 Material Design Guidelines 中有建议卡片、按钮这类元素触摸时应当有一个浮起的效果,也就是增大 Z 轴位移


要实现这个效果并不难,我们只需要借助 Lollipop 的一个新属性 android:stateListAnimator (PS:这也意味着这个方法不可以用于旧版本系统QAQ)

首先,创建一个 TranslationZ 的变换动画放在 /res/anim,自己取一个名(如 touch_raise.xml),加入以下内容:

1
2
3
4
5
6
7
8
9
10
11
12
13
14
15
16
17
<? xml version = "1.0" encoding = "utf-8" ?>
< selector xmlns:android = "http://schemas.android.com/apk/res/android" >
      < item android:state_enabled = "true" android:state_pressed = "true" >
           < objectAnimator
                android:duration = "@android:integer/config_shortAnimTime"
                android:propertyName = "translationZ"
                android:valueTo = "@dimen/touch_raise"
                android:valueType = "floatType" />
      </ item >
      < item >
            < objectAnimator
            android:duration = "@android:integer/config_shortAnimTime"
            android:propertyName = "translationZ"
            android:valueTo = "0dp"
            android:valueType = "floatType" />
      </ item >
</ selector >

然后为你需要添加效果的 CardView(其他 View 同理)所在的 Layout XML 复制多一份到 /res/layout-v21,然后在新的那份 XML 的 CardView 中加入属性 android:stateListAnimator="@anim/touch_raise"。
这样,你的卡片按住时就会有浮起(阴影加深)的效果了。

◆ 尽量不要用作固定高度的 List Item

除了横向滚动列表和类似 Google Play 音乐中的带封面图片卡片 Item,其他地方应该尽量避免做固定高度的卡片。
举一个错误例子,我之前写的快递查询应用「水表助手」,快递卡片就是用了固定宽度(误人子弟系列QAQ)


不需要用卡片的地方也不应该使用,滥用只会让用户更快地厌倦你的界面设计。

1445743798116099.png

(这个是复制自官方的错误范例)

◆ 低版本(低于 Lollipop)的 setElevation 不是万能的

由于缺少一些系统 API(如 RenderThread),CardView 中的 Elevation 兼容实现并不完美,和真正的实现方法还是有较大的差距(不是指效果),所以调用 setCardElevation 也不能随心所欲地传入一个 Float 型,在低版本系统使用时应当处理一下传入的数值(似乎只能是整数,碰到过错误但是没详细研究……懒癌请原谅)或加上 try-catch (不推荐)。

————————我是分割线————————

除了本文提到的五个点,CardView 还有许多需要注意的地方,在这里就不一一列举了~

对于实现 Material Design 卡片,CardView 并不是唯一的选择,也有人通过自己写 Drawable、Layout 来实现出性能更好的卡片效果,但对在这方面不擅长的同学来说 CardView 算是*好的选择,毕竟是 Google 自家的东西,在效果、兼容性方面都十分到位。

Android开发:使用CardView实现卡片式设计

开头引用一段官网的介绍

A FrameLayout with a rounded corner background and shadow.

CardView uses elevation property on Lollipop for shadows and falls back to a custom emulated shadow implementation on older platforms.

Due to expensive nature of rounded corner clipping, on platforms before Lollipop, CardView does not clip its children that intersect with rounded corners. Instead, it adds padding to avoid such intersection (See setPreventCornerOverlap(boolean) to change this behavior).

Before Lollipop, CardView adds padding to its content and draws shadows to that area. This padding amount is equal to maxCardElevation + (1 - cos45) * cornerRadius on the sides and maxCardElevation * 1.5 + (1 - cos45) * cornerRadius on top and bottom.

Since padding is used to offset content for shadows, you cannot set padding on CardView. Instead, you can use content padding attributes in XML or setContentPadding(int, int, int, int) in code to set the padding between the edges of the CardView and children of CardView.

Note that, if you specify exact dimensions for the CardView, because of the shadows, its content area will be different between platforms before Lollipop and after Lollipop. By using api version specific resource values, you can avoid these changes. Alternatively, If you want CardView to add inner padding on platforms Lollipop and after as well, you can callsetUseCompatPadding(boolean) and pass true.

To change CardView’s elevation in a backward compatible way, use setCardElevation(float). CardView will use elevation API on Lollipop and before Lollipop, it will change the shadow size. To avoid moving the View while shadow size is changing, shadow size is clamped by getMaxCardElevation(). If you want to change elevation dynamically, you should call setMaxCardElevation(float)when CardView is initialized.

简单的效果图:
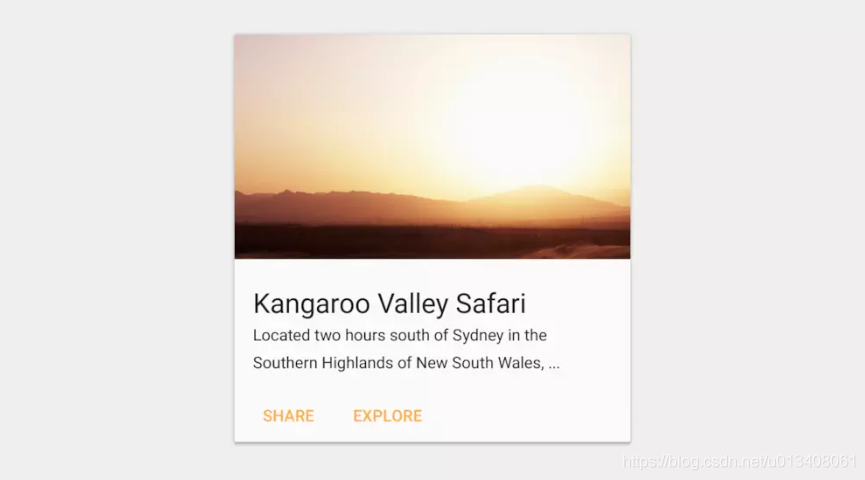
%title插图%num

简略版介绍

Apps often need to display data in similarly styled containers. These containers are often used in lists to hold each item’s information. The system provides the CardView API as an easy way for you show information inside cards that have a consistent look across the platform. These cards have a default elevation above their containing view group, so the system draws shadows below them. Cards provide an easy way to contain a group of views while providing a consistent style for the container.

开始使用

  1. Add the dependencies

The CardView widget is part of the v7 Support Libraries. To use it in your project, add the following dependency to your app module’s build.gradle file:

Cardview 是Android 5.0 才引入的,所以需要导入这个依赖包。

  1. dependencies {
  2. implementation ‘com.android.support:cardview-v7:27.1.1’
  3. }
  1. Create Cards

In order to use the CardView you need to add it to your layout file. Use it as a view group to contain other views. In this example, the CardView contains a single TextView to display some information to the user.

XML代码就是前面分析的那个,这里不再重复了。

The cards are drawn to the screen with a default elevation, which causes the system to draw a shadow underneath them. You can provide a custom elevation for a card with the card_view:cardElevation attribute. This will draw a more pronounced shadow with a larger elevation, and a lower elevation will result in a lighter shadow. CardView uses real elevation and dynamic shadows on Android 5.0 (API level 21) and above and falls back to a programmatic shadow implementation on earlier versions.

Use these properties to customize the appearance of the CardView widget:

  • To set the corner radius in your layouts, use the card_view:cardCornerRadius attribute.
  • To set the corner radius in your code, use the CardView.setRadius method.
  • To set the background color of a card, use the card_view:cardBackgroundColor attribute.

For more information, see the API reference for CardView.

关于Cards的设计规范可以参考官网介绍:https://material.google.com/components/cards.html#

为了更好地实现这种 Cards UI 的设计,Google在v7包中引进了一种全新的控件:CardVew,本文将从开发的角度介绍CardView的一些常见使用细节。

Google用一句话介绍了CardView:一个带圆角和阴影背景的FrameLayout。CardView在Android Lollipop(API 21)及以上版本的系统中适配较好,本文我们以一个具体的例子来学习CardView的基本使用和注意事项,效果图如下:
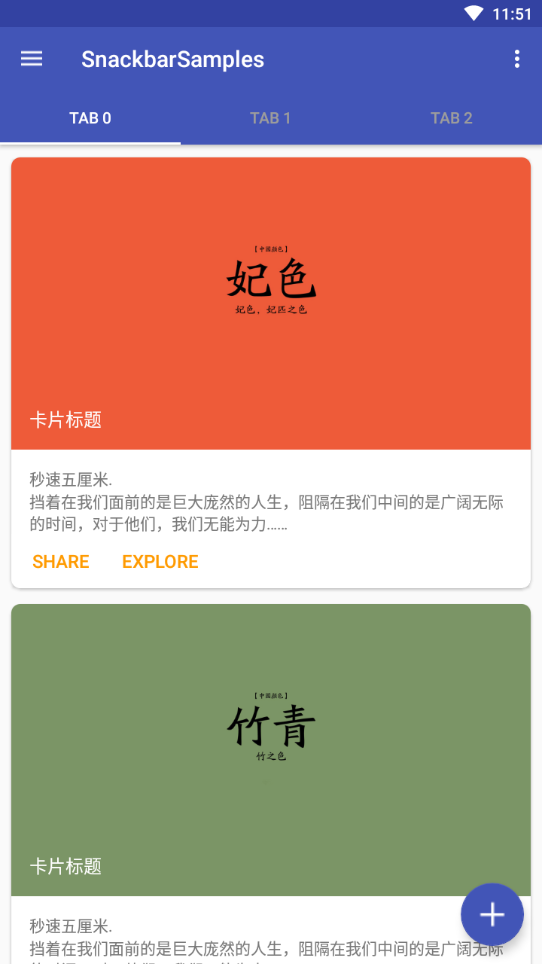
%title插图%num

这是一个list列表,列表中的item使用了卡片式设计,主要利用CardView控件实现,下面来分析一下布局文件的核心代码。

  1. <LinearLayout xmlns:android=“http://schemas.android.com/apk/res/android”
  2. xmlns:tools=“http://schemas.android.com/tools”
  3. xmlns:card_view=“http://schemas.android.com/apk/res-auto”
  4. >
  5. <!– A CardView that contains a TextView –>
  6. <android.support.v7.widget.CardView
  7. xmlns:card_view=“http://schemas.android.com/apk/res-auto”
  8. android:id=“@+id/card_view”
  9. android:layout_gravity=“center”
  10. android:layout_width=“200dp”
  11. android:layout_height=“200dp”
  12. card_view:cardCornerRadius=“4dp”>
  13. <TextView
  14. android:id=“@+id/info_text”
  15. android:layout_width=“match_parent”
  16. android:layout_height=“match_parent” />
  17. </android.support.v7.widget.CardView>
  18. </LinearLayout>

可以看出,核心部分在于CardView的属性使用,下面我们针对几个特殊的属性逐一分析,深化了解。

关于Z轴

Android5.0 引入了Z轴的概念,可以让组件呈现3D效果.
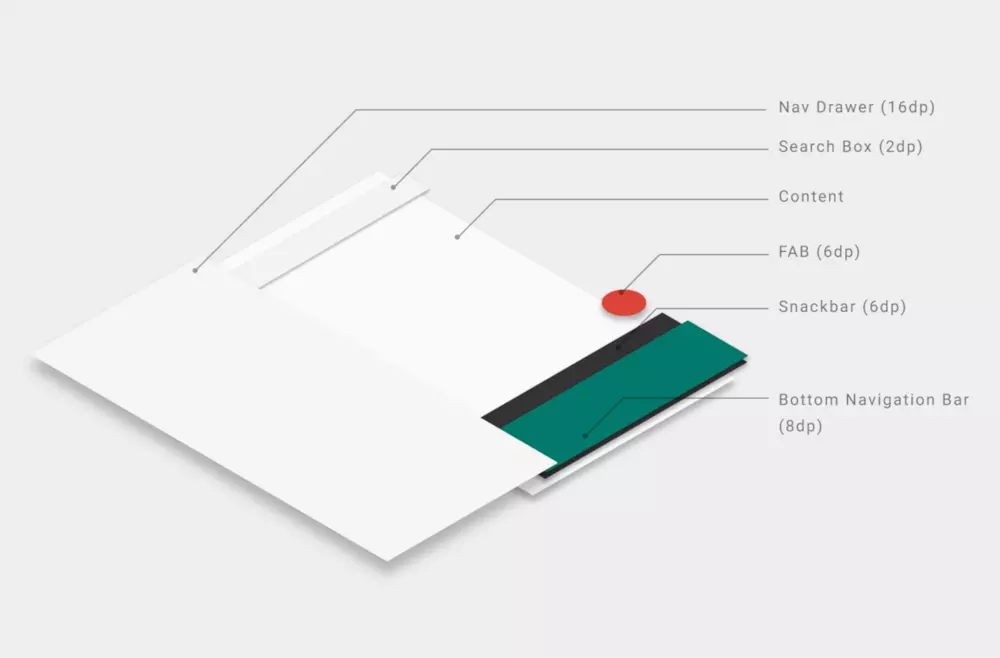
%title插图%num

排版技巧

前面我们说过,CardView从本质上属于FrameLayout,而CardView通常包含了较多的内容元素,为了方便地排版布局中的各个元素,一般借助于其他基本布局容器,比如这里我们使用了一个RelativeLayout作为CardView的唯一Child。

Shadow Padding

在Android Lollipop之前的系统,CardView会自动添加一些额外的padding空间来绘制阴影部分,这也导致了以Lollipop为分界线的不同系统上CardView的尺寸大小不同。为了解决这个问题,有两种方法:*种,使用不同API版本的dimension资源适配(也就是借助values和values-21文件夹中不同的dimens.xml文件);第二种,就是使用cardUseCompatPadding属性,设置为true(默认值为false),让CardView在不同系统中使用相同的padding值。

圆角覆盖

这也是一个解决系统兼容的问题。在pre-Lollipop平台(API 21版本之前)上,CardView不会裁剪内容元素以满足圆角需求,而是使用添加padding的替代方案,从而使内容元素不会覆盖CardView的圆角。而控制这个行为的属性就是cardPreventCornerOverlap,默认值为true。在本例中我们设置了该属性为false。这里我们看一下,在pre-Lollipop平台中,不同cardPreventCornerOverlap值的效果对比图(左false,右true):

%title插图%num

显然,默认值下自动添加padding的方式不可取,所以需要设置该属性值为false。需要注意的一点是,该属性的设置在Lollipop及以上版本的系统中没有任何影响,除非cardUseCompatPadding的值为true。

Ripple效果

Cards一般都是可点击的,为此我们使用了foreground属性并使用系统的selectableItemBackground值,同时设置clickable为true(如果在java代码中使用了cardView.setOnClickListener,就可以不用写clickable属性了),从而达到在Lollipop及以上版本系统中实现点击时的涟漪效果(Ripple)。在pre-Lollipop版本中,则是一个普通的点击变暗的效果。

lift-on-touch

根据官网Material motion部分对交互动作规范的指导,Cards、Button等视图应该有一个触摸抬起(lift-on-touch)的交互效果,也就是在三维立体空间上的Z轴发生位移,从而产生一个阴影加深的效果,与Ripple效果共同使用,官网给了一个很好的示例图:
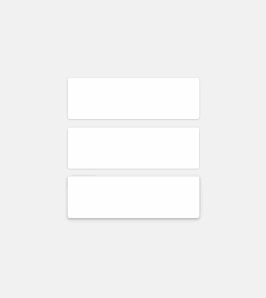
%title插图%num


在实现这个效果也很简单,可以在res/drawable目录下建立一个lift_on_touch.xml文件,内容如下:

  1. <?xml version=”1.0″ encoding=”utf-8″?>
  2. <!– animate the translationZ property of a view when pressed –>
  3. <selector xmlns:android=“http://schemas.android.com/apk/res/android”>
  4. <item
  5. android:state_enabled=“true”
  6. android:state_pressed=“true”>
  7. <set>
  8. <objectAnimator
  9. android:duration=“@android:integer/config_shortAnimTime”
  10. android:propertyName=“translationZ”
  11. android:valueTo=“6dp”
  12. android:valueType=“floatType”/>
  13. </set>
  14. </item>
  15. <item>
  16. <set>
  17. <objectAnimator
  18. android:duration=“@android:integer/config_shortAnimTime”
  19. android:propertyName=“translationZ”
  20. android:valueTo=“0”
  21. android:valueType=“floatType”/>
  22. </set>
  23. </item>
  24. </selector>

即通过属性动画动态改变translationZ值,沿着Z轴,从0dp到6dp变化。这里的6dp值也是有出处的,参考Google I/O 2014 app和Assign Elevation to Your Views。然后将其赋值给android:stateListAnimator属性即可。由于stateListAnimator属性只适用于Lollipop及以上版本,为了隐藏xml中的版本警告,可以指定tools:targetApi="lollipop"

关于这个功能,需要补充说明一点。这里的lift_on_touch.xml,严格意义上来讲,属于anim资源,同时适用于API 21及以上版本,所以按道理上来讲应该将其放置在res/anim-v21目录下,然后使用@anim/lift_on_touch赋值给stateListAnimator属性,而不是例子中的@drawable/lift_on_touch方法。但是放置在res/anim-v21目录下会产生一个“错误”提示:

<selector style="box-sizing: border-box;">XML file should be in either “animator” or “drawable”,not “anim”</selector>

虽然这个“错误”不影响编译运行,但是对于追求完美主义的程序员们来说还是碍眼,所以本例中我选择将其放在了res/drawable目录下,大家可以自行斟酌使用。

关于对lift-on-touch效果的理解,YouToBe网站有个视频解说,感兴趣的话可以参看看,地址如下:
DesignBytes: Paper and Ink: The Materials that Matter

总结说明

CardView还有一些其他属性可供使用,比如cardElevation设置阴影大小,contentPadding代替普通android:padding属性等,比较基础,本文就不一一介绍了,大家可以在官网上参考学习。从上面的介绍可以看出,在使用CardView时基本上都会用到一些标准配置的属性,我们可以借助style属性,将其封装到styles.xml文件中,统一管理,比如:

  1. <style name=“AppCardView” parent=“@style/CardView.Light”>
  2. <item name=“cardPreventCornerOverlap”>false</item>
  3. <item name=“cardUseCompatPadding”>true</item>
  4. <item name=“android:foreground”>?attr/selectableItemBackground</item>
  5. <item name=“android:stateListAnimator” tools:targetApi=“lollipop”>@anim/lift_up</item>
  6. ……
  7. </style>


CardView的layout_margin属性不起作用

使用CardView作为适配器的Item布局的根View,在RecyclerView.Adapter中的onCreateViewHolder中加载Item布局的时候,如果使用的LayoutInflater.from(Context).inflate(layoutId,null)这个方法来加载布局的话,那么Item布局中的CardView中的有些属性是无法起作用的,比如:android:layout_margin=”xxdp”,就算设置了这个属性,但是在5.1系统是不能显示为卡片式的,但是在4.4系统是可以显示为卡片式的。

如果要在5.1系统中也能显示为卡片式布局,那么需要更换inflate加载布局的方法,更换为LayoutInflater.from(Context).inflate(layoutId,parent,false),

使用这个方法,就能在5.1系统显示卡片式布局,同时在4.4系统同样能够显示卡片式。

从源码层面查看两个方法的区别:

调用这两个方法都会执行到LayoutInflater的inflate方法中:

public View inflate(@LayoutRes int resource, @Nullable ViewGroup root, boolean attachToRoot) {
final Resources res = getContext().getResources();
if (DEBUG) {
Log.d(TAG, “INFLATING from resource: \”” + res.getResourceName(resource) + “\” (”
+ Integer.toHexString(resource) + “)”);
}

final XmlResourceParser parser = res.getLayout(resource);
try {
return inflate(parser, root, attachToRoot);
} finally {
parser.close();
}
}
两个方法的区别:
1、LayoutInflater.from(Context).inflate(layoutId,null)

会先调用方法

public View inflate(@LayoutRes int resource, @Nullable ViewGroup root) {
return inflate(resource, root, root != null);
}
*终调用inflate方法时,三个参数分别是 inflate(layoutId,null,false)。

2、LayoutInflater.from(Context).inflate(layoutId,parent,false)

这个方法会直接执行上面的方法,此时参数分别是inflate(layoutId,parent,false),在这个例子中parent为RecyclerView的实例。

这里采用加载布局的方法不同,其实*终是传入inflate的参数不同,那么参数不同会导致什么结果呢?

进入下面的方法查看:

inflate(parser, root, attachToRoot)
public View inflate(XmlPullParser parser, ViewGroup root, boolean attachToRoot) {
//省略其他代码,直接看相关的代码
if (root != null) {//第二种方法
final View temp = createViewFromTag(root, name, attrs, false);//temp就是CardView

// Create layout params that match root, if supplied
params = root.generateLayoutParams(attrs);
if (!attachToRoot) {
// Set the layout params for temp if we are not
// attaching. (If we are, we use addView, below)
temp.setLayoutParams(params);//给temp设置ViewGroup.LayoutParams的属性(在本例中是GridLayoutManager)
}
}

// 这个方法会将temp下的所有子控件全部加载进来。
rInflate(parser, temp, attrs, true, true);

if (root != null && attachToRoot) {//第二种方法会执行
root.addView(temp, params);
}

if (root == null || !attachToRoot) {
result = temp;//*终会返回这个result
}
}
*种方法是进入上面的方法后,加载完子控件后直接返回CardView,没有添加到root中,所以layout_margin属性不起作用,因为layout_margin属性是需要一个父控件作为参照物的,没有添加到root就没有参照物了。
第二种方法是加载完所有子控件并且添加到root后,再返回CardView,CardView已经有参照物父控件root,所以属性能起到作用。

在做的时候,因为采用的是*种方法,一直android:layout_margin=”xx”的值,但是一直都没起任何作用。在更换为第二种方法后,才显示正常。

写在*后的话:

本来想着能实现了就行了,但是作为一个有追求(…)的程序猿,必须得知道为什么会这样才行,所以才想看看源码,看能不能找到原因,看了这一点点源码后,就把自己的理解写出来了,正确与否还有待验证哈。

*次涉及源码的解读分析,才发现还是看源码看得少,虽然是个简单的分析,但还是有收获的。

遗留问题:

还有一个问题是,为什么*种方法在4.4系统时就可以显示想要的效果,在5.1系统就不能显示那种效果呢。

如果有人知道,能够知会一声就更好了。

————————————————

CardView使用与兼容

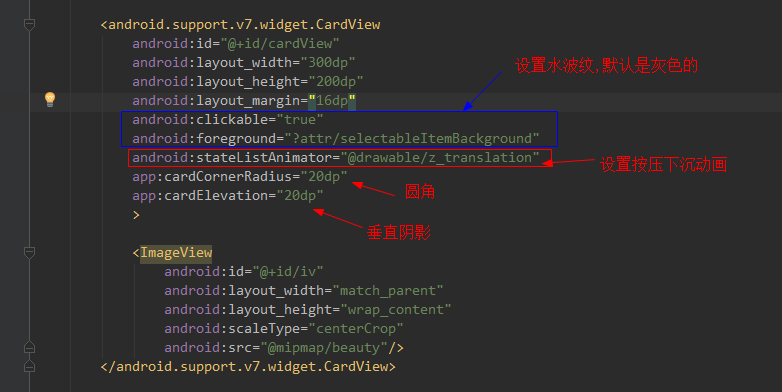
1.5.0版本:

%title插图%num

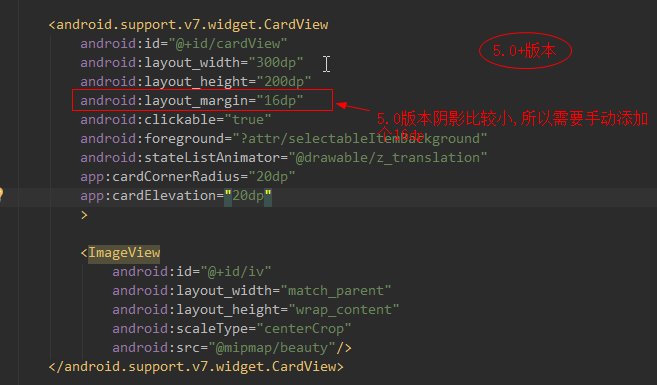
2.细节:margin与阴影(5.0+)

4.4因为阴影比较大,所以需要设置android:layout_margin=”0dp”,减小阴影

%title插图%num

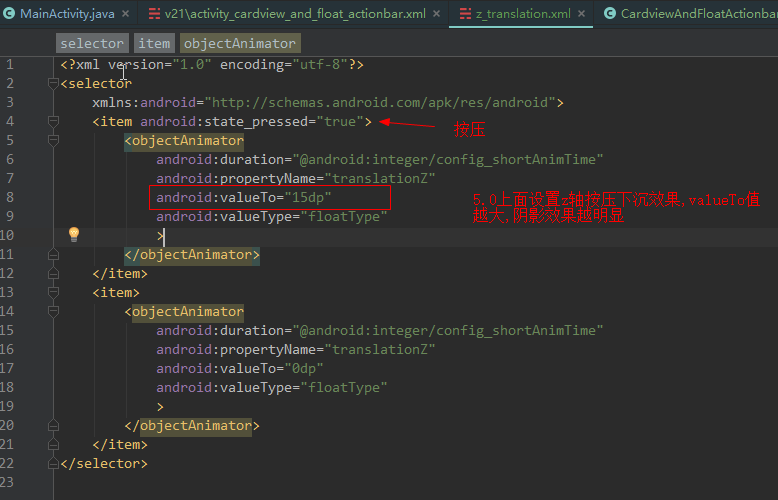
3.按压下沉,阴影加重效果:

5.0以上才有

4.4需要自己自定义

1 android:stateListAnimator="@drawable/z_translation"

%title插图%num

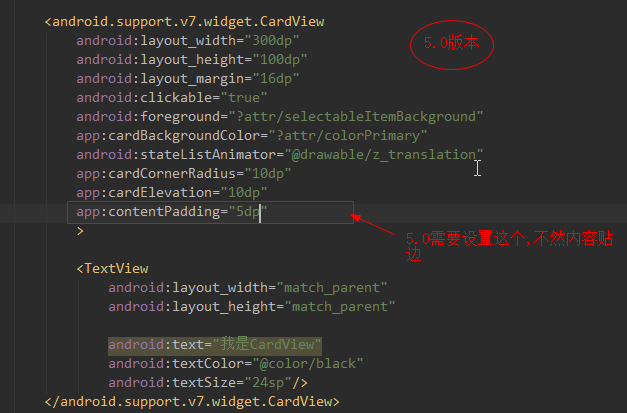
4.关于app:contentPadding:

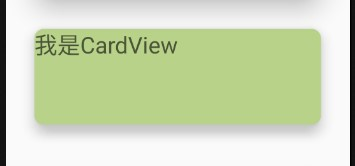
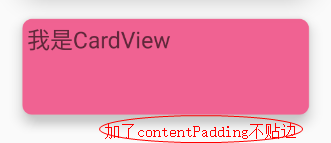
5.0上面需要设置这个,不然里面TextView会贴到圆角上

%title插图%num

图1

%title插图%num

图2

%title插图%num

图3

4.4上面不需要设置这个

5.关于app:cardCornerRadius边框圆角:

5.0+ 图片和布局都可以很好的呈现圆角效果,图片也变圆角了

%title插图%num

4.x 图不能变成圆角,如果要做成5.x一样的效果:通过加载图片的时候自己去处理成圆角


6.关于app:cardElevation:

app:cardElevation=”10dp” 阴影效果 (值越大阴影效果越明显)


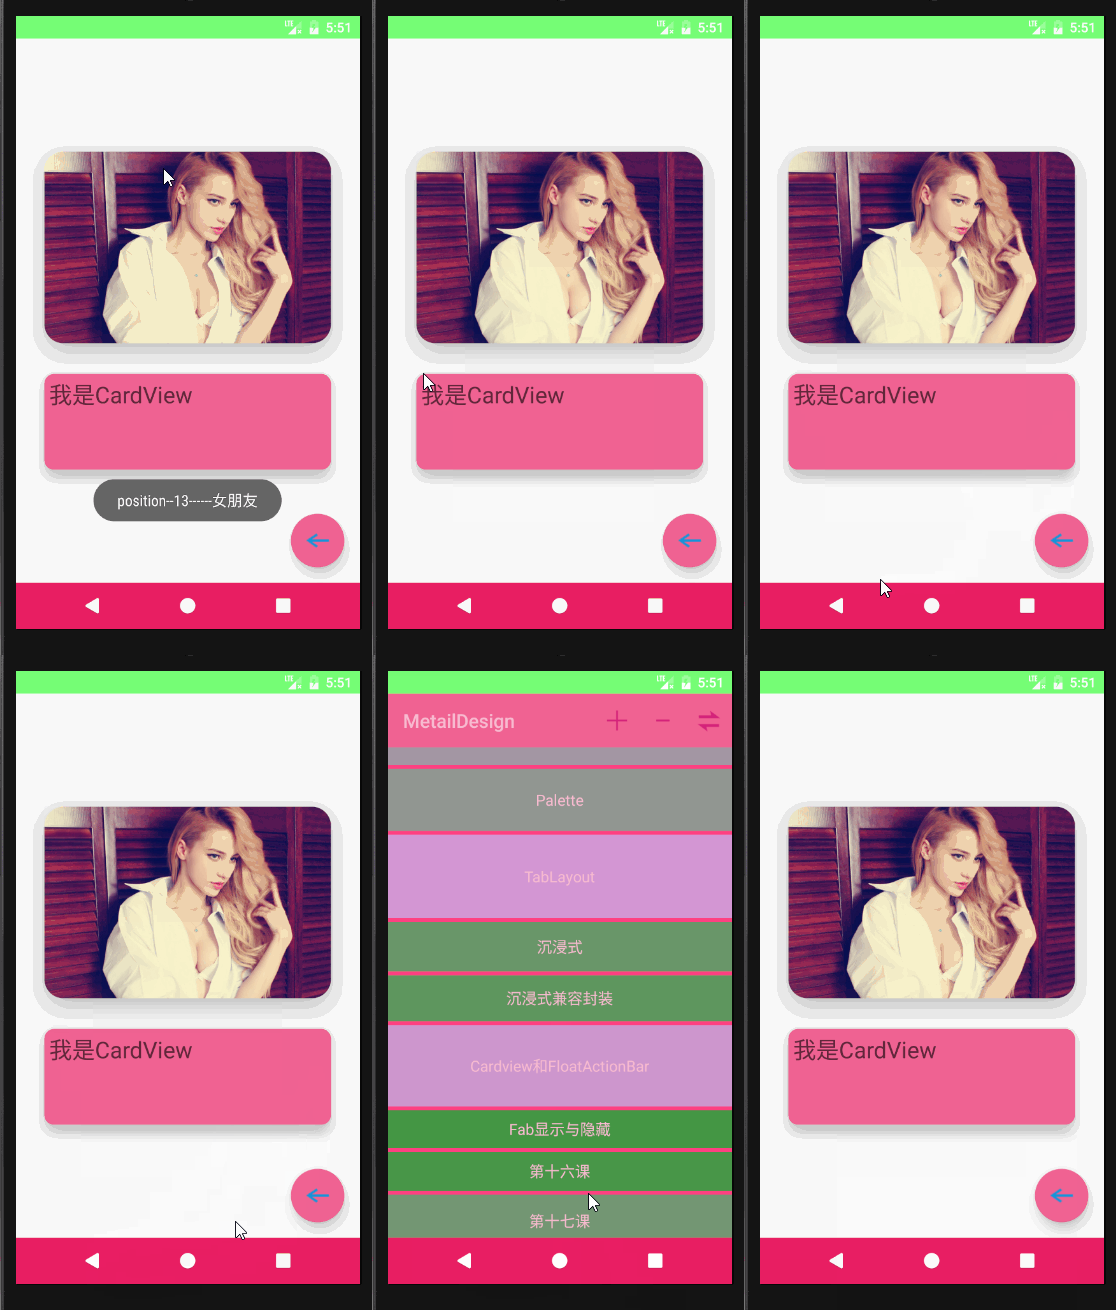
7.5.0效果图:

%title插图%num


快速讲解CardView的使用

CardView和RecyclerView一样是Android5.0以后新出现的控件,伴随着Material Design设计而诞生。

一、引入CardView

在AS新建项目中需要使用CardView组件,和RecyclerView一样,需要在Gradle里面提前加入CardView的

包,直接在Gradle中加入:

compile ‘com.android.support:cardview-v7:25.3.1’(CardView版本号与项目里面V7版本号相同即可)

或者在Library dependence中输入CardView,选择V7包下那个即可。

二、为何使用CardView

CardView是继承自FramLayout的一个布局控件,官网里对CardView的注释为:

A FrameLayout with a rounded corner background and shadow.(CardView为带圆角和阴影的FramLayout)

以往,我们需要自定义Shape来实现圆角和阴影效果;现在,这些效果集成到了CardView的属性里。同时,

CardView应该被使用在显示层次性的内容时,在显示列表或网格时更应该被选择,因为这些边缘可以使得用户

更容易去区分这些内容。

三、CardView属性

app:cardBackgroundColor      设置背景颜色

app:cardCornerRadius         设置圆角大小

app:cardElevation            设置z轴阴影高度

app:cardMaxElevation         设置z轴*大高度值

app:contentPadding           内容与边距的间隔

app:contentPaddingLeft       内容与左边的间隔

app:contentPaddingTop        内容与顶部的间隔

app:contentPaddingRight      内容与右边的间隔

app:contentPaddingBottom     内容与底部的间隔

app:paddingStart             内容与边距的间隔起始

app:paddingEnd               内容与边距的间隔终止

app:cardUseCompatPadding     设置内边距,在API21及以上版本和之前的版本仍旧具有一样的计算方式

app:cardPreventConrerOverlap 在API20及以下版本中添加内边距,这个属性为了防止内容和边角的重叠

注意:CardView中使用android:background设置背景颜色无效。

Ps:多说一句,有时候部分人为了突出这些属性是在CardView中使用的,会在CardView内重新命名属性名,

如:xmlns:card_view=”http://schemas.android.com/apk/res-auto”,那么app就会变成card_view,但是

直接使用app不影响什么,只是一个属性前缀名的变化。

四、点击CardView出现波纹(Ripple)效果

在CardView布局中加入:android:foreground=”?android:attr/selectableItemBackground”即可实现

点击CardView出现波纹效果。


友情链接:

CardView更多使用细节

http://www.open-open.com/lib/view/open1476847497671.html
————————————————

升级 AndroidX 之后 常用的依赖

1、CardView
implementation ‘androidx.cardview:cardview:1.0.0’

2、TabLayout
implementation ‘com.google.android.material:material:1.0.0’

3、RecycleView
implementation ‘androidx.recyclerview:recyclerview:1.0.0’

4、Snackbar
implementation ‘com.google.android.material.snackbar.Snackbar:1.0.0-rc01’

5、swiperefreshlayout
implementation ‘androidx.swiperefreshlayout:swiperefreshlayout:1.0.0’

6、viewpager
implementation ‘androidx.viewpager:viewpager:1.0.0’

7、design ui 库
implementation ‘com.google.android.material:material:1.0.0-rc01’

8、coordinatorlayout
implementation ‘androidx.coordinatorlayout:coordinatorlayout:1.0.0’

9、constraintlayout 约束布局
implementation ‘androidx.constraintlayout:constraintlayout:1.1.2’

10、NavigationView 侧滑
implementation ‘com.google.android.material.navigation.NavigationView:1.0.0′

11、drawerlayout 抽屉布局
implementation’androidx.drawerlayout:drawerlayout:1.0.0′

12、gridlayout 网格布局
implementation’androidx.gridlayout:gridlayout:1.0.0′

13、recyclerview-selection RecycleView 高亮显示方案
implementation’androidx.recyclerview:recyclerview-selection:1.0.0’

14、附赠 国内可打开的 官方对照连接
AndroidX 依赖对比 google官方

15、viewPager 2 这个是2与viewPager不同哦
implementation ‘androidx.viewpager2:viewpager2:1.0.0’
————————————————