国外那里有便宜的大宽带服务器?特别是 G 口或者百兆独享的那种,而且能抗 ddos ,至于服务器配置没啥要求, 512 内存单核都行
ddos 服务器 便宜 国外7 条回复 • 2016-04-06 00:07:14 +08:00
wkdhf233 1
wkdhf233 2015-10-29 23:36:38 +08:00
OVH
luo362722353 2
luo362722353 2015-10-29 23:37:12 +08:00 via iPhone
OVH
https://www.ovh.fr
kozora 3
kozora 2015-10-30 02:02:43 +08:00
@luo362722353
@wkdhf233 OVH 国人买不到了
luo362722353 4
luo362722353 2015-10-30 21:54:58 +08:00
@kozora 这都不是问题。
dreamcountry 5
dreamcountry 2015-11-08 20:42:36 +08:00
vultr 提供 10Gbps ddos 防护 10 美元 /月,服务器费用另算,但挺便宜 768MB 内存 5 美元 /月,新人有 50 美元优惠码: http://vultr.youhuima.cc 。
Yamade 6
Yamade 2016-02-24 10:56:44 +08:00
@luo362722353 ovh 你在哪里买的。求告知。
superxzr 7
superxzr 2016-04-06 00:07:14 +08:00
Voxility ,不过我觉得也是大坑
日期: 2021 年 9 月 13 日
Java基础–定时任务Timer
Java基础–定时任务Timer
一、Timer介绍
java.util.Timer
java.util.TimerTask
Timer是一个定时器类,通过该类可以为指定的定时任务进行配置。TimerTask类是一个定时任务类,该类实现了Runnable接口,而且是一个抽象类,如下所示:
public abstract class TimerTask implements Runnable
可以通过继承该类,来实现自己的定时任务。
Timer定时器实例有多种构造方法:
Timer()
创建一个新计时器。
Timer(boolean isDaemon)
创建一个新计时器,可以指定其相关的线程作为守护程序运行。
Timer(String name)
创建一个新计时器,其相关的线程具有指定的名称。
Timer(String name, boolean isDaemon)
创建一个新计时器,其相关的线程具有指定的名称,并且可以指定作为守护程序运行。
二、Timer方法
定时执行方法
1、在特定时间执行任务,只执行一次
public void schedule(TimerTask task,Date time)
2、在特定时间之后执行任务,只执行一次
public void schedule(TimerTask task,long delay)
3、指定*次执行的时间,然后按照间隔时间,重复执行
public void schedule(TimerTask task,Date firstTime,long period)
4、在特定延迟之后*次执行,然后按照间隔时间,重复执行
public void schedule(TimerTask task,long delay,long period)
参数:
delay: 延迟执行的毫秒数,即在delay毫秒之后*次执行
period:重复执行的时间间隔
5、*次执行之后,特定频率执行,与3同
public void scheduleAtFixedRate(TimerTask task,Date firstTime,long period)
6、在delay毫秒之后*次执行,后按照特定频率执行
public void scheduleAtFixedRate(TimerTask task,long delay,long period)
方法名称schedule()和scheduleAtFixedRate()两者的区别
<1>schedule()方法更注重保持间隔时间的稳定:保障每隔period时间可调用一次
<2>scheduleAtFixedRate()方法更注重保持执行频率的稳定:保障多次调用的频率趋近于period时间,如果任务执行时间大于period,会在任务执行之后马上执行下一次任务
Timer注销
timer.cancel();
三、案例
1、特定时间后执行
public void schedule(TimerTask task,long delay)
参数:
task为:执行任务
delay:时间毫秒数
方法的含义:
在delay毫秒后执行任务task,只执行一次。
案例:
1分钟后同步数据。
同步任务:
package com.yank.framework.common;

import java.util.TimerTask;

public class SynchroTimerTask extends TimerTask {

    @Override
    public void run() {
        // TODO Auto-generated method stub
        System.out.println("Synchro data to other servers.");
    }

}
定时任务:
package com.yank.framework.common;

import java.util.Timer;
import java.util.TimerTask;

public class SynchroTest {

    public static void main(String[] args) {
        // TODO Auto-generated method stub

        TimerTask task = new SynchroTimerTask();
        Timer timer = new Timer();
        timer.schedule(task, 1000);
    }

}
2、案例2:按点吃饭
首先定义吃饭的任务,制定饭点,没小时进行检查,到点就吃饭。
package com.yank.framework.common;

import java.util.ArrayList;
import java.util.Calendar;
import java.util.List;
import java.util.TimerTask;

/*
 * 定时吃饭
 * */
public class EatTimerTask extends TimerTask {

    //吃饭时间
    private static List<Integer> eatTimes;
    /*
     * 静态初始化
     * */
    static {
        initEatTimes();
    }

    /*
     * 初始化吃饭时间
     * */
    private static void initEatTimes(){
        eatTimes = new ArrayList<Integer>();
        eatTimes.add(8);
        eatTimes.add(12);
        eatTimes.add(18);
    }

    /*
     * 执行
     * */
    @Override
    public void run() {
        // TODO Auto-generated method stub
        Calendar calendar = Calendar.getInstance();
        System.out.println("检查是否到了吃饭的点");
        int hour = calendar.get(Calendar.HOUR_OF_DAY);
        if(eatTimes.contains(hour))
        {
            System.out.println("饿了,吃饭...");
        }
    }

}
定时检查执行:
package com.yank.framework.common;

import java.util.Calendar;
import java.util.Date;
import java.util.Timer;
import java.util.TimerTask;

public class EatTimerTaskTest {
    public static void main(String[] arg){
        TimerTask task = new EatTimerTask();
        Calendar  calendar= Calendar.getInstance();


        Date firstTime = calendar.getTime();
        //间隔:1小时
        long period = 1000 * 60 * 60;
        //测试时间每分钟一次
        //period = 1000 * 60;

        Timer timer = new Timer();
        timer.schedule(task, firstTime, period);
    }
}
java关于Timer schedule执行定时任务
java关于Timer schedule执行定时任务
timer = new Timer(true);
timer.schedule(
new java.util.TimerTask() { public void run() { //server.checkNewMail(); 要操作的方法 } }, 0, 5*60*1000);
*个参数是要操作的方法,第二个参数是要设定延迟的时间,第三个参数是周期的设定,每隔多长时间执行该操作。
使用这几行代码之后,Timer本身会每隔5分钟调用一遍server.checkNewMail()方法,不需要自己启动线程。Timer本身也是多线程同步的,多个线程可以共用一个Timer,不需要外部的同步代码。
(1)Timer.schedule(TimerTask task,Date time)安排在制定的时间执行指定的任务。
(2)Timer.schedule(TimerTask task,Date firstTime ,long period)安排指定的任务在指定的时间开始进行重复的固定延迟执行.
(3)Timer.schedule(TimerTask task,long delay)安排在指定延迟后执行指定的任务.
(4)Timer.schedule(TimerTask task,long delay,long period)安排指定的任务从指定的延迟后开始进行重复的固定延迟执行.
(5)Timer.scheduleAtFixedRate(TimerTask task,Date firstTime,long period)安排指定的任务在指定的时间开始进行重复的固定速率执行.
(6)Timer.scheduleAtFixedRate(TimerTask task,long delay,long period)安排指定的任务在指定的延迟后开始进行重复的固定速率执行.
java timer 定时器
以下内容根据 The JavaTM Tutorial 和相关API doc翻译整理,以供日后参考:
1.概览
Timer是一种定时器工具,用来在一个后台线程计划执行指定任务。它可以计划执行一个任务一次或反复多次。
TimerTask一个抽象类,它的子类代表一个可以被Timer计划的任务。
简单的一个例程:
 import java.util.Timer;
 import java.util.TimerTask;
 /**
/** * Simple demo that uses java.util.Timer to schedule a task to execute
 * once 5 seconds have passed.
 */
*/
 public class Reminder {
 Timer timer;
 public Reminder(int seconds) {
 timer = new Timer();
 timer.schedule(new RemindTask(), seconds*1000);
 }
}
 class RemindTask extends TimerTask {
 public void run() {
 System.out.println(“Time’s up!”);
 timer.cancel(); //Terminate the timer thread
 }
} }
}
 public static void main(String args[]) {
 System.out.println(“About to schedule task.”);
 new Reminder(5);
 System.out.println(“Task scheduled.”);
 }
} }
}
运行这个小例子,你会首先看到:
About to schedule task.
5秒钟之后你会看到:
Time’s up!
这个小例子可以说明一些用Timer线程实现和计划执行一个任务的基础步骤:
实现自定义的TimerTask的子类,run方法包含要执行的任务代码,在这个例子里,这个子类就是RemindTask。
实例化Timer类,创建计时器后台线程。
实例化任务对象 (new RemindTask()).
制定执行计划。这里用schedule方法,*个参数是TimerTask对象,第二个参数表示开始执行前的延时时间(单位是milliseconds,这里定义了5000)。还有一种方法可以指定任务的执行时间,如下例,指定任务在11:01 p.m.执行:
//Get the Date corresponding to 11:01:00 pm today.
Calendar calendar = Calendar.getInstance();
calendar.set(Calendar.HOUR_OF_DAY, 23);
calendar.set(Calendar.MINUTE, 1);
calendar.set(Calendar.SECOND, 0);
Date time = calendar.getTime();
timer = new Timer();
timer.schedule(new RemindTask(), time);
2.终止Timer线程
默认情况下,只要一个程序的timer线程在运行,那么这个程序就会保持运行。当然,你可以通过以下四种方法终止一个timer线程:
调用timer的cancle方法。你可以从程序的任何地方调用此方法,甚至在一个timer task的run方法里。
让timer线程成为一个daemon线程(可以在创建timer时使用new Timer(true)达到这个目地),这样当程序只有daemon线程的时候,它就会自动终止运行。
当timer相关的所有task执行完毕以后,删除所有此timer对象的引用(置成null),这样timer线程也会终止。
调用System.exit方法,使整个程序(所有线程)终止。
Reminder 的例子使用了*种方式。在这里不能使用第二种方式,因为这里需要程序保持运行直到timer的任务执行完成,如果设成daemon,那么当main线程 结束的时候,程序只剩下timer这个daemon线程,于是程序不会等timer线程执行task就终止了。
有些时候,程序的终止与 否 并不只与timer线程有关。举个例子,如果我们使用AWT来beep,那么AWT会自动创建一个非daemon线程来保持程序的运行。下面的代码我们对 Reminder做了修改,加入了beeping功能,于是我们需要加入System.exit的调用来终止程序。
 import java.util.Timer;
 import java.util.TimerTask;
 import java.awt.Toolkit;
 /**
/** * Simple demo that uses java.util.Timer to schedule a task to execute
 * once 5 seconds have passed.
 */
*/
 public class ReminderBeep {
 Toolkit toolkit;
 Timer timer;
 public ReminderBeep(int seconds) {
 toolkit = Toolkit.getDefaultToolkit();
 timer = new Timer();
 timer.schedule(new RemindTask(), seconds*1000);
 }
}
 class RemindTask extends TimerTask {
 public void run() {
 System.out.println(“Time’s up!”);
 toolkit.beep();
 //timer.cancel(); //Not necessary because we call System.exit
 System.exit(0); //Stops the AWT thread (and everything else)
 }
} }
}
 public static void main(String args[]) {
 System.out.println(“About to schedule task.”);
 new ReminderBeep(5);
 System.out.println(“Task scheduled.”);
 }
} }
}
3.反复执行一个任务
先看一个例子:
 public class AnnoyingBeep {
 Toolkit toolkit;
 Timer timer;
 public AnnoyingBeep() {
 toolkit = Toolkit.getDefaultToolkit();
 timer = new Timer();
 timer.schedule(new RemindTask(),
 0, //initial delay
 1*1000); //subsequent rate
 }
}
 class RemindTask extends TimerTask {
 int numWarningBeeps = 3;
 public void run() {
 if (numWarningBeeps > 0) {
 toolkit.beep();
 System.out.println(“Beep!”);
 numWarningBeeps–;
 } else {
 toolkit.beep();
 System.out.println(“Time’s up!”);
 //timer.cancel(); //Not necessary because we call System.exit
 System.exit(0); //Stops the AWT thread (and everything else)
 }
} }
} }
} …
… }
}执行,你会看到如下输出:
Task scheduled.
Beep!
Beep! //one second after the first beep
Beep! //one second after the second beep
Time’s up! //one second after the third beep
这里使用了三个参数的schedule方法用来指定task每隔一秒执行一次。如下所列为所有Timer类用来制定计划反复执行task的方法 :
schedule(TimerTask task, long delay, long period)
schedule(TimerTask task, Date time, long period)
scheduleAtFixedRate(TimerTask task, long delay, long period)
scheduleAtFixedRate(TimerTask task, Date firstTime, long period)
当 计划反复执行的任务时,如果你注重任务执行的平滑度,那么请使用schedule方法,如果你在乎的是任务的执行频度那么使用 scheduleAtFixedRate方法。 例如,这里使用了schedule方法,这就意味着所有beep之间的时间间隔至少为1秒,也就是说,如 果有一个beap因为某种原因迟到了(未按计划执行),那么余下的所有beep都要延时执行。如果我们想让这个程序正好在3秒以后终止,无论哪一个 beep因为什么原因被延时,那么我们需要使用scheduleAtFixedRate方法,这样当*个beep迟到时,那么后面的beep就会以*快 的速度紧密执行(*大限度的压缩间隔时间)。
4.进一步分析schedule和scheduleAtFixedRate
(1) 2个参数的schedule在制定任务计划时, 如果指定的计划执行时间scheduledExecutionTime<= systemCurrentTime,则task会被立即执行。scheduledExecutionTime不会因为某一个task的过度执行而改变。
(2) 3个参数的schedule在制定反复执行一个task的计划时,每一次执行这个task的计划执行时间随着前一次的实际执行时间而变,也就是 scheduledExecutionTime(第n+1次)=realExecutionTime(第n次)+periodTime。也就是说如果第n 次执行task时,由于某种原因这次执行时间过长,执行完后的systemCurrentTime>= scheduledExecutionTime(第n+1次),则此时不做时隔等待,立即执行第n+1次task,而接下来的第n+2次task的 scheduledExecutionTime(第n+2次)就随着变成了realExecutionTime(第n+1次)+periodTime。说 白了,这个方法更注重保持间隔时间的稳定。
(3)3个参数的scheduleAtFixedRate在制定反复执行一个task的计划时,每一 次 执行这个task的计划执行时间在*初就被定下来了,也就是scheduledExecutionTime(第n次)=firstExecuteTime +n*periodTime;如果第n次执行task时,由于某种原因这次执行时间过长,执行完后的systemCurrentTime>= scheduledExecutionTime(第n+1次),则此时不做period间隔等待,立即执行第n+1次task,而接下来的第n+2次的 task的scheduledExecutionTime(第n+2次)依然还是firstExecuteTime+(n+2)*periodTime这 在*次执行task就定下来了。说白了,这个方法更注重保持执行频率的稳定。
解析 ViewTreeObserver 源码(下)
解析 ViewTreeObserver 源码(下)
继上篇内容,本文介绍 ViewTreeObserver 的使用,以及体会其所涉及的观察者模式,期间会附带回顾一些基础知识。*后,我们简单聊一下 Android 的消息传递,附高清示意图,轻松捋清整个传递过程!
在开始下篇之前,有必要回顾一下上篇《解析 ViewTreeObserver 源码,体会观察者模式、Android消息传递(上)》提及的 ViewTreeObserver 的概念:
ViewTreeObserver 是被用来注册监听视图树的观察者,在视图树发生全局改变时将收到通知。这种全局事件包括但不限于:整个视图树的布局发生改变、在视图开始绘制之前、视图触摸模式改变时…
还没有看上篇,或者对上篇已经没印象的,建议先去看一下。
本篇内容较多,为节省篇幅,直接接着上篇继续讲。
#1. 一览 ViewTreeObserver 的大纲
先通过这部分来对类的构成进行粗略的认知,这样才能自如的应对后面的内容。本部分建议大家参考源码去看,这样会更直观、更容易理解,我参考的源码是 Android 6.0 的 SDK(api 23)。
查看类的大纲发现,该类看着挺复杂,但概括起来看就很简单了,下面我们按类别来一个个拿下。(windows 下 AS 查看类大纲的默认快捷键是 Ctrl + F12,大纲模式下还支持搜索以快速定位)
1.1 类的接口
ViewTreeObserver 通过接口回调的方式实现观察者模式,当接收到通知后,通过接口的回调方法告知程序相应的事件发生了。在 ViewTreeObserver 中,包含了 11 个接口,对应着11中观察事件,如下图:
这里写图片描述
1.2 类的方法
介绍完接口,下面总结一下 ViewTreeObserver 类的方法,大概分为以下四种类型。
添加监听:addOnXxxListener(OnXxxListener)
移除监听:removeOnXxxListener(OnXxxListener)
分发事件:dispatchOnXxx()
其他方法:checkIsAlive()、isAlive()方法等
“其他方法”在上篇差不多提过了,现在我们着重看前三类方法,下面简称 add、remove 和 dispatch 方法。
查看类可知,对于前面那张图所展示的每一个接口,都有与其对应的 add、remove、dispatch 方法。举个例子吧,以 OnGlobalLayoutListener(全局布局监听) 为例,那么与其对应的三类方法就是:
addOnGlobalLayoutListener(OnGlobalLayoutListener listener);
removeOnGlobalLayoutListener(OnGlobalLayoutListener victim);
dispatchOnGlobalLayout();
这么说,一共有11个接口,那么与之对应的 add、remove、dispatch 方法也就分别有11个,没错,我们通过大纲查看时就是这样。这个大家自行去类中查看,或者根据上面举的例子类推一下,我就不再贴代码了。
下面补充一点与方法的使用相关的内容:
虽说 ViewTreeObserver 包含这么多方法,但是系统并没有对我们开放所有的API。我们可以验证一下,在程序代码中先通过 getViewTreeObserver() 获取 View 的 ViewTreeObserver 对象,然后使用该对象分别调用这几类方法,分别模糊匹配 add、remove 和 dispatch,然后查看IDE的智能提示。
先看看调用 add 和 remove 方法:
如图所示,add 和 remove 方法只分别只有8个,并没有11个。其中remove中*后一个方法removeGloableOnLayoutListener已经过时了,在 API 16 取代它的方法是removeOnGloableLayoutListener。查看removeGloableOnLayoutListener方法可知,其直接调用了removeOnGloableLayoutListener方法,功能上没区别。区别在于名字,肯定是初期方法命名不合理,后来想改,但又不能直接修改或删除。所以,在一开始就设计好一些规范,并在开发过程中按照代码规范开发,是有多重要…
既然都是8个,那各自少掉的3个呢?进 ViewTreeObserver类一看,发现不让外部调用的是与OnWindowShownListener、OnComputeInternalInsetsListener、OnEnterAnimationCompleteListener接口对应的add、remove方法,这几个方法之所以在程序中无法访问,是因为被添加了 @hide标签,这是什么?
@hide 意味着被其标记的方法、类或者变量,在自动生成文档时,将不会出现在API文档中对开发者开放,但是系统可以调用,这就解释了为什么我们只能访问其中8个方法了。其中有些要求对版本有要求,例如添加或移除 OnWindowAttachListener,需要 API 18 以上,而我们一版在开发时会选择*低适配 Android 4.0,也即是 API 为 14,这样一来就无法使用。
其实,可以通过反射访问被 @hide 标记的域。但是不建议这么做,因为 Google 在添加该标记时解释道:
We are not yet ready to commit to this API and support it,so @hide。
既然没有准备好提交这个API并支持他,也就意味着 Google 可能会随时修改这些方法(虽然可能性很小),所以出于保险还是不要通过反射使用的好(个人观点)。
再来看看 dispatch 方法可用的有哪些:
喔,居然只有3个!查看 ViewTreeObserver 类,发现其余8个不可访问的方法没有声明修饰符,那就是默认的 default 类型。我们知道,default 修饰的方法只能在同一包内可见,ViewTreeObserver.java 在 android.view 包下,我们在程序中显然无法访问。
#2. 接口和方法的作用
为了保持内容的连贯和思路的清晰,在上一节只是介绍了 ViewTreeObserver 类的构成,并没有解释具体的作用。下面趁热打铁,看一下各自的作用。此处仍以 OnGlobalLayoutListener(全局布局监听) 接口对应的三个方法为例,其他接口的原理都一样,不再赘述。
2.1 OnGlobalLayoutListener 接口:
注释很精确的概括了其作用:当全局布局状态,或者视图树的子view可见性发生改变时,将调用该回调接口。
该接口包含了一个回调方法 onGlobalLayout(),我们在程序中就是通过覆写该方法,实现自己的逻辑,具体使用将在实战部分介绍。
##2.2 addOnGlobalLayoutListener 和 removeOnGlobalLayoutListener 方法
还是将这俩好基友放在一块介绍,我直接简称 add 和 remove 了。
在程序中,通过 add 方法添加一个对 view 布局发生改变的监听,传入 OnLayoutGlobalListener 接口对象,覆写接口的 onGlobalLayout() 方法,系统会将我们传入的 OnLayoutGlobalListener 存在集合中。
当通过 add 监听之后,我们需要在适当的时候通过 remove 方法移除该监听,防止多次调用。通常在覆写的 onGlobalLayout() 时方法中调用 remove 方法移除监听。
##2.3 dispatchOnGlobalLayout 方法
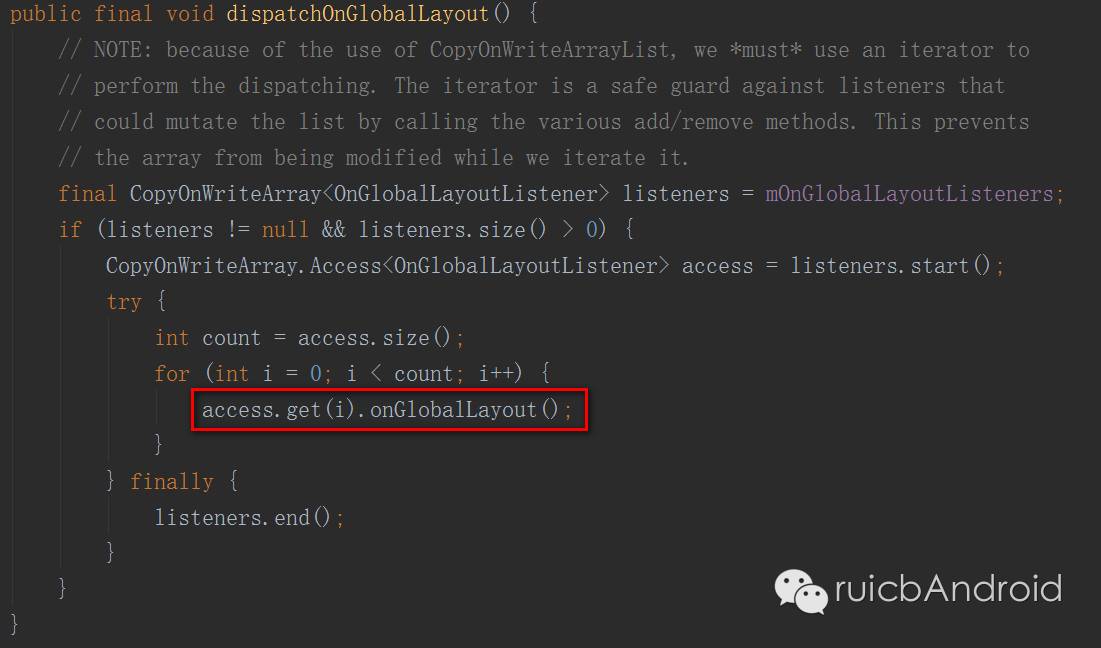
dispatch 方法一般都由系统调用,我们不需要去关心。在 dispatchOnGlobalLayout 方法中,会遍历存放 OnLayoutGlobalListener 对象的集合,然后调用 OnLayoutGlobalListener 对象的 onGlobalLayout() 方法,通知程序该事件发生了。
[注:上述代码中存放 OnGlobalLayoutListener 的集合 CopyOnWriteArray,值得了解一下,会让你受益匪浅。本打算讲的,但限于篇幅只好作罢,感兴趣的可以上网了解一下]
3.使用姿势(实战)
到目前为止,我们对 ViewTreeObserver 的认识仍停留在概念级别,终于等到了实战环节,验收自己学习成果的时刻到了。
##3.1 使用流程
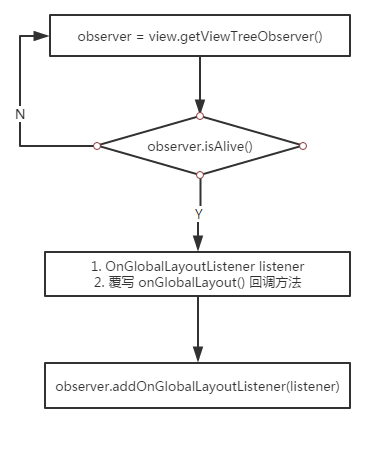
我们还是先以 OnGlobalLayoutListener 为例介绍一下标准使用流程,这里需要结合上篇所学内容。
通过 View 对象的 getViewTreeObserver() 获取 ViewTreeObserver 对象。
检测 observer 是否可用。不可用的话再获取一次
定义 OnGlobalLayoutListener 接口对象 listener,并覆写 onGlobalLayout() 回调方法。如果只监听一次,记得在方法*后调用 observer.removeOnGlobalLayoutListener() 移除监听,避免重复调用。
observer.addOnGlobalLayoutListener(listener) ,至此完成对该 View 对象的全局布局监听。
附上一张不完整的流程图,使用在线工具 ProcessOn 画的,挺好用的,推荐给大家:
##3.2 实际使用
上面只是标准使用流程,实际开发中我们不会这么多约束,下面看两个实际的例子。值得注意的是,我们一直所说的 View,实际上指的是 View 及其子类,比如 LinearLayout、ImageView、TextView等。
① 在 onCreate() 中获取 View 的高度
在开发中,我们有时需要在 onCreate() 方法中拿到一个view(任何View的子类)的宽高,这时候我们直接通过 getWidth() 和 getHeight() 方法获取的值均为 0,因为真正的值要在 view 完成 onLayout() 之后才可以返回。这时,我们就可以借助 OnGlobalLayoutListener 监听 view 的布局改变,当 view 布局发生改变且完成 onLayout() 后,就会调用 dispatchOnGlobal() 通知我们,接下来就会走到回调方法 onGlobalLayout() 中去。
view.getViewTreeObserver().addOnGlobalLayoutListener(
new ViewTreeObserver.OnGlobalLayoutListener() {
@Override
public void onGlobalLayout() {
//1. do sth you want
width = view.getWidth();
height = view.getHeight;
Log.d(“OnGlobalLayoutListener”, “width:” + width + “,height:” + height);
//2. remove listener
// api 小于 16
if (Build.VERSION.SDK_INT < Build.VERSION_CODES.JELLY_BEAN){
//使用过时方法
view.getViewTreeObserver().removeGlobalOnLayoutListener(this);
}
// api >= 16
else {
//使用替换方法
view.getViewTreeObserver().removeOnGlobalLayoutListener(this);
}
}
});
代码已经写得很清楚了,下面再补充两点:
因为每次都是通过 getViewTreeObserver() 直接获取 View 当前的observer,所以就没再使用 isAlive() 判断。
在介绍 remove 方法时,提到 removeGlobalOnLayoutListener() 方法已经过时,取而代之的是 removeOnGlobalLayoutListener() 方法。后者是在 JELLY_BEAN 版本才引入的,对应的 api 是 16。由于我当前程序的 minSdkVersion 为 14,所以需要根据实际版本号分开处理。其实,在本例中,是不需要分开处理的,我们直接调用已过时的 removeGlobalOnLayoutListener() 方法即可,因为在前面分析过,二者仅仅是名字上的差别。但我之所以这么做,就是为了演示如何判断版本号并据此选择对应的方案。毕竟有些方法系统只提供了高版本的实现,之前的版本就没有对应的方法,此时我们就必须自己实现在低版本上的功能了。
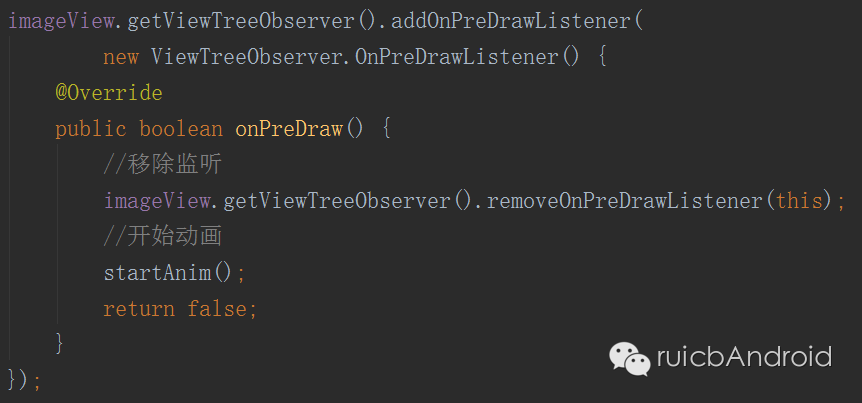
除了 OnGlobalLayoutListener,我们还可以借助 OnPreDrawListener 实现上述功能。同时,OnPreDrawListener 还可以帮助我们实现 View 初始化加载时的动画效果。下面再举个例子,供大家参考以熟悉api,实际的开发中需要灵活运用。
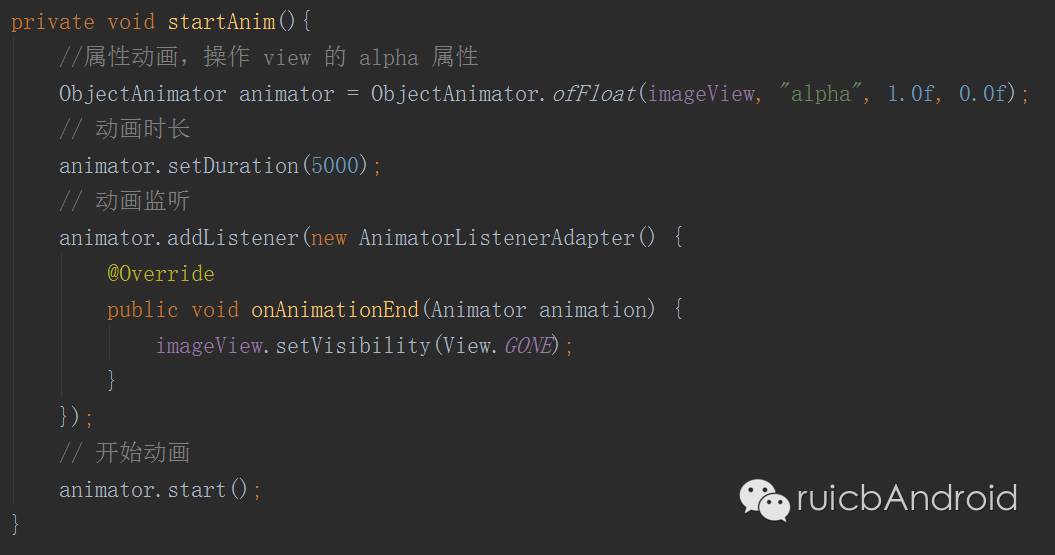
② View 的初始化加载动画
直接上代码,在 onCreate() 方法中:
添加属性动画:
*终效果:
———————
解析 ViewTreeObserver 源码(上)
解析 ViewTreeObserver 源码(上)
主要内容:ViewTreeObserver 是被用来注册监听视图树的观察者,在视图树发生全局改变时将收到通知。本文从 ViewTreeObserver 源码出发,带你剖析 ViewTreeObserver 的设计及使用,并间接体会观察者模式、Android消息传递机制在其中的使用。
这两天看代码看到了 ViewTreeObserver ,之前有接触过,但一直不太其到底在表达什么。这次既然又碰到了,那就干脆研究一下吧。于是我开始以关键字“ViewTreeObserver” Google 相关内容,结果发现找到的内容都差不多,更有甚者通篇直接翻译api,惊呆了!真的一点都不夸张,不相信的可以自己搜索试试看…
本系列分为上下两篇,本篇较为基础,主要介绍 ViewTreeObserver 的基础信息,以及说一下观察者模式,至于消息传递以及实战等更多内容将在下篇介绍。
1. 分开理解 ViewTreeObserver
ViewTreeObserver,拆开来理解就是 ViewTree 和 Observer。
ViewTree 就是我们常说的视图树,在Android中,所有视图都是由View及View的子类构成,ViewGroup 也是View的子类,它可以装载View或者ViewGroup,这样,一层层嵌套,就有了视图树的概念。给一张图感受一下:
视图树
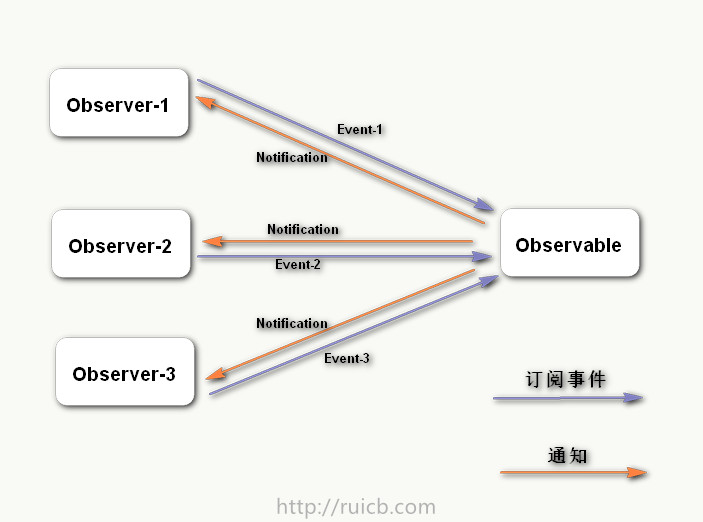
Observer 即观察者的意思,其对应的观察者模式是软件设计模式的一种,在许多编程语言中被广泛运用。其核心在于:一个目标对象,我们称之为被观察者(Observable),管理着所有依附于它的观察者(Observers),当被观察者发生某种改变时(称为事件),被观察者调用对该事件感兴趣的观察者所提供的方法,主动通知观察者。
总结起来就是三要素:观察者,被观察者,事件,图示如下,图画的有点虚。
观察者和被观察者
至于在 ViewTreeObserver 中,观察者模式是如何工作的,需要留到后面再说了,因为涉及到 View 的 measure、layout 和 draw 等过程。等不及的可以自己看一下,给点提示:看 ViewRootImpl 类。
2. ViewTreeObserver 概念
分别介绍 ViewTree 和 Observer 之后,我们就不难理解 ViewTreeObserver 的概念了。在这里,ViewTree 即为被观察者(也可以是单个View),ViewTreeObserver 就是观察者,ViewTreeObserver 对 ViewTree 注册监听(观察它),当 ViewTree 发生某种变化时,将调用 ViewTreeObserver 的相关方法,通知其这一改变。我们要做的就是覆写这一方法,添加自己的逻辑。
来看一下官方文档的注释说明:
ViewTreeObserver 是被用来注册监听视图树的观察者,在视图树发生全局改变时将收到通知。这种全局事件包括但不限于:整个视图树的布局发生改变、在视图开始绘制之前、视图触摸模式改变时…
3. 获取 ViewTreeObserver 对象
了解了 ViewTreeObserver 之后,接下来说说如何获取 ViewTreeObserver 对象。我想大多数人会想到 new ViewTreeObserver(),因为这个我们*擅长了。
但是,ViewTreeObserver 的构造方法明确声明了:This constructor should not be called。也就是我们没法调用,当我们尝试这么做时,IDE 会提示:
‘ViewTreeObserver()’ is not public in ‘android.view.ViewTreeObserver’.Cannot be accessed from outside package
根据 ViewTreeObserver 类的注释可知,我们只能通过 View 的 getViewTreeObserver() 方法获取 ViewTreeObserver 对象,那么我们看一下 getViewTreeObserver() 方法的源码:
getViewTreeObserver
先介绍一下方法中的 AttachInfo,官方文档如此注释说明:
A set of information given to a view when it is attached to its parent
意思是:当这个 View 被附着到父窗口时,将会获得这一组信息。说的好抽象啊,还是自己这组信息都有啥吧。
AttachInfo 是 View 类的内部类,找到这个类,浏览一遍,发现其含了一个 ViewTreeObserver 对象,以及该 View 所处的窗口(Window)、设备(Display)、根视图(rootView)等信息,信息量还是蛮大的,感兴趣的可以自己了解下,我们目前只关心这个 ViewTreeObserver 对象。
下面分析方法的逻辑。这个方法首先判断 View 所持有的 mAttachInfo ,当 mAttachInfo 不为空时,直接返回 mAttachInfo 中的 ViewTreeObserver 对象;否则去判断 View 类的 ViewTreeObserver 对象 mFloatingTreeObserver,若 mFloatingTreeObserver 为空,则创建该对象,并返回。
对于 mFloatingTreeObserver,官方注释为:
Special tree observer used when mAttachInfo is null.
很明显,这是一个特殊的视图树观察者对象,只有当 mAttachInfo 为空时才会被使用。
至此,我们成功的获取了 ViewTreeObserver 对象。
4. 确保 ViewTreeObserver 可用
在前面,我们成功获取了 ViewTreeObserver 对象,当我们使用该 对象调用 addOnXxxListener 方法监听 View 的某个状态时,该方法总是首先调用 checkIsAlive() 方法,检测 View 的 ViewTreeObserver 对象是否存活(可用)。
为什么要先去检测呢?官方文档给出的解释是:通过 View 的 getViewTreeObserver() 方法返回的 ViewTreeObserver ,在 View 的生命周期中不能保证始终有效。
既然我如此,那么通过源码我们看一下 checkIsAlive() 都做了什么:
checkIsAlive
逻辑还是很简单的:如果 View 的 ViewTreeObserver 对象不可用,将抛出 IllegalStateException (非法状态异常),并提示我们 重新调用 View 的 getViewTreeObserver() 方法获取对象。
但是,我们能不能在调用 addOnXxxListener 之前,能否检测当前 View 的 ViewTreeObserver 对象是否可用呢,总不能每次等异常了才发现要去重新获取把?答案是肯定的!
ViewTreeObserver 为我们提供了 isAlive() 方法,逻辑很简单,就一句代码“return mAlive”,mAlive 就是在 checkIsAlive() 方法中所判断的变量。该变量标记当前 View 的 ViewTreeObserver 对象是否可用。
*后,翻译官方文档的注释,来总结如何确保 ViewTreeObserver 可用:
当 ViewTreeObserver 不可用时,调用 isAlive() 方法以外的任何其他方法,都将抛出异常。所以,如果 View 对 ViewTreeObserver 持有长时间引用,那么其应该在调用 ViewTreeObserver 对象的任何其他方法之前,确保通过 isAlive() 的返回值检查 ViewTreeObserver 的状态是否可用。
5. 结尾
至此,有关 ViewTreeObserver 的基础只是介绍就到这儿了,相信你一定会觉得没看过瘾,因为本篇只是介绍了 ViewTreeObserver 的概念、如何获取View实例,以及如何避免 ViewTreeObserver 对象为空,我也觉的说的有点简单了。但是,当你发现这些网上都没有,需要靠自己读源码和注释去了解时,就不是那么简单了。
下篇预告:ViewTreeObserver 的 API 介绍、观察者模式是如何起作用的、View 涉及的消息传递机制 以及 ViewTreeObserver 的使用等,统统放出来。请耐心等候,这期间不妨自己去看看源码。
*后,感谢你耐心看完,看完之后有任何问题,欢迎随时交流。
Zygote进程——SystemServer的诞生
在ZygoteInit的main()方法中做了几件大事,其中一件便是启动Systemserver进程,代码如下:
@/frameworks/base/core/Java/com/Android/internal/os/ZygoteInit.java
- public static void main(String argv[]) {
- try {
- ……
- if (argv[1].equals(“start-system-server”)) {
- startSystemServer();//启动system_server进程
- } else if (!argv[1].equals(“”)) {
- throw new RuntimeException(argv[0] + USAGE_STRING);
- }
- ……
- }
startSystemServer方法的实现如下:
@/frameworks/base/core/java/com/android/internal/os/ZygoteInit.java
- /**
- * Prepare the arguments and fork for the system server process.
- */
- private static boolean startSystemServer()
- throws MethodAndArgsCaller, RuntimeException {
- long capabilities = posixCapabilitiesAsBits(
- OsConstants.CAP_KILL,
- OsConstants.CAP_NET_ADMIN,
- OsConstants.CAP_NET_BIND_SERVICE,
- OsConstants.CAP_NET_BROADCAST,
- OsConstants.CAP_NET_RAW,
- OsConstants.CAP_SYS_MODULE,
- OsConstants.CAP_SYS_NICE,
- OsConstants.CAP_SYS_RESOURCE,
- OsConstants.CAP_SYS_TIME,
- OsConstants.CAP_SYS_TTY_CONFIG
- );
- /* Hardcoded command line to start the system server */
- String args[] = {
- “–setuid=1000”,
- “–setgid=1000”,
- “–setgroups=1001,1002,1003,1004,1005,1006,1007,1008,1009,1010,1018,1032,3001,3002,3003,3006,3007”,
- “–capabilities=” + capabilities + “,” + capabilities,
- “–runtime-init”,
- “–nice-name=system_server”,
- “com.android.server.SystemServer”,
- };
- ZygoteConnection.Arguments parsedArgs = null;
- int pid;
- try {
- parsedArgs = new ZygoteConnection.Arguments(args);
- ZygoteConnection.applyDebuggerSystemProperty(parsedArgs);
- ZygoteConnection.applyInvokeWithSystemProperty(parsedArgs);
- /* Request to fork the system server process */
- pid = Zygote.forkSystemServer(//以fork的方式创建system_server进程
- parsedArgs.uid, parsedArgs.gid,
- parsedArgs.gids,
- parsedArgs.debugFlags,
- null,
- parsedArgs.permittedCapabilities,
- parsedArgs.effectiveCapabilities);
- } catch (IllegalArgumentException ex) {
- throw new RuntimeException(ex);
- }
- /* For child process */
- if (pid == 0) {//pid==0说明在子进程中,父进程为Zygote
- handleSystemServerProcess(parsedArgs);
- }
- return true;
- }
在startSystemServer中先设置了fork SystemServer所需的参数,然后通过forkSystemServer方法fork出SystemServer进程,*后通过handleSystemServerProcess处理新进程中的善后事宜。
首先看一下参数:
1、setuid=1000,这里1000代表SYSTEM_UID,即系统进程,关于进程ID的说明可以参见:/frameworks/base/core/java/android/os/Process.java。
2、nice-name=system_server表示制定进程的名字为“system_server”
3、com.android.server.SystemServer表示SystemServer类的位置。
接下来看一下forkSystemServer的实现:
@/libcore/dalvik/src/main/java/dalvik/system/Zygote.java
- /**
- * Special method to start the system server process. In addition to the
- * common actions performed in forkAndSpecialize, the pid of the child
- * process is recorded such that the death of the child process will cause
- * zygote to exit.
- *
- * @param uid the UNIX uid that the new process should setuid() to after
- * fork()ing and and before spawning any threads.
- * @param gid the UNIX gid that the new process should setgid() to after
- * fork()ing and and before spawning any threads.
- * @param gids null-ok; a list of UNIX gids that the new process should
- * setgroups() to after fork and before spawning any threads.
- * @param debugFlags bit flags that enable debugging features.
- * @param rlimits null-ok an array of rlimit tuples, with the second
- * dimension having a length of 3 and representing
- * (resource, rlim_cur, rlim_max). These are set via the posix
- * setrlimit(2) call.
- * @param permittedCapabilities argument for setcap()
- * @param effectiveCapabilities argument for setcap()
- *
- * @return 0 if this is the child, pid of the child
- * if this is the parent, or -1 on error.
- */
- public static int forkSystemServer(int uid, int gid, int[] gids, int debugFlags,
- int[][] rlimits, long permittedCapabilities, long effectiveCapabilities) {
- preFork();
- int pid = nativeForkSystemServer(
- uid, gid, gids, debugFlags, rlimits, permittedCapabilities, effectiveCapabilities);
- postFork();
- return pid;
- }
- native public static int nativeForkSystemServer(int uid, int gid, int[] gids, int debugFlags,
- int[][] rlimits, long permittedCapabilities, long effectiveCapabilities);
nativeForkSystemServer*终通过JNI实现,代码为:
@/dalvik/vm/native/dalvik_system_Zygote.cpp
- /*
- * native public static int nativeForkSystemServer(int uid, int gid,
- * int[] gids, int debugFlags, int[][] rlimits,
- * long permittedCapabilities, long effectiveCapabilities);
- */
- static void Dalvik_dalvik_system_Zygote_forkSystemServer(
- const u4* args, JValue* pResult)
- {
- pid_t pid;
- pid = forkAndSpecializeCommon(args, true);
- /* The zygote process checks whether the child process has died or not. */
- if (pid > 0) {//pid大于0,说明是在父进程中
- int status;
- ALOGI(“System server process %d has been created”, pid);
- gDvm.systemServerPid = pid;
- /* There is a slight window that the system server process has crashed
- * but it went unnoticed because we haven’t published its pid yet. So
- * we recheck here just to make sure that all is well.
- */
- if (waitpid(pid, &status, WNOHANG) == pid) {//堵塞,等待system_server进程
- ALOGE(“System server process %d has died. Restarting Zygote!”, pid);
- kill(getpid(), SIGKILL);//一旦上面的等待返回,说明进程pid(system_server)已终止,此时Zygote杀死自己
- }
- }
- RETURN_INT(pid);
- }
可以看出Dalvik_dalvik_system_Zygote_forkSystemServer会调用forkAndSpecializeCommon来fork出system_server进程。这里要注意*后几句,在fork出system_server以后,Zygote会调用waitpid等待system_server的终止,一旦发现system_server终止,Zygote则马上自杀。
接下来看一下handleSystemServerProcess的实现:
@/frameworks/base/core/java/com/android/internal/os/ZygoteInit.java
- /**
- * Finish remaining work for the newly forked system server process.
- */
- private static void handleSystemServerProcess(
- ZygoteConnection.Arguments parsedArgs)
- throws ZygoteInit.MethodAndArgsCaller {
- closeServerSocket();//关闭从Zygote复制过来的socket
- // set umask to 0077 so new files and directories will default to owner-only permissions.
- Libcore.os.umask(S_IRWXG | S_IRWXO);//设置文件的默认权限,去除所有者之外的权限
- if (parsedArgs.niceName != null) {
- Process.setArgV0(parsedArgs.niceName);//system_server
- }
- if (parsedArgs.invokeWith != null) {
- WrapperInit.execApplication(parsedArgs.invokeWith,
- parsedArgs.niceName, parsedArgs.targetSdkVersion,
- null, parsedArgs.remainingArgs);
- } else {
- /*
- * Pass the remaining arguments to SystemServer.
- */
- RuntimeInit.zygoteInit(parsedArgs.targetSdkVersion, parsedArgs.remainingArgs);
- }
- /* should never reach here */
- }
上面的代码中用到了Linux中的umask这个函数,不明白的读者可以参考:http://hi.baidu.com/fengyun409/item/82cd158ffe7f67c8b17154e7。
下面继续看RuntimeInit.zygoteInit方法的实现:
@/frameworks/base/core/java/com/android/internel/os/RuntimeInit.java
- /**
- * The main function called when started through the zygote process. This
- * could be unified with main(), if the native code in nativeFinishInit()
- * were rationalized with Zygote startup.<p>
- *
- * Current recognized args:
- * <ul>
- * <li> <code> [–] <start class name> <args>
- * </ul>
- *
- * @param targetSdkVersion target SDK version
- * @param argv arg strings
- */
- public static final void zygoteInit(int targetSdkVersion, String[] argv)
- throws ZygoteInit.MethodAndArgsCaller {
- if (DEBUG) Slog.d(TAG, “RuntimeInit: Starting application from zygote”);
- redirectLogStreams();//将System.out 和 System.err 输出重定向到Android 的Log系统
- /*
- * 初始化了一些系统属性,其中*重要的一点就是设置了一个未捕捉异常的handler,
- * 当代码有任何未知异常,就会执行它,
- * 调试过Android代码的同学经常看到的”*** FATAL EXCEPTION IN SYSTEM PROCESS” 打印就出自这里
- */
- commonInit();
- /*
- * *终会调用app_main的onZygoteInit函数
- * 这里的作用是在新进程中引入Binder,也就说通过nativeZygoteInit以后,新的进程就可以使用Binder进程通信了
- */
- nativeZygoteInit();
- applicationInit(targetSdkVersion, argv);//应用初始化
- }
这个函数是不是有些面熟?没错在《Zygote进程【2】——Zygote的分裂》一文中我们见过,Zygote进程在接收到ActivityManagerService请求创建进程的请求时就调用的该方法来处理创建子进程的后续工作。
- private static void applicationInit(int targetSdkVersion, String[] argv)
- throws ZygoteInit.MethodAndArgsCaller {
- // If the application calls System.exit(), terminate the process
- // immediately without running any shutdown hooks. It is not possible to
- // shutdown an Android application gracefully. Among other things, the
- // Android runtime shutdown hooks close the Binder driver, which can cause
- // leftover running threads to crash before the process actually exits.
- nativeSetExitWithoutCleanup(true);
- // We want to be fairly aggressive about heap utilization, to avoid
- // holding on to a lot of memory that isn’t needed.
- VMRuntime.getRuntime().setTargetHeapUtilization(0.75f);
- VMRuntime.getRuntime().setTargetSdkVersion(targetSdkVersion);
- final Arguments args;
- try {
- args = new Arguments(argv);
- } catch (IllegalArgumentException ex) {
- Slog.e(TAG, ex.getMessage());
- // let the process exit
- return;
- }
- // Remaining arguments are passed to the start class’s static main
- invokeStaticMain(args.startClass, args.startArgs);
- }
所以,这里与Zygote分裂时不同的是:这里的args.startClass的值为com.android.server.SystemServer。接下来大家都知道了,SystemServer类的main函数将会被调用。
@/frameworks/base/services/java/com/android/server/SystemServer.java
- public static void main(String[] args) {
- if (System.currentTimeMillis() < EARLIEST_SUPPORTED_TIME) {
- // If a device’s clock is before 1970 (before 0), a lot of
- // APIs crash dealing with negative numbers, notably
- // java.io.File#setLastModified, so instead we fake it and
- // hope that time from cell towers or NTP fixes it
- // shortly.
- Slog.w(TAG, “System clock is before 1970; setting to 1970.”);
- SystemClock.setCurrentTimeMillis(EARLIEST_SUPPORTED_TIME);//初始化系统时间
- }
- if (SamplingProfilerIntegration.isEnabled()) {
- SamplingProfilerIntegration.start();
- timer = new Timer();
- timer.schedule(new TimerTask() {
- @Override
- public void run() {
- SamplingProfilerIntegration.writeSnapshot(“system_server”, null);
- }
- }, SNAPSHOT_INTERVAL, SNAPSHOT_INTERVAL);
- }
- // Mmmmmm… more memory!
- dalvik.system.VMRuntime.getRuntime().clearGrowthLimit();
- // The system server has to run all of the time, so it needs to be
- // as efficient as possible with its memory usage.
- VMRuntime.getRuntime().setTargetHeapUtilization(0.8f);
- Environment.setUserRequired(true);
- System.loadLibrary(“android_servers”);//加载android_servers库
- Slog.i(TAG, “Entered the Android system server!”);
- // Initialize native services.
- nativeInit();//初始化native service
- // This used to be its own separate thread, but now it is
- // just the loop we run on the main thread.
- ServerThread thr = new ServerThread();
- thr.initAndLoop();
- }
在main中会加载libandroid_servers.so库,然后调用nativeInit初始化native层的Service。
- /**
- * Called to initialize native system services.
- */
- private static native void nativeInit();
@/frameworks/base/services/jni/com_android_server_SystemServer.cpp
- static void android_server_SystemServer_nativeInit(JNIEnv* env, jobject clazz) {
- char propBuf[PROPERTY_VALUE_MAX];
- property_get(“system_init.startsensorservice”, propBuf, “1”);
- if (strcmp(propBuf, “1”) == 0) {
- // Start the sensor service
- SensorService::instantiate();
- }
- }
可以看出这里只初始化了传感器service,这与之前的代码有所不同,在比较早的Android版本中,服务的初始化分为init1和init2两个过程,其中init主要负责native层service的初始化(SurfaceFlinger、AudioFlinger等),init2负责java层service的初始化。
在main方法*后会调用ServerThread类的initAndLoop来初始化系统服务,这个函数比较长,这里就不复制代码了。
好了,到这里SystemServer的诞生过程就完了


