分类: IOS技术

IOS技术

iOS 使用UIBezierPath实现不等距曲线图

iOS,关于画线有很多很好的第三方,比如Charts、ECharts等等,但是我没有找到画不等距的,就自己简单的实现了一下。首先看,效果

%title插图%num

就是描点画线加动画,没有太难的。
我自定义了一个LineChartView,和几个模型,具体demo下面会给链接

%title插图%num

给lineChartview暴露出了几个属性和方法,都有注释

%title插图%num

在controller里面进行初始化配置

%title插图%num

setChartView方法

s

1 self.chartView.y_TextFont = [UIFont systemFontOfSize:14];
2     self.chartView.minValue = 0;
3     self.chartView.maxValue = 100;
4     NSArray *x_names = @[@”清醒”,@”一般”,@”黄金”];
5     NSArray *xValue = @[@0,@50,@100];
6     NSArray *x_colors = @[[UIColor redColor],[UIColor orangeColor],[UIColor yellowColor]];
7     NSMutableArray *xAxis = [NSMutableArray new];
8     for (int i = 0; i < x_names.count; i++) {
9         XJYAxisModel * model = [XJYAxisModel new];
10         model.clolor = x_colors[i];
11         model.value = xValue[i];
12         model.title = x_names[i];
13         [xAxis addObject:model];
14     }
15     [self.chartView drawLineChartViewWithX_Value_Names:xAxis xCount:xCount];

我在controller里面定义了个方法setXAxis,用于设置x轴线上的模型具体实现

1 – (NSArray *)setXAxis{
2 //    *大值和*小值 -> 每个轴线上的值 , 比如*大值90,*小值是0,10条轴线(9个间隙),则每条轴线的间距是10(0、10、20、30、40、50、60、70、80、90)
3     float min = 0;
4     float max = 90;
5     float space = (max – min)/(xCount – 1);
6     NSMutableArray *xAxisArr = [NSMutableArray new];
7     for (int i = 0 ; i < xCount; i++) {
8         XJXAxisModel *model  = [XJXAxisModel new];
9         model.value = [NSNumber numberWithFloat: i * space];
10         model.title = [NSString stringWithFormat:@”12:0%d”,i];
11         model.clolor = [UIColor whiteColor];
12         model.textFont = [UIFont systemFontOfSize:10];
13         [xAxisArr addObject:model];
14     }
15
16     return xAxisArr;
17 }

页面上弄了一个按钮,用于触发赋值,

1 – (void)refreshData{
2     static int a = 0;
3     if (a == 0) {
4         NSMutableArray *datas = [NSMutableArray new];
5             NSArray *valueXs = @[@0,@5,@11,@19,@25,@31,@39,@43,@51,@59,@70,@85,@90];
6             NSArray *valueYs = @[@0,@10,@55,@99,@88,@99,@77,@87,@10,@53,@80,@10,@0];
7             for (int i = 0; i < valueXs.count; i++) {
8                 XJDataModel *model = [XJDataModel new];
9                 model.xValue = valueXs[i];
10                 model.yValue = valueYs[i];
11                 [datas addObject:model];
12             }
13         [self.chartView drawLineChartViewWithDataModels:datas withXAxisData:[self setXAxis]];
14         a = 1;
15     }else{
16         NSMutableArray *datas = [NSMutableArray new];
17             NSArray *valueXs = @[@0,@5,@11,@19,@25,@31,@39,@43,@51,@59,@70,@85,@90];
18             NSArray *valueYs = @[@0,@90,@55,@9,@88,@19,@77,@87,@10,@93,@80,@10,@0];
19             for (int i = 0; i < valueXs.count; i++) {
20                 XJDataModel *model = [XJDataModel new];
21                 model.xValue = valueXs[i];
22                 model.yValue = valueYs[i];
23                 [datas addObject:model];
24             }
25         [self.chartView drawLineChartViewWithDataModels:datas withXAxisData:[self setXAxis]];
26         a = 0;
27     }
28 }

在画线的具体实现里面,先赋值x轴文案,然后描点画线并设置动画效果

1 – (void)drawLineChartViewWithDataModels:(NSArray<XJDataModel *> *)datas withXAxisData:(NSArray< XJXAxisModel * >*)xAxis{
2     [self reset];
3 //    1. 设置x轴文案
4     [self setXAxisData:xAxis];
5     if (datas.count == 0) {
6         return;
7     }
8 //    [shapeLayer removeFromSuperlayer];
9     //2.获取目标值点坐标
10     NSMutableArray *allPoints = [NSMutableArray array];
11     for (int i = 0; i < datas.count; i++) {
12         XJDataModel *model = [datas objectAtIndex:i];
13         float Y = y_start – scaleY * model.yValue.floatValue;
14         float X = x_start + scaleX * model.xValue.floatValue;
15         NSLog(@”X,Y = (%.2f,%.2f)”,X,Y);
16         CGPoint point = CGPointMake(X, Y);
17         [allPoints addObject:[NSValue valueWithCGPoint:point]];
18     }
19
20 //    画线
21     UIBezierPath *path = [UIBezierPath bezierPath];
22     [path moveToPoint:[allPoints[0] CGPointValue]];
23     CGPoint PrePonit;
24     for (int i =0; i<allPoints.count; i++) {
25         if (i==0) {
26             PrePonit = [allPoints[0] CGPointValue];
27         }else{
28             CGPoint NowPoint = [allPoints[i] CGPointValue];
29             [path addCurveToPoint:NowPoint controlPoint1:CGPointMake((PrePonit.x+NowPoint.x)/2, PrePonit.y) controlPoint2:CGPointMake((PrePonit.x+NowPoint.x)/2, NowPoint.y)]; //三次曲线
30             PrePonit = NowPoint;
31         }
32     }
33     shapeLayer = [CAShapeLayer layer];
34     shapeLayer.path = path.CGPath;
35     shapeLayer.lineWidth = 2.0;
36     shapeLayer.strokeColor = [UIColor orangeColor].CGColor;
37     shapeLayer.fillColor = [UIColor clearColor].CGColor;
38     shapeLayer.borderWidth = 3.0;
39     [self.subviews[0].layer addSublayer:shapeLayer];
40 //    加动画
41     CABasicAnimation *animation = [CABasicAnimation animationWithKeyPath:@”strokeEnd”];
42     animation.duration = 1.0;
43     animation.fromValue = @0.0f;
44     animation.toValue = @1.0f;
45     [shapeLayer addAnimation:animation forKey:@”strokeEnd”];
46     for (int i = 0; i < datas.count; i++) {
47         CGPoint point =[allPoints[i] CGPointValue];
48         UIBezierPath *path = [UIBezierPath bezierPathWithRoundedRect:CGRectMake(point.x-2.5, point.y-2.5, 5, 5) cornerRadius:5];
49         CAShapeLayer *layer = [CAShapeLayer layer];
50         layer.strokeColor = [UIColor whiteColor].CGColor;
51         layer.fillColor = [UIColor whiteColor].CGColor;
52         layer.path = path.CGPath;
53         [self.subviews[0].layer addSublayer:layer];
54         [pointShapeLayers addObject:layer];
55     }
56 }


iOS 高德室内地图导航功能的简单实现

打开高德官网:http://lbs.amap.com/ ,并注册、登录,在控制台中创建应用,拿到Key值。

点击iOS室内地图SDK

%title插图%num

开发文档:http://lbs.amap.com/api/ios-indoor-sdk/summary/ ,在下面有相关下载,下载SDK

然后按照开发文档创建和配置工程,另外需要申请室内地图的数据,才能用。

%title插图%num

%title插图%num

首先,在ViewController里面,导入sdk

#import <IndoorMapSDK/IndoorMapSDK.h>

#import <OnlineLocationSDK/OnlineLocationSDK.h>

然后继承:OIMMapViewDelegate(室内地图),OIMRoutePlanningDelegate(线路规划)

创建对象:

@property (nonatomic,strong) OIMMapView *imapView;

//室内地图路算对象

@property(nonatomic, strong)OIMRoutePlanning* imRoutePlanning;

//路算起点

@property(nonatomic, strong)OIMFeature* selectedFeature;

//路算起点

@property(nonatomic, strong)OIMFeature* routePlanningStart;

在viewDidLoad方法里面初始化OIMMapView

_imapView = [[OIMMapView alloc]initWithFrame:self.view.bounds];

//    _imapView.showsIndoorMap = YES;

_imapView.key = App_key;

[_imapView setBuildingId:BuildingId floorNo:1];

_imapView.delegate = self;

_imapView.showRoutePlanning = YES;

_imapView.showLocationPoint = YES;

_imapView.showZoomControl = NO;


[self.view addSubview:_imapView];

其中,App_key是在官网创建应用给的key,BuildingId是申请室内地图数据时,高德给的BuildingId;

然后实现代理方法

#pragma mark – OIMMapViewDelegate

-(void)mapView:(OIMMapView *)mapView didFinishLoadingMap:(NSString *)buildingId floorNo:(int)floorNo

{

}

-(void)mapView:(OIMMapView*)mapView didFailLoadingMap:(NSString*)buildingId floorNo:(int)floorNo withError:(NSError *)error{
[self alert:error.description message:@””];


}

//加载楼层

-(void)mapView:(OIMMapView*)mapView willStartLoadingFloor:(NSString*)buildingId floorNo:(int)floorNo{
}

-(void)mapView:(OIMMapView*)mapView didFinishLoadingFloor:(NSString*)buildingId floorNo:(int)floorNo{

}

/*!

*  @brief  点击地图完成

*

*  @param mapView 室内地图对象

*  @param feature 点击的POI

*

*  @since 2.0.0

*/

-(void)mapView:(OIMMapView*)mapView didClickFeature:(OIMFeature*)feature{
//清除所有的选择气泡显示

[self.imapView clearStatus:OIMFeatureStatus_Selected];

//清除所有的高亮显示

[self.imapView setFeature:self.selectedFeature highlight:NO];

//设置点击的对象显示气泡

[self.imapView setFeature:feature status:OIMFeatureStatus_Selected];

//设置点击的对象高亮

[self.imapView setFeature:feature highlight:YES];

self.selectedFeature = feature;

//如果还没有路算起点

if(self.routePlanningStart==nil)

{
//清除路算结果

[self.imapView setShowRoutePlanning:NO];

//设置路算起点

self.routePlanningStart = feature;

//设置路算起点图标

[self.imapView setFeature:feature status:OIMFeatureStatus_RouteStart];

//清除路算终点图标

[self.imapView clearStatus:OIMFeatureStatus_RouteStop];

//清除选择图标

[self.imapView clearStatus:OIMFeatureStatus_Selected];


}

else

{
//显示路算结果

[self.imapView setShowRoutePlanning:YES];

//设置路算终点图标

[self.imapView setFeature:feature status:OIMFeatureStatus_RouteStop];

//清除选择图标

[self.imapView clearStatus:OIMFeatureStatus_Selected];

if(self.imRoutePlanning == nil)

{
//初始化室内路算对象

self.imRoutePlanning = [[OIMRoutePlanning alloc]initWithDelegate:self];

//设置路算对象的KEY

self.imRoutePlanning.key = App_key;

}

//路算请求

[self.imRoutePlanning requestRoutePlanning:BuildingId fromPoiId:self.routePlanningStart.pid toPoiId:feature.pid];

//清除路算起点

self.routePlanningStart = nil;


}


}

这样我们就可以在室内设置起点和终点然后规划路线了。

%title插图%num
其实按照sdk的文档,我们可以拿到某个楼层上的所有模块的信息:

%title插图%num%title插图%num%title插图%num

NSArray* floorList = [self.imapView getFloorList];

NSLog(@”%@”,floorList);

但是他返回的

(

(null)[0]B1,

(null)[0]F1,

(null)[0]F2,

(null)[0]F3,

(null)[0]F4,

(null)[0]F5

)

打断点是

%title插图%num

然后我就问高德,*后人家说这不是技术问题,是人家不提供这个功能(我去,早说嘛,害的我还以为配置有问题,重新搞了好几次)。

所以就不要纠结了。安卓的可以试试,看看行不行。

mac上终端命令行下载东西

首先cd到要下载的文件夹目录下,比如我要下载一个mp4文件,在终端键入

curl -o card.mp4 http://lw1089-hc34.aipai.com/user/596/17601596/1006/card/44113620/card.mp4?to=aipai

%title插图%num

iOS transform的简单使用

一、 transform 属性
在OC中,通过 transform 属性可以修改对象的平移、缩放比例和旋转角度。

1)创建“基于控件初始位置”的形变

CGAffineTransformMakeRotation ——旋转

CGAffineTransformMakeTranslation ——平移

CGAffineTransformMakeScale ——缩放

2)创建“基于 transform 参数”的形变

CGAffineTransformTranslate

CGAffineTransformScale

CGAffineTransformRotate

补充:在OC中,所有跟角度相关的数值,都为弧度制 180度 = M_PI , 45度 = M_PI_4 。

正数表示顺时针旋转,负数表示逆时针旋转。

“基于 transform 参数”的形变可以基于控件上一次的状态进行叠加形变,如先旋转再平移。

二、示例
用代码在 viewDidLoad 中添加控制旋转的按钮:

1     //向左旋转按钮
2     UIButton *leftrotatebtn = [UIButton buttonWithType:UIButtonTypeCustom];
3     leftrotatebtn.frame = CGRectMake(125, 450, 80, 40);
4     [leftrotatebtn setTitle:@”向左旋转” forState:UIControlStateNormal];
5    [leftrotatebtn setTitleColor:[UIColor blueColor] forState:UIControlStateNormal];
6     [leftrotatebtn setTag:1];
7    [self.view addSubview:leftrotatebtn];
8     //添加按钮的单击事件
9    [leftrotatebtn addTarget:self action:@selector(rotate:) forControlEvents:UIControlEventTouchUpInside];
10
11     //向右旋转按钮
12     UIButton *rightrotatebtn = [UIButton buttonWithType:UIButtonTypeCustom];
13     rightrotatebtn.frame = CGRectMake(125, 500, 80, 40);
14     [rightrotatebtn setTitle:@”向右旋转” forState:UIControlStateNormal];
15    [rightrotatebtn setTitleColor:[UIColor blueColor] forState:UIControlStateNormal];
16     [rightrotatebtn setTag:0];
17    [self.view addSubview:rightrotatebtn];
18     //添加按钮的单击事件
19     [rightrotatebtn addTarget:self action:@selector(rotate:) forControlEvents:UIControlEventTouchUpInside];

viewDidLoad 是视图加载完成后调用的方法,通常在此方法中执行视图控制器的初始化工作。

添加旋转按钮响应事件:

1 – (void)rotate:(id)sender{
2     UIButton *button = (UIButton *)sender;
3     if (button.tag) {
4         //self.headImageView.transform = CGAffineTransformMakeRotation(-M_PI_4);
5         //逆时针旋转
6         self.headImageView.transform = CGAffineTransformRotate(self.headImageView.transform, -M_1_PI);
7     } else {
8         //顺时针旋转
9         self.headImageView.transform = CGAffineTransformRotate(self.headImageView.transform, M_PI_4);
10    }
11 }

iOS兼容问题-transform

iOS兼容问题-transform

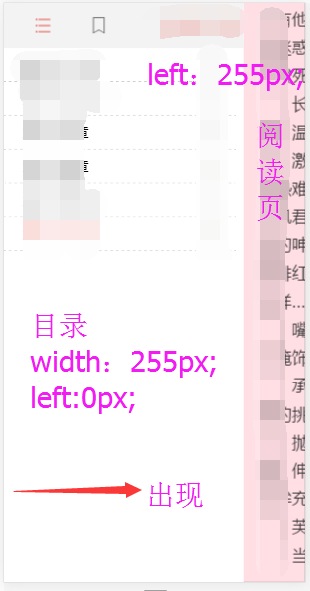
*近在弄一个bug,公司在弄一个阅读器的软件,在阅读页点击下面的导航目录时,目录能够从左至右的方向缓慢出来,用的

%title插图%num%title插图%num

transform: translate(255px, 0px) translateZ(0px);  //目录出现

transform: translate(0px, 0px) translateZ(0px);    //目录隐藏

来进行目录的显示和隐藏。在安卓手机能够自由切换,并且页面正常但是在苹果手机上就不行。在苹果手机上进行阅读是点击目录然后在进入阅读页,屏幕向右侧滑动会出现白色空白且大小目录一致,然后我就觉得是目录影响了阅读页,开始我认为是因为position定位的问题,原本是position:relative;后来我改成了absolute;空白是没有了;但是引出了一系列的原本没有的bug!!!

所以这个解决方法不行。方寸大乱…..

后来实在没办法了,我就改掉了$Woread.transUtil(“.rb_all, .raad_box_ml”, 0);这样的切换写法也就是上方的transform改成了

//目录出现,阅读页的左边left定位到目录的右侧位置

$(“.raad_box_ml”).css(“left”,”0px”);
$(“.rb_all”).css(“left”,”255px”);

%title插图%num%title插图%num


//目录隐藏,阅读页的左边left定位到屏幕左边缘

$(“.raad_box_ml”).css(“left”,”-255px”);  //.raad_box_ml目录的class,255px也为目录的宽度
$(“.rb_all”).css(“left”,”0px”);   //.rb_all为整个阅读页(不包括目录)的class

这样写 IOS和Android都能兼容了。

这个问题困扰了我3天左右,我觉得的是transform在IOS下有点不兼容。也许是我想错了,有知道的大神可以指出,虚心接受~~~

ios layer 动画-(transform.scale篇)

x轴缩放:
CABasicAnimation *theAnimation;
theAnimation=[CABasicAnimation animationWithKeyPath:@”transform.scale.x”];
theAnimation.duration=8;
theAnimation.removedOnCompletion = YES;
theAnimation.fromValue = [NSNumber numberWithFloat:1];
theAnimation.toValue = [NSNumber numberWithFloat:0.5];
[yourView.layer addAnimation:theAnimation forKey:@”animateTransform”];

y轴缩放:
CABasicAnimation *theAnimation;
theAnimation=[CABasicAnimation animationWithKeyPath:@”transform.scale.y”];
theAnimation.duration=8;
theAnimation.removedOnCompletion = YES;
theAnimation.fromValue = [NSNumber numberWithFloat:1];
theAnimation.toValue = [NSNumber numberWithFloat:0.5];
[yourView.layer addAnimation:theAnimation forKey:@”animateTransform”];

x轴,y轴同时按比例缩放:
CABasicAnimation *theAnimation;
theAnimation=[CABasicAnimation animationWithKeyPath:@”transform.scale”];
theAnimation.duration=8;
theAnimation.removedOnCompletion = YES;
theAnimation.fromValue = [NSNumber numberWithFloat:1];
theAnimation.toValue = [NSNumber numberWithFloat:0.5];
[yourView.layer addAnimation:theAnimation forKey:@”animateTransform”];

以上缩放是以view的中心点为中心缩放的,如果需要自定义缩放点,可以设置卯点:
//中心点
[yourView.layer setAnchorPoint:CGPointMake(0.5, 0.5)];

//左上角
[yourView.layer setAnchorPoint:CGPointMake(0, 0)];

//右下角
[yourView.layer setAnchorPoint:CGPointMake(1, 1)];

iOS transform(平移、旋转、缩放)

1.CGAffineTransformMakeTranslation每次都是以*初位置的中心点为起始参照

CGAffineTransformTranslate每次都是以传入的transform为起始参照

CGAffineTransformIdentity为*初状态,即*初位置的中心点

一、平移

//平移
[UIView animateWithDuration:0.5 animations:^{
//使用Make,它是相对于*原始的位置做的形变.
//self.imageV.transform = CGAffineTransformMakeTranslation(0, -100);
//相对于上一次做形变.
self.imageV.transform = CGAffineTransformTranslate(self.imageV.transform, 0, -100);
}];

二、旋转

[UIView animateWithDuration:0.5 animations:^{

//旋转(旋转的度数, 是一个弧度)
//self.imageV.transform = CGAffineTransformMakeRotation(M_PI_4);

self.imageV.transform = CGAffineTransformRotate(self.imageV.transform, M_PI_4);

}];

三、缩放

[UIView animateWithDuration:0.5 animations:^{
//缩放
//self.imageV.transform = CGAffineTransformMakeScale(0.5, 0.5);
self.imageV.transform = CGAffineTransformScale(self.imageV.transform, 0.8, 0.8);
}];

苹果开发者账号续费详细步骤(2017年7月以后)

*新更新:
2019年8月:
提供税号的环节包含在网站的续费步骤中,以下打电话提供税号的内容请自行忽略。


收到了苹果发来的一封邮件,提示开发者账号快要到期了,需要续费。
内容如下:

%title插图%num

于是去开发者网站https://developer.apple.com/account/看了一下

%title插图%num

上面显示了账号快要到期的提示

点击右上角的Renew Membership按钮

进入了登录界面

%title插图%num

登录以后进入如下界面:

%title插图%num

直接进行第二项选择地区,选择中国以后出现如下界面:

%title插图%num

填写银行卡号、联系人信息和账单地址,点击继续

然后是填写发票信息

在2017年7月以后,开发票需要提供纳税人识别号

由于当时不确定是付款之前提供税号还是付款之后提供

所以咨询了一下苹果的客服

%title插图%num

确定了是付款完成之后再拨打电话提供税号

填写发票信息这一步,注意一定要选择公司抬头的发票,我当时错选了个人抬头的发表,后期又找苹果客服改的,只有一次改正的机会。

填写发票信息和付款时没有来得及截图(因为当时老板在旁边),付款用的是信用卡,不用支付密码就付款成功了。

付款成功以后会出现如下界面:

%title插图%num
%title插图%num

同时绑定AppleID的邮箱会收到如下两封邮件:

%title插图%num
%title插图%num

同时还会收到一封带有发票信息pdf附件的邮件

%title插图%num

接下来是拨打苹果公司的客服电话提供税号

过程比较漫长,建议直接拨打如下电话4006668800-转1-转3-转1-转5(注意一定要要在9点-18点之间拨打,如果太晚拨打苹果公司就下班了)

说一下我拨打电话的过程,首先我拨打了在线客服提供的电话400-666-8800,接通以后客服让我提供个人信息,然后让我拨打电话400-670-1855,接通以后还是先提供个人信息,然后客服问我开发者账号的所有者是不是我本人,是我们老板的,所以让老板本人接听了电话,老板接听电话以后客服又说需要拨打4006668800-转1-转3-转1-转5,所以我又按照他说的拨打了电话,接通以后相继转接了三个客服,才*后报上了我们的税号,客服和我说我填写的不是发票抬头不是公司的是个人的,需要修改,且只有一次修改的机会,经过反复确认,*后终于确定了发票信息。客服说因为我这个发票是经过修改的,所以查不到任何物流信息,发票会在4周之内寄到填写的公司地址所在地(*快2-3周)。客服*后还提醒我*近降温,注意保暖,非常贴心!

至此全部过程已经结束。整个过程花了1个小时左右。

iOS 13 适配TabBar红点偏移、UISearchBar显示问题

%title插图%num

iOS 13 如期而至,虽然正式版还没出来,但是适配工作可以开展起来啦。在适配 iOS 13 过程中,遇到了如下一些问题。

1. UITextField 的私有属性 _placeholderLabel 被禁止访问了

遇到的*个崩溃是修改UITextFieldplaceholder的颜色,历史遗留代码如下:

  1. [_textField setValue:self.placeholderColor forKeyPath:@“_placeholderLabel.textColor”];

收到的错误信息⚠️

  1. ‘Access to UITextField’s _placeholderLabel ivar is prohibited. This is an application bug

那么这个问题如何处理呢?

其实,UITextField有个attributedPlaceholder的属性,我们可以自定义这个富文本来达到我们需要的结果。

修改如下:

  1. NSMutableAttributedString *placeholderString = [[NSMutableAttributedString alloc] initWithString:placeholder attributes:@{NSForegroundColorAttributeName : self.placeholderColor}];
  2. _textField.attributedPlaceholder = placeholderString;

注意⚠️,iOS 13 通过 KVC 方式修改私有属性,有 Crush 风险,谨慎使用!

2. 控制器的 modalPresentationStyle 默认值变了

对于这个变化,有点措手不及,直接修改了模态窗口的交互。
查阅了下 UIModalPresentationStyle枚举定义,赫然发现iOS 13新加了一个枚举值:

  1. typedef NS_ENUM(NSInteger, UIModalPresentationStyle) {
  2. UIModalPresentationFullScreen = 0,
  3. UIModalPresentationPageSheet API_AVAILABLE(ios(3.2)) API_UNAVAILABLE(tvos),
  4. UIModalPresentationFormSheet API_AVAILABLE(ios(3.2)) API_UNAVAILABLE(tvos),
  5. UIModalPresentationCurrentContext API_AVAILABLE(ios(3.2)),
  6. UIModalPresentationCustom API_AVAILABLE(ios(7.0)),
  7. UIModalPresentationOverFullScreen API_AVAILABLE(ios(8.0)),
  8. UIModalPresentationOverCurrentContext API_AVAILABLE(ios(8.0)),
  9. UIModalPresentationPopover API_AVAILABLE(ios(8.0)) API_UNAVAILABLE(tvos),
  10. UIModalPresentationBlurOverFullScreen API_AVAILABLE(tvos(11.0)) API_UNAVAILABLE(ios) API_UNAVAILABLE(watchos),
  11. UIModalPresentationNone API_AVAILABLE(ios(7.0)) = -1,
  12. UIModalPresentationAutomatic API_AVAILABLE(ios(13.0)) = -2,
  13. };

是的,就是UIModalPresentationAutomatic,苹果居然直接将modalPresentationStyle默认值改成这个,有点不解,难道是怕我们不知道新加了这个交互?这个也完全违反了开闭原则吧?。

如何修改:
如果你完全接受苹果的这个默认效果,那就不需要去修改任何代码。
如果,你原来就比较细心,已经设置了modalPresentationStyle的值,那你也不会有这个影响。
对于想要找回原来默认交互的同学,直接设置如下即可:

  1. self.modalPresentationStyle = UIModalPresentationOverFullScreen;

注意:UIModalPresentationOverFullScreen*低支持iOS 8,如果你还要支持iOS 8以下版本,那么你可以用UIModalPresentationFullScreen,这个两个值的交互略有些细微差别,具体的可以自己看下效果。

3. MPMoviePlayerController 在iOS 13已经不能用了

在使用到MPMoviePlayerController的地方,直接抛了异常:

  1. ‘MPMoviePlayerController is no longer available. Use AVPlayerViewController in AVKit.

如何修改:
这个没啥好说的,既然不能再用了,那只能换掉了。替代方案就是AVKit里面的那套播放器。

4. iOS 13 DeviceToken有变化‼️

这个很重要⚠️
可能大多数使用第三方推送的童鞋都不会注意到这个问题,一般现在的第三方推送都是将DeviceToken原始数据丢进去,具体的解析都是第三方内部处理,所以,这些第三方解析DeviceToken的方式正确的话,那就毫无问题。如果你们是通过这种方式来获取DeviceToken,那你需要注意了。(这个坑也是多年前埋下的,很多文章介绍的也是下面这个方法,不规范的做法迟早要还的?),如下:

  1. NSString *dt = [deviceToken description];
  2. dt = [dt stringByReplacingOccurrencesOfString: @“<“ withString: @“”];
  3. dt = [dt stringByReplacingOccurrencesOfString: @“>” withString: @“”];
  4. dt = [dt stringByReplacingOccurrencesOfString: @” “ withString: @“”];

这段代码运行在 iOS 13 上已经无法获取到准确的DeviceToken字符串了,iOS 13 通过[deviceToken description]获取到的内容已经变了。

{length = 32, bytes = 0x778a7995 29f32fb6 74ba8167 b6bddb4e … b4d6b95f 65ac4587 }

可以看到,跟原来我们认识的那个已经完全不一样了。其实,造成这样的问题,主要还是没有使用正确的方式来操作,下面是解决办法:

  1. NSMutableString *deviceTokenString = [NSMutableString string];
  2. const char *bytes = deviceToken.bytes;
  3. NSInteger count = deviceToken.length;
  4. for (int i = 0; i < count; i++) {
  5. [deviceTokenString appendFormat:@”%02x”, bytes[i]&0x000000FF];
  6. }

或者你也可以使用*光提供的方法(2019年7月24日更新)

  1. (void)application:(UIApplication *)application didRegisterForRemoteNotificationsWithDeviceToken:(NSData *)deviceToken
  2. {
  3. if (![deviceToken isKindOfClass:[NSData class]]) return;
  4. const unsigned *tokenBytes = [deviceToken bytes];
  5. NSString *hexToken = [NSString stringWithFormat:@”%08x%08x%08x%08x%08x%08x%08x%08x”,
  6. ntohl(tokenBytes[0]), ntohl(tokenBytes[1]), ntohl(tokenBytes[2]),
  7. ntohl(tokenBytes[3]), ntohl(tokenBytes[4]), ntohl(tokenBytes[5]),
  8. ntohl(tokenBytes[6]), ntohl(tokenBytes[7])];
  9. NSLog(@“deviceToken:%@”,hexToken);
  10. }

5.Sign in with Apple (提供第三方登录的注意啦⚠️)

如果你的应用使用了第三方登录,那么你可能也需要加下 「Sign in with Apple」?

Sign In with Apple will be available for beta testing this summer. It will be required as an option for users in apps that support third-party sign-in when it is commercially available later this year.

怎么做呢?网上已经有很多demo了,此处就不展开啦。

6.即将废弃的 LaunchImage

从 iOS 8 的时候,苹果就引入了 LaunchScreen,我们可以设置 LaunchScreen来作为启动页。当然,现在你还可以使用LaunchImage来设置启动图。不过使用LaunchImage的话,要求我们必须提供各种屏幕尺寸的启动图,来适配各种设备,随着苹果设备尺寸越来越多,这种方式显然不够 Flexible。而使用 LaunchScreen的话,情况会变的很简单, LaunchScreen是支持AutoLayout+SizeClass的,所以适配各种屏幕都不在话下。
注意啦⚠️,从2020年4月开始,所有使⽤ iOS13 SDK的 App将必须提供 LaunchScreenLaunchImage即将退出历史舞台。

7. Dark Mode

Apps on iOS 13 are expected to support dark mode
Use system colors and materials
Create your own dynamic colors and images Leverage flexible infrastructure


私有KVC

iOS不允许valueForKeysetValue: forKey获取和设置私有属性,需要使用其它方式修改

如:

  1. [textField setValue:[UIColor red] forKeyPath:@“_placeholderLabel.textColor”];
  2. //替换为
  3. textField.attributedPlaceholder = [[NSAttributedString alloc] initWithString:@“输入”attributes:@{NSForegroundColorAttributeName: [UIColor red]}];

UISearchBar显示问题

TextField

升级到iOS13,UISearchController上的SearchBar显示异常,查看后发现对应的高度只有1px,目前没找到具体导致的原因,解决办法是使用KVO监听frame值变化后设置去应该显示的高度

黑线处理crash

之前为了处理搜索框的黑线问题会遍历后删除UISearchBarBackground,在iOS13会导致UI渲染失败crash;解决办法是设置UISearchBarBackground的layer.contents为nil

  1. public func clearBlackLine() {
  2. for view in self.subviews.last!.subviews {
  3. if view.isKind(of: NSClassFromString(“UISearchBarBackground”)!) {
  4. view.backgroundColor = UIColor.white
  5. view.layer.contents = nil
  6. break
  7. }
  8. }
  9. }

TabBar红点偏移

如果之前有通过TabBar上图片位置来设置红点位置,在iOS13上会发现显示位置都在*左边去了。遍历UITabBarButtonsubViews发现只有在TabBar选中状态下才能取到UITabBarSwappableImageView,解决办法是修改为通过UITabBarButton的位置来设置红点的frame

https://www.jianshu.com/p/4654f8f6e16e

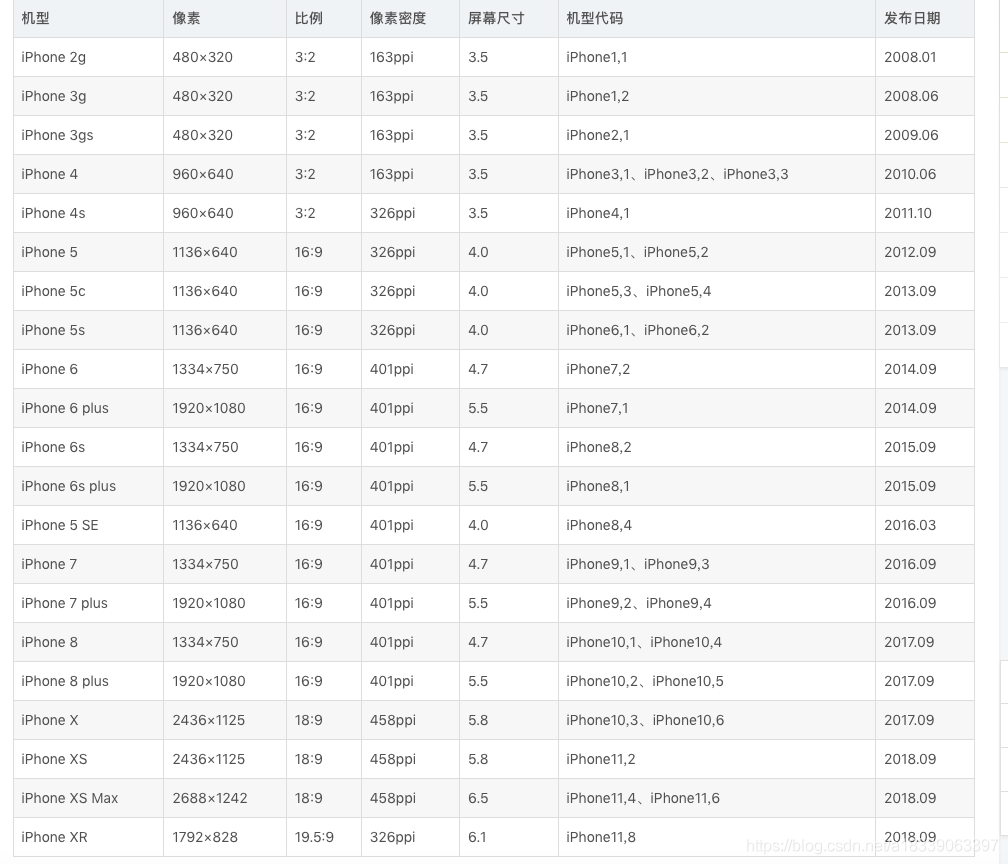
苹果手机各种尺寸详细表以及iPhoneX、iPhoneXS、iPhoneXR、iPhoneXSMax、iPhone 11、iPhone 12、屏幕适配

iPhone设备

物理分辨率是硬件所支持的,逻辑分辨率是软件可以达到的。

代数 设备 操作系统 逻辑分辨率(point) 物理分辨率(pixel) 屏幕尺寸(对角线长度) 缩放因子
iPhone
*代 iPhone 2G iOS 1 320 x 480 480 x 320 3.5寸 1x
第二代 iPhone 3 iOS 2 320 x 480 480 x 320 3.5寸 1x
第三代 iPhone 3GS iOS 3 320 x 480 480 x 320 3.5寸 1x
第四代 iPhone 4 iOS 4 320 x 480 960 × 640 3.5寸 2x
第五代 iPhone 4S iOS 5 320 x 480 960 × 640 3.5寸 2x
第六代 iPhone 5 iOS 6 320 x 568 1136 x 640 4.0寸 2x
第七代 iPhone 5S/5C iOS 7 320 x 568 1136 x 640 4.0寸 2x
第八代 iPhone 6 iOS 8 375 x 667 1334 x 750 4.7寸 2x
第八代 iPhone 6 Plus iOS 8 414 x 736 2208 x 1242 (1920×1080) 5.5寸 3x
第九代 iPhone 6S iOS 9 375 x 667 1334 x 750 4.7寸 2x
第九代 iPhone 6S Plus iOS 9 414 x 736 2208 x 1242 (1920×1080) 5.5寸 3x
iPhone SE iOS 9 320 x 568 1136 x 640 4寸 2x
第十代 iPhone 7 iOS 10 375 x 667 1334 x 750 4.7寸 2x
第十代 iPhone 7 Plus iOS 10 414 x 736 2208 x 1242 (1920×1080) 5.5寸 3x
第十一代 iPhone 8 iOS 11 375 x 667 1334 x 750 4.7寸 2x
第十一代 iPhone 8 Plus iOS 11 414 x 736 2208 x 1242 (1920×1080) 5.5寸 3x
第十一代 iPhone X iOS 11 375 x 812 2436 × 1125 5.8寸 3x
第十二代 Phone Xʀ iOS 12 414 x 896  1792 × 828 6.1寸 2x
第十二代 iPhone Xs iOS 12 375 x 812 2436 × 1125 5.8寸 3x
第十二代 iPhone Xs Max iOS 12 414 x 896 2688 × 1242 6.5寸 3x
第十三代  iPhone 11 iOS 13 414 x 896 1792 × 828 6.1寸 2x
第十三代 iPhone 11 Pro iOS 13 375 x 812 2436 × 1125 5.8寸 3x
第十三代 iPhone 11 Pro Max iOS 13 414 x 896 2688 × 1242  6.5寸 3x
 iPhone SE(二代) iOS 13 375 x 667 1334 x 750 4.7寸 2x
第十四代  iPhone 12 mini iOS 14 375 x 812 2340 × 1080 5.4寸 3x
第十四代 iPhone 12 iOS 14 390 x 844 2532 × 1170 6.1寸 3x
第十四代  iPhone 12 Pro iOS 14 390 x 844 2532 × 1170 6.1寸 3x
第十四代 iPhone 12 Pro Max iOS 14 428 x 926 2778 × 1284 6.7寸 3x

苹果所有设备屏幕尺寸

手机型号 尺寸(对角线) 物理点 宽长比例 像素点 倍数 状态栏高度 底部安全距离 导航栏高度 tabbar高度
iPhone 4/4S 3.5英寸 320×480 0.667 640×960 @2x 20 44 49
iPhone 5/5S/5C 4英寸 320×568 0.563 640×1136 @2x 20 44 49
iPhone SE 4英寸 320×568 0.563 640×1136 @2x 20 44 49
iPhone 6 4.7英寸 375×667 0.562 750×1334 @2x 20 44 49
iPhone 6 Plus 5.5英寸 414×736 0.563 1242×2208 @3x 20 44 49
iPhone 6S 4.7英寸 375×667 0.562 750×1334 @2x 20 44 49
iPhone 6S Plus 5.5英寸 414×736 0.563 1242×2208 @3x 20 44 49
iPhone 7 4.7英寸 375×667 0.562 750×1334 @2x 20 44 49
iPhone 7 Plus 5.5英寸 414×736 0.563 1242×2208 @3x 20 44 49
iPhone 8 4.7英寸 375×667 0.562 750×1334 @2x 20 44 49
iPhone 8 Plus 5.5英寸 414×736 0.563 1242×2208 @3x 20 44 49
iPhone X 5.8英寸 375×812 0.462 1125×2436 @3x 44 34 44 83
iPhone XS 5.8英寸 375×812 0.462 1125×2436 @3x 44 34 44 83
iPhone XS Max 6.5英寸 414×896 0.462 1242×2688 @3x 44 34 44 83
iPhone XR 6.1英寸 414×896 0.462 828×1792 @2x 44 34 44 83
iPhone 11 6.1英寸 414×896 0.462 828×1792 @2x 44 34 44 83
iPhone 11 Pro 5.8英寸 375×812 0.462 1125×2436 @3x 44 34 44 83
iPhone 11 Pro Max 6.5英寸 414×896 0.462 1242×2688 @3x 44 34 44 83


如图所示:

这里写图片描述

Tips:

机型 屏幕宽高比
iPhone 5 320÷568=0.563
iPhone 6 375÷667=0.562
iPhone 6 Plus 414÷736=0.5625

*终发现iPhone5和6一个小秘密,它们的比例是不变的


iPod设备

设备 操作系统 物理分辨率(pixel) 屏幕尺寸(对角线长度) 缩放因子
iPod Touch 1 iOS 1 480 x 320 3.5寸 1x
iPod Touch 2 iOS 2 480 x 320 3.5寸 1x
iPod Touch 3 iOS 3 480 x 320 3.5寸 1x
iPod Touch 4 iOS 4 960 x 640 3.5寸 2x
iPod Touch 5 iOS 6 1136 x 640 4.0寸 2x
iPod Touch 6 iOS 8 1136 x 640 4.0寸 2x

iPad设备

设备 操作系统 物理分辨率(pixel) 屏幕尺寸(对角线长度) 缩放因子
iPad 1 iOS 3 1024 x 768 9.7寸 1x
iPad 2 iOS 4 1024 x 768 9.7寸 1x
iPad 3 (The New iPad) iOS 5 2048 x 1536 9.7寸 2x
iPad 4 iOS 6 2048 x 1536 9.7寸 2x
iPad Air iOS 7 2048 x 1536 9.7寸 2x
iPad Air 2 iOS 8 2048 x 1536 9.7寸 2x
iPad Pro iOS 9 2048 x 1536 9.7寸 2x
iPad (第五代) iOS 10 2048 x 1536 9.7寸 2x
iPad Pro iOS 9 2732 x 2048 12.9寸 3x
iPad Pro (取代9.7寸) iOS 10 2224 x 1668 10.5寸 3x
iPad mini iOS 6 1024 x 768 7.9寸 1x
iPad mini 2 iOS 7 2048 x 1536 7.9寸 2x
iPad mini 3 iOS 8 2048 x 1536 7.9寸 2x
iPad mini 4 iOS 9 2048 x 1536 7.9寸 2x

所有设备型号官网地址:https://www.theiphonewiki.com/wiki/Models

%title插图%num


//获得屏幕的宽高
#define kScreenWidth ([UIScreen mainScreen].bounds.size.width)
#define kScreenHeight ([UIScreen mainScreen].bounds.size.height)
//iPhoneX / iPhoneXS
#define  isIphoneX_XS     (kScreenWidth == 375.f && kScreenHeight == 812.f ? YES : NO)
//iPhoneXR / iPhoneXSMax
#define  isIphoneXR_XSMax    (kScreenWidth == 414.f && kScreenHeight == 896.f ? YES : NO)
//异性全面屏
#define   isFullScreen    (isIphoneX_XS || isIphoneXR_XSMax)

// Status bar height.
#define  StatusBarHeight     (isFullScreen ? 44.f : 20.f)

// Navigation bar height.
#define  NavigationBarHeight  44.f

// Tabbar height.
#define  TabbarHeight         (isFullScreen ? (49.f+34.f) : 49.f)

// Tabbar safe bottom margin.
#define  TabbarSafeBottomMargin         (isFullScreen ? 34.f : 0.f)

// Status bar & navigation bar height.
#define  StatusBarAndNavigationBarHeight  (isFullScreen ? 88.f : 64.f)

友情链接: SITEMAP | 旋风加速器官网 | 旋风软件中心 | textarea | 黑洞加速器 | jiaohess | 老王加速器 | 烧饼哥加速器 | 小蓝鸟 | tiktok加速器 | 旋风加速度器 | 旋风加速 | quickq加速器 | 飞驰加速器 | 飞鸟加速器 | 狗急加速器 | hammer加速器 | trafficace | 原子加速器 | 葫芦加速器 | 麦旋风 | 油管加速器 | anycastly | INS加速器 | INS加速器免费版 | 免费vqn加速外网 | 旋风加速器 | 快橙加速器 | 啊哈加速器 | 迷雾通 | 优途加速器 | 海外播 | 坚果加速器 | 海外vqn加速 | 蘑菇加速器 | 毛豆加速器 | 接码平台 | 接码S | 西柚加速器 | 快柠檬加速器 | 黑洞加速 | falemon | 快橙加速器 | anycast加速器 | ibaidu | moneytreeblog | 坚果加速器 | 派币加速器 | 飞鸟加速器 | 毛豆APP | PIKPAK | 安卓vqn免费 | 一元机场加速器 | 一元机场 | 老王加速器 | 黑洞加速器 | 白石山 | 小牛加速器 | 黑洞加速 | 迷雾通官网 | 迷雾通 | 迷雾通加速器 | 十大免费加速神器 | 猎豹加速器 | 蚂蚁加速器 | 坚果加速器 | 黑洞加速 | 银河加速器 | 猎豹加速器 | 海鸥加速器 | 芒果加速器 | 小牛加速器 | 极光加速器 | 黑洞加速 | movabletype中文网 | 猎豹加速器官网 | 烧饼哥加速器官网 | 旋风加速器度器 | 哔咔漫画 | PicACG | 雷霆加速