BFS和DFS代码实现

BFS和DFS代码实现

BFS DFS实现图的遍历
以以下图数据为例:

%title插图%num

首先BFS是广度优先遍历算法,从图的某一个节点出发,然后遍历完这个节点相邻的节点。这个算法的核心就是,先把周围的找完,再去找更深的地方。通俗易懂的说法:DFS就是一条路走到底,发现没路了,返回来,走另一条路。BFS就是每条路都走一点,走一点点后就走另一条路了。
在BFS遍历的时候,需要用队列将遍历的这个节点的相邻节点添加到队列中去,然后取队首,将这个节点相邻的节点加到队列中(未在队列中的),重复上述步骤。
以上面的图为例,假定我们先将A节点加入队列中,然后A节点出队列,与A节点相邻的B、C节点依次入队列,然后B节点出队列,与B节点相邻的C、D节点依次入队列…
*终我们得到的出队列的顺序为:A B C D E F,此答案不唯一,比如在A出队列后,可以先将B加入队列,然后是C,那么结果可能是A C B D E F,注意:*对不可能是A B C E D F,因为B和E不相邻。
根据以上思路,我们用Python代码实现BFS如下:

def DFS(graph, s):
queue = []
queue.append(s) # 向list添加元素,用append()
seen = set() # 此处为set, python里set用的是hash table, 搜索时比数组要快。
seen.add(s) # 向set添加函数,用add()
while (len(queue) > 0):
vertex = queue.pop(0) # 弹出*后一个元素
nodes = graph[vertex]
for w in nodes:
if w not in seen:
queue.append(w)
seen.add(w)
print(vertex)
graph = {
“A”:[“B”,”C”],
“B”:[“A”,”C”,”D”],
“C”:[“A”,”B”,”D”,”E”],
“D”:[“B”,”C”,”E”,”F”],
“E”:[“C”,”D”],
“F”:[“D”]
}
DFS(graph, ‘A’)

C++代码如下:

#include <bits/stdc++.h>
using namespace std;
queue<char> q;
bool a[200];
void BFS(vector<char> vi[],char root)
{
q.push(root);
while(!q.empty())
{
char c = q.front();
q.pop();
cout << c << ” “;
a[(int)c] = 1;
for(int i=0; i<vi[c].size(); i++)
{
if(a[(int)vi[c][i]]==0)
{
q.push(vi[c][i]);
a[(int)vi[c][i]] = 1;
}
}
}
}
int main(void)
{
vector<char> vi[100];
vi[‘A’].push_back(‘B’);
vi[‘A’].push_back(‘C’);
vi[‘B’].push_back(‘A’);
vi[‘B’].push_back(‘C’);
vi[‘B’].push_back(‘D’);
vi[‘C’].push_back(‘A’);
vi[‘C’].push_back(‘B’);
vi[‘C’].push_back(‘D’);
vi[‘C’].push_back(‘E’);
vi[‘D’].push_back(‘B’);
vi[‘D’].push_back(‘C’);
vi[‘D’].push_back(‘E’);
vi[‘D’].push_back(‘F’);
vi[‘E’].push_back(‘C’);
vi[‘E’].push_back(‘D’);
vi[‘F’].push_back(‘D’);
BFS(vi, ‘E’);
}

DFS和BFS的唯一不同就是把队列换成栈

Python篇-简易邮箱

Python篇-简易邮箱

python编写简易邮箱
打开邮箱的IMAP/SMTP服务
1、进入qq邮箱账户设置页面

%title插图%num

2、找到服务,打开服务

%title插图%num

3、复制下授权码(编程时需要)

%title插图%num
代码实现
”’
发送邮件
”’
import tkinter
import smtplib
from email.mime.text import MIMEText

class SendMail:
# 初始化画窗口
def __init__(self):
# 创建窗口对象
windows = tkinter.Tk()
# 设置标题
windows.title(“邮件发送”)
# 设置大小
windows.geometry(“500×300″)
# 设置窗口大小不可变
windows.resizable(width=False, height=False)

# 创建文本标签
text_title = tkinter.Label(windows, text=”\n\n邮件主题”)
# 展示文本标签
text_title.pack()
self.ed_sendTitle = tkinter.Entry(windows, width=”50″)
self.ed_sendTitle.pack();

text_msg = tkinter.Label(windows, text=”邮件正文”)
text_msg.pack()
self.ed_sendMsg = tkinter.Entry(windows, width=”50″)
self.ed_sendMsg.pack();

text_sendName = tkinter.Label(windows, text=”发件人昵称”)
text_sendName.pack()
self.ed_sendName = tkinter.Entry(windows, width=”50″)
self.ed_sendName.pack();

text_toUserName = tkinter.Label(windows, text=”收件人邮箱”)
text_toUserName.pack()
self.ed_toUserName = tkinter.Entry(windows, width=”50″)
self.ed_toUserName.pack();

btn = tkinter.Button(windows, text=”发送”, command=self.sendMsg)
btn.pack()

# 显示窗口
windows.mainloop()

def sendMsg(self):
#发送邮件
#标题
title = self.ed_sendTitle.get()
# 正文
text = self.ed_sendMsg.get()
# 发件人
sendName = self.ed_sendName.get()
sendUserName = “[email protected]
sendCode = “usdtkujdfdfeehdc”
#[email protected]
# 收件人邮箱
toUserName = self.ed_toUserName.get()
”’
1、封装邮件
”’
msg = MIMEText(text)
msg[“subject”] = title
msg[“from”] = sendName
”’
2、登录邮箱
”’
email = smtplib.SMTP(“smtp.qq.com”, 25)
email.login(sendUserName, sendCode)
”’
3、发送邮件
”’
email.sendmail(sendUserName, toUserName, msg=msg.as_string())
”’
4、退出邮箱
”’
email.quit()

if __name__ == ‘__main__’:
sendMail = SendMail()

运行效果

%title插图%num

IOS 学习总结之动画

  1. UIView的,翻转、旋转,偏移,翻页,缩放,取反的动画效果
  2. 翻转的动画
  3. //开始动画
  4. [UIView beginAnimations:@”doflip” context:nil];
  5. //设置时常
  6. [UIView setAnimationDuration:1];
  7. //设置动画淡入淡出
  8. [UIView setAnimationCurve:UIViewAnimationCurveEaseInOut];
  9. //设置代理
  10. [UIView setAnimationDelegate:self];
  11. //设置翻转方向
  12. [UIView setAnimationTransition:
  13. UIViewAnimationTransitionFlipFromLeft forView:manImageView cache:YES];
  14. //动画结束
  15. [UIView commitAnimations];
  16. 旋转动画
  17. 创建一个CGAffineTransform transform对象
  18. CGAffineTransform transform;
  19. //设置旋转度数
  20. transform = CGAffineTransformRotate(manImageView.transform,M_PI/6.0);
  21. //动画开始
  22. [UIView beginAnimations:@”rotate” context:nil ];
  23. //动画时常
  24. [UIView setAnimationDuration:2];
  25. //添加代理
  26. [UIView setAnimationDelegate:self];
  27. //获取transform的值
  28. [manImageView setTransform:transform];
  29. //关闭动画
  30. [UIView commitAnimations];
  31. 偏移动画
  32. [UIView beginAnimations:@”move” context:nil];
  33. [UIView setAnimationDuration:2];
  34. [UIView setAnimationDelegate:self];
  35. //改变它的frame的x,y的值
  36. manImageView.frame=CGRectMake(100,100, 120,100);
  37. [UIView commitAnimations];
  38. 翻页动画
  39. [UIView beginAnimations:@”curlUp” context:nil];
  40. [UIView setAnimationCurve:UIViewAnimationCurveEaseInOut];//指定动画曲线类型,该枚举是默认的,线性的是匀速的
  41. //设置动画时常
  42. [UIView setAnimationDuration:1];
  43. [UIView setAnimationDelegate:self];
  44. //设置翻页的方向
  45. [UIView setAnimationTransition:UIViewAnimationTransitionCurlUp forView:manImageView cache:YES];
  46. //关闭动画
  47. [UIView commitAnimations];
  48. 缩放动画
  49. CGAffineTransform transform;
  50. transform = CGAffineTransformScale(manImageView.transform,1.2,1.2);
  51. [UIView beginAnimations:@”scale” context:nil];
  52. [UIView setAnimationDuration:2];
  53. [UIView setAnimationDelegate:self];
  54. [manImageView setTransform:transform];
  55. [UIView commitAnimations];
  56. 取反的动画效果是根据当前的动画取他的相反的动画
  57. CGAffineTransform transform;
  58. transform=CGAffineTransformInvert(manImageView.transform);
  59. [UIView beginAnimations:@”Invert” context:nil];
  60. [UIView setAnimationDuration:2];//动画时常
  61. [UIView setAnimationDelegate:self];
  62. [manImageView setTransform:transform];//获取改变后的view的transform
  63. [UIView commitAnimations];//关闭动画

zxing 二维码扫描 配置和使用

二维码扫描使用*多的主要有两个库:zbarSDK 和zxing

关于zbar的使用比较简单,在这里不多说了,对于zxing的使用就比较麻烦,虽然网上有很多关于zxing的使用方法,不过查了很多中文和英文的贴子。发现说的都不够详细,对与像我这样*次搞的新手来说差一步就错了很多!

现在根据自己项目中使用的情况,详细具体的总结一下如何将ZXing集成到已有的iOS工程中

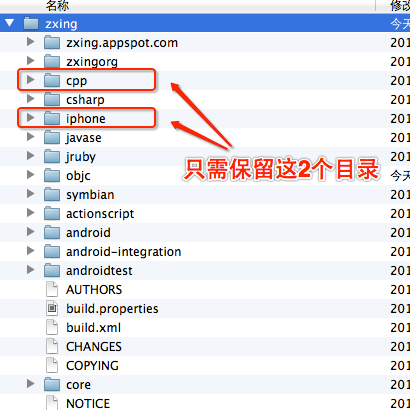
*步:首先去Google Code或Github将ZXing的代码下载下来(ZXing(Github镜像地址)),整个工程比较大,我们只需要其中涉及iOS的部分,所以*好做一些裁剪。简单来说,我们只需要保留cpp和iphone这2个文件夹,其余的全部删掉。如下图所示:

%title插图%num

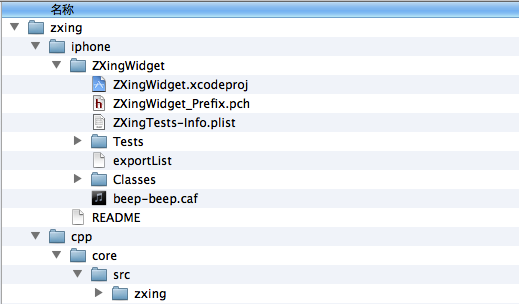
第二步:裁剪,对于cpp这个目录,只保留cpp/core/src/zxing下面的内容,其余内容也可以删掉了。同样对iphone这个目录只需要保存 iphone/ZXingWidget/下面的内容,但是整个目录结构必须保持原样。裁剪完后,整个目录结构如下所示:

%title插图%num

第三步:首先将修该后的zxing上面的开发包(即上面修改后的zxing文件夹),拷贝到你的项目根文件夹下面;

添加文件到你的工程中,选择“Add filesto…”,在弹出的框中,找到:你的项目文件夹/zxing/iphone/ZXingWidget下面的ZXingWidget.xcodeproj,选择”ZXingWidget.xcodeproj”,在添加前,请先运行该项目,进行编译,如果成功,再进行此步添加!

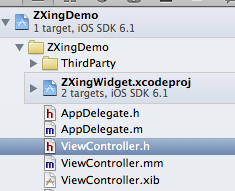
添加成功后项目结构如下图:

%title插图%num

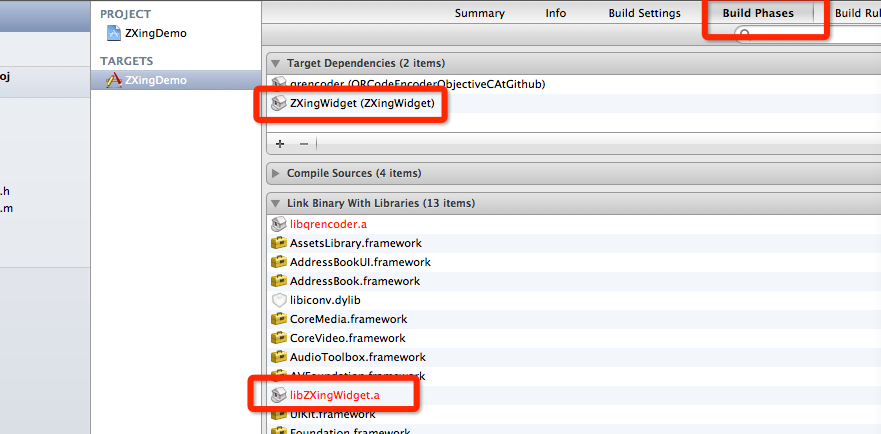
第四步:选择你的项目–TARGETS–Build Phases—Target Dependencies—-然后点击”+”添加“ZXingWidget”。添加后如下图:

%title插图%num
第五步:

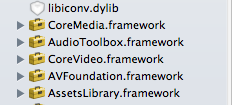
同样,添加frameWorks.方法:Build Phases—Target Dependencies—-”Link Binary With Libraries”—点击”+”。添加如下几项:

libZXingWidget.a

AddressBook

AddressBookUI

AudioToolbox

AVFoundation

CoreMedia

CoreVideo

libiconv.dylib

完成后如下图:

%title插图%num

第六步:后一步,在设置中增加如下2个header search path:

1. BuildSettings — 2.搜索”header search paths” — 3.双击”HeaderSearch Paths”

/zxing/iphone/ZXingWidget/Classes
./zxing/cpp/core/src
需要注意的是,*个path要设置成循环查找子目录,而第二个不循环查找,如下图所示:

%title插图%num

完成这一步,就已经完成了ZXing库的集成工作,(如果不做修改的话,zxing暂时只能识别二维码,不能识别条形码)

在这里编译工程,应该能成功,不会报错,如果有报错信息等,看看是否是少添加了库,Header Search Paths中的路径是否正确;


在项目中引用

首先将你使用ZXingWidgetController的文件的后缀该为.mm, 例如:我在MyZxingViewController.m改为:MyZxingViewController.mm否则在使用的时候会报:xxx filenot found的类似的问题

同时你必须将 #import<ZXingWidgetController.h>添加到你的.h文件中将

#import <QRCodeReader.h>

#import <MultiFormatOneDReader.h>添加到.mm文件中,否则也会报iostream file not found类似的问题


MyZxingViewController文件夹中引用

.h

#import <UIKit/UIKit.h>

#import “ZXingWidgetController.h”

//#import “QRCodeReader.h”//这个引用在.h文件中为出错:iostream file not found

@interface Contact : UIViewController <ZXingDelegate>{

UITextView *resultsView;

NSString *resultsToDisplay;

}

@property (retain, nonatomic) IBOutlet UITextView *resultsView;

@property (nonatomic, copy) NSString *resultsToDisplay;

– (IBAction)scanPressed:(id)sender;

@end


具体用法可以参考ZXing(Github镜像地址)中的例子


修改zxing 使其能扫描条形码

例子中的代码确实只能做二维码的识别, 不能做条形码的扫描。 研究了一下又在网上找了一下,  结果发现稍做修改,还是可以让ZXing支持条形码和二维码的同时识别的, 代码稍侯就贴出来。本人亲自试过,确实可行。

总结地来说, ZBar使用起来比ZXing相对方便一点, 也就是更像是 卡片机与单反相机的区别。但如果需要修改代码的话,做一些自定义什么的,建议使用ZXing, 如果只是想随便用用的话, 建议使用ZBar.

好,话不多说, 下面说说如何使ZXing改改后可以支持扫条形码。

1.在- (IBAction)scanPressed:(id)sender方法中:
ZXingWidgetController*widController = [[ZXingWidgetControlleralloc] initWithDelegate:selfshowCancel:YESOneDMode:YES];
MultiFormatOneDReader*OneReaders=[[MultiFormatOneDReader alloc]init];
QRCodeReader* qrcodeReader = [[QRCodeReader alloc] init];
NSSet*readers = [[NSSet alloc] initWithObjects:OneReaders,qrcodeReader,nil];
[qrcodeReader release];[OneReaders release];
2.在ZXingWidgetController.m的(void)captureOutput:(AVCaptureOutput *)captureOutput :方法中,注释掉以下方法
if(oneDMode) {

// let’s just give the decoder a vertical band right above the red line

cropRect.origin.x = cropRect.origin.x + (cropRect.size.width / 2) – (ONE_D_BAND_HEIGHT + 1);

cropRect.size.width = ONE_D_BAND_HEIGHT;

// do a rotate

CGImageRef croppedImg = CGImageCreateWithImageInRect(capture, cropRect);

capture = [selfCGImageRotated90:croppedImg];

capture = [selfCGImageRotated180:capture];

//              UIImageWriteToSavedPhotosAlbum([UIImage imageWithCGImage:capture], nil, nil, nil);

CGImageRelease(croppedImg);

cropRect.origin.x = 0.0;

cropRect.origin.y = 0.0;

cropRect.size.width = CGImageGetWidth(capture);

cropRect.size.height = CGImageGetHeight(capture);

}


3. 将上面注释掉的代码向下数大概约20行处的代码:UIImage *scrn = [[UIImage alloc] initWithCGImage:newImage]; 改为:int backCameraImageOrientation = UIImageOrientationRight; UIImage *scrn = [[UIImage alloc] initWithCGImage:newImage scale: (CGFloat)1.0 orientation:backCameraImageOrientation];

4. 在OverlayView.m注释代码以下代码:

self.oneDMode = isOneDModeEnabled;
然后运行 , 会发现可扫条形码了 ,   还可以同时扫二维码了

用Python对文件夹中的文件重新排序命名

用Python对文件夹中的文件重新排序命名

利用Python对文件重新排序命名
在小伙伴们儿开始运行某一段算法的时候,往往需要对数据进行预处理,然而其中*常见的处理方式之一就是对文件的批量重命名。逻辑很简单、思路也很清晰,可是有的时候就是想不起来该从何下手。

解放小白双手,让python带你遨游。

老规矩 直接肝代码
// rename
import os
path = “F:/data/save2”
filelist = os.listdir(path) //读取文件内容
count=1
for file in filelist: //遍历文件
print(file)
for file in filelist:
Olddir=os.path.join(path,file)
if os.path.isdir(Olddir):
continue
filename=os.path.splitext(file)[0]
filetype=os.path.splitext(file)[1]
Newdir=os.path.join(path,str(count).zfill(6)+filetype)
//zfill(6):表示命名为6位数
os.rename(Olddir,Newdir)

count+=1

打印出原始文件名

%title插图%num
重命名之后的结果

%title插图%num

Opencv二维直方图

Opencv二维直方图

文章目录
1 理论
2 二维直方图
3 绘制二维直方图
1 理论
一维直方图中,仅考虑像素的灰度强度值;二维直方图中,则需要考虑像素的色相和饱和度值。

2 二维直方图
cv.calcHist():对于颜色直方图,需要将图像从RGB转换为HSV,且参数如下:
1)channel = [0, 1]:需要同时处理H和S平面;
2)bins = [182, 256]:分别对应于H、S平面;
3)range = [0, 180, 0, 256]:分别对应于色相值、饱和度。

import cv2 as cv

img = cv.imread(“1.jpg”)
hsv = cv.cvtColor(img, cv.COLOR_BGR2HSV)
hist = cv.calcHist([hsv], [0, 1], None, [180, 256], [0, 180, 0, 256])
print(hist)

3 绘制二维直方图
1)cv.imshow():绘制一张灰度图,除非知道不同颜色的色相值。

import cv2 as cv

img = cv.imread(“1.jpg”)
hsv = cv.cvtColor(img, cv.COLOR_BGR2HSV)
hist = cv.calcHist([hsv], [0, 1], None, [180, 256], [0, 180, 0, 256])
cv.imshow(“”, hist)
cv.waitKey()

2)matplotlib.pyplot.imshow():

import cv2 as cv
import matplotlib.pyplot as plt

img = cv.imread(“miao.png”)
hsv = cv.cvtColor(img, cv.COLOR_BGR2HSV)
hist = cv.calcHist([hsv], [0, 1], None, [180, 256], [0, 180, 0, 256])
plt.imshow(hist, interpolation=”nearest”)
plt.show()

输出如下:

%title插图%num
参考文献:
【1】Opencv中文文档;

ZXing 二维码 For IOS 配置以及使用

ZXing(Github镜像地址)是一个开源的条码生成和扫描库(开源协议为Apache2.0)。它不但支持众多的条码格式,而且有各种语言的实现版本,它支持的语言包括:Java, C++, C#, Objective-C, ActionScript和Ruby。

ZBar一般都是直接使用现成的静态库就好了,除非自己要自定义一些功能。zxing也可以但是要包含好多 头文件,还是直接引用工程方便。
下面是具体步骤:
 1.在github 下载zxing开源的代码https://github.com/zxing/zxing。
2.我们保留我们需要的cpp和iphone这2个文件夹,其余的全部删掉。如下图所示
%title插图%num
%title插图%num
3.对于cpp这个目录,只保留cpp/core/src/zxing下面的内容,其余内容也可以删掉了。但是整个目录结构必须保持原样。裁剪完后,整个目录结构如下所示:
%title插图%num
%title插图%num
4.接下来,我们把裁剪后的zxing目录整个移动到你自己的项目的根目录下,并且把上图中可以看到的ZXingWidget.xcodeproj文件拖动到你的iOS工程中。

%title插图%num%title插图%num

二:

%title插图%num%title插图%num

5.我们需要设置ZXing项目和我们原本的iOS项目之间的依赖关系。在我们的iOS项目的设置中,点击build phases tab,然后增加 Target Dependencies 和 Link binary,并且增加这些framework依赖:

完成之后如下图:

%title插图%num%title插图%num

二:

%title插图%num%title插图%num

*后一步,在设置中增加如下2个header search path:


./zxing/iphone/ZXingWidget/Classes

./zxing/cpp/core/src

需要注意的是,*个path要设置成循环查找子目录,而第二个不循环查找,如下图所示:

%title插图%num

注意:我在使用中遇到了一些问题,主要是编译的问题。


1.一个是找不到 头文件。解决方法:把用到ZXing的源文件扩展名由.m改成.mm。

2.报错:Undefined symbols for architecture armv7s,解决方法:把ZXingWidget的一个build target参数:”Build Active Architecture Only” 修改成 “NO”.

%title插图%num%title插图%num

3.报错:No such file or directory,出现该错误可能是你的Header Search Path写错了,或者就是你的zxing库的目录结构不是我上面强调的,好好检查一下吧。

4.如果遇到下面问题:

std::allocator<char> const&)", referenced from:  
  
(null): "std::string::append(std::string const&)", referenced from:  
  
(null): "std::__throw_out_of_range(char const*)", referenced from:  
  
(null): "std::ios_base::Init::Init()", referenced from:  
  
(null): "std::basic_string<char, std::char_traits<char>, std::allocator<char> >::basic_string(std::string const&)", referenced from:  
  
(null): "std::basic_ostringstream<char, std::char_traits<char>, std::allocator<char> >::~basic_ostringstream()", referenced from:  
  
(null): "std::string::append(unsigned long, char)", referenced from:  
  
(null): "std::string::_M_leak_hard()", referenced from:  
  
(null): "std::basic_stringbuf<char, std::char_traits<char>, std::allocator<char> >::str() const", referenced from:  
  
(null): "std::string::erase(unsigned long, unsigned long)", referenced from:
(null): Linker command failed with exit code 1 (use -v to see invocation)


就是C++编译器的设置问题

在Build Settings里我们设置一下:

%title插图%num%title插图%num

这样就ok了。

如果再提示

Undefined symbols for architecture arm64:
  "_OBJC_CLASS_$_QRCodeReader", referenced from:
      objc-class-ref in ViewController.o
  "_OBJC_CLASS_$_ZXingWidgetController", referenced from:
      objc-class-ref in ViewController.o
ld: symbol(s) not found for architecture arm64
clang: error: linker command failed with exit code 1 (use -v to see invocation)

那是zxing不支持*新的arm64架构,改两个地方

1.选armv7和armv7s

%title插图%num

2.删除arm64

%title插图%num


如果要加入生成二维码的功能,从下面的链接下载Zxing Demo

http://code4app.com/ios/ZXing-Demo/515561f76803fa5e77000002


1.首先把ThirdParty这个文件夹拖到自己的工程里面来,注意是跟main.n在同一级目录,如下图

%title插图%num

注意QRCodeEncoderObjectiveCAtGithub.xcodeproj的targets

%title插图%num

在项目的targets里面加入这两个

%title插图%num

下面这个要注意,ZXingDemo是示例工程名,这里要改成自己项目的名称。

%title插图%num

自动更新表统计信息

自动更新表统计信息

#author yw_shan
import os,sys
import subprocess
import re
import time
import threading
import argparse
import testlog
if sys.version.startswith(‘2.7’):
import Queue
else:
import queue

class updateStatis(object):
def __init__(self,host,user,pwd):
self.host=host
self.user=user
self.pwd=pwd

def get_dbconn(self):
# traf=”trafci.sh -h {} -u {} -p {} -q ” .format(self.host,self.user,self.pwd)
traf=”trafci.sh -h {} -u {} -p {} -q ” .format(num.host,num.user,num.password)
return traf

def get_tab(self):
gettab=[]
with open(‘./conf/tab_loop_test.conf’,’r’) as f:
trss_sql=f.readlines()
trss_sqls = ”.join(trss_sql)
tab = re.split(r’,|\n’, trss_sqls)
for tabs1 in tab:
if tabs1 is None or tabs1 == ” or tabs1.startswith(‘#’) or tabs1 ==”:
continue
tabss = tabs1.strip().replace(‘”‘, ”).replace(‘,’, ”)
gettab.append(tabss)
return gettab

def get_sql(self,pp,conn,tabs):
try:
for tabs1 in tabs:
sql='”update statistics for table {} on every key sample”‘ .format(tabs1)
esql=conn+sql
q.put(esql)
log.logger.info(pp+”–>”+esql)
q.task_done()
except Exception as e:
log.logger.error(“get_sql–>” + e)

def exec_sql(self,cc):
try:
flag=3
while 1:
if not q.empty():
gesql=q.get()
# print(“{}==>{}” .format(cc,gesql))
log.logger.info(cc+”==>”+gesql)
sp_out = subprocess.Popen(gesql, shell=True, stdout=subprocess.PIPE).communicate()[0]
log.logger.info(sp_out)
q.join()
if ‘ ERROR[‘ in sp_out:
log.logger.error(gesql)
rq = time.strftime(“%Y%m%d%H%M”, time.localtime())
with open(‘./logs/failUpdateSql.log’, ‘a+’) as f2:
f2.write(str(rq)+’ — ‘+str(gesql)+’\n’)
else:
flag=flag-1
if flag>=0:
continue
if flag<0:
break
except Exception as e:
log.logger.error(“exec_sql–>”+e)

def parser(self):
parser=argparse.ArgumentParser(prog=’update_statis.py’,description=’Function: update table statistics’)
parser.add_argument(‘-t’,’–thread’,type=int,default=2,help=’set the parallel number of threads’)
parser.add_argument(‘-H’, ‘–host’, type=str, default=”, help=’set host ip address’)
parser.add_argument(‘-u’, ‘–user’, type=str,default=”, help=’set user’)
parser.add_argument(‘-p’, ‘–password’, type=str,default=”, help=’set password’)
parser.add_argument(‘-q’, ‘–queue’, type=int, default=3, help=’set the parallel number of queue’)
arg=parser.parse_args()
return arg

def logs(self):
su=’statUpdate.log’
fsu=’failUpdateSql.log’
rq = time.strftime(“%Y%m%d%H%M”, time.localtime())
if not os.path.exists(‘logs’):
os.mkdir(‘./logs’)
os.chdir(os.path.join(os.getcwd(), ‘logs’))
if os.path.exists(su):
os.rename(su,su+’.’+rq)
if os.path.exists(fsu):
os.rename(fsu,fsu+’.’+rq)
os.chdir(os.path.dirname(os.getcwd()))

def main(self):
try:
thrp = threading.Thread(target=us.get_sql, args=(‘procdure’, conn, tab,))
thrp.start()
for i in range(int(num.thread)):
ct=threading.Thread(target=us.exec_sql, args=(‘custmer-%d’ % i,))
log.logger.info(ct)
ct.start()
for i in range(int(num.thread)):
ct.join()
log.logger.info(“run complete,waiting exit……”)
except Exception as e:
log.logger.error(“–main()–“+e)

import logging
from logging import handlers

class Logger(object):
level_relations = {
‘debug’:logging.DEBUG,
‘info’:logging.INFO,
‘warning’:logging.WARNING,
‘error’:logging.ERROR,
‘crit’:logging.CRITICAL
}

def __init__(self,filename,level=’info’,when=’D’,backCount=7,fmt=’%(asctime)s – %(filename)s[line:%(lineno)d] – %(levelname)s: %(message)s’):
self.logger = logging.getLogger(filename)
format_str = logging.Formatter(fmt)
self.logger.setLevel(self.level_relations.get(level))
sh = logging.StreamHandler()
sh.setFormatter(format_str)
th = handlers.TimedRotatingFileHandler(filename=filename,when=when,backupCount=backCount,encoding=’utf-8′)
th.setFormatter(format_str)
self.logger.addHandler(sh)
self.logger.addHandler(th)

执行效果

%title插图%num
执行效果

%title插图%num

云服务器上Wamp搭建网站

说明:想要在云服务器搭建网站,且需要被外网访问浏览的苦逼程序员可以参考本文。前提是你已经购买好了服务器以及公网IP。

近一个月买了3次服务器,使用wamp搭建了3次网站了。本以为*后一次会轻车熟路,但是东搞西搞还是花了1个多小时。看来还是要把一些关键的东西记录下来,不然隔久了真的会忘记。

总结下出现这3次配置中遇到的问题:
1,新的服务器上安装wamp一般会报错
报错系统缺少msvcr110.dll 文件。解决办法:安装VS开发组建后重新安装即可,下载地址:http://pan.baidu.com/s/1hsCXR28 或者 http://pan.baidu.com/s/1miQwQZe

2,wamp配置文件httpd.conf外网访问设置问题
wamp配置文件httpd.conf要设置能让外网访问,否则别的设备无法访问你的网站。设置方法网上一大堆,具体的设置可能与版本也有关系,我使用到的是2.2版本的wamp,屏蔽下面两行代码即可。
%title插图%num

关于wamp的配置只用配置这两行就能被外网访问了,不知道怎么网上还流传了各种其他的配置方法(在配置方法,配置这两行就能确保你的网站可以被外网访问)

3,服务器防火墙80端口问题
为了这件事折腾了两次,总结就是新购买的服务器需要打开防火墙的80端口。怎么打开呢?
a,问客服,至少我两次都是这样解决的。。。
b,按照图中说明狂点下去

%title插图%num

c,有些服务器不能在本地修改防火墙的端口(比如说UCloud),但是他们的网页控制台中是提供了修改接口的。

4,关于www目录下设置项目首选项的问题
毕竟在wamp中所有工程都放在www文件目录下,但是我们往往希望进入我们的域名首选项是某个特定的网站。那么如果设置呢?
同样在httpd.conf中修改DocumentRoot 的位置即可,比如默认位置是DocumentRoot “c:/wamp/www/”
改为
DocumentRoot “c:/wamp/www/xxxx”   xxxx 就是你指定的工程目录

希望能给刚刚接触网站搭建这块的朋友一些帮助

CTF-密码学-36进制

CTF-密码学-36进制

提示:文章写完后,目录可以自动生成,如何生成可参考右边的帮助文档

文章目录
前言
一、题目是什么意思?
二、解题步骤
1.读入数据并运行
总结
前言
随着网络的不断发展,密码学这门技术也越来越重要,很多人都开启了学习密码学的学习,本文就介绍了*简单的进制基础内容。
提示:以下是本篇文章正文内容,下面案例可供参考

一、题目是什么意思?
The length of alphanumeric is thirty six

*步 :下载并打开文件,一串数字,如下图所示。

59714216646867023270440406545399263948228435794919139272931

二、解题步骤
1.读入数据并运行
代码如下:

导入包:pip install base36
用法:

import base36
num=59714216646867023270440406545399263948228435794919139272931
print(base36.dumps(num))

D:\Python\python.exe d:/Users/lhb/PycharmProjects/pythonProject/test.py
flagis2fya2r884fnoekustyxmecv7a98blhwj

Process finished with exit code 0

<font color=#999AAA >

总结
这里对题目进行总结:
以上就是今天要讲的内容,本文仅仅简单介绍了解题思路

友情链接: SITEMAP | 旋风加速器官网 | 旋风软件中心 | textarea | 黑洞加速器 | jiaohess | 老王加速器 | 烧饼哥加速器 | 小蓝鸟 | tiktok加速器 | 旋风加速度器 | 旋风加速 | quickq加速器 | 飞驰加速器 | 飞鸟加速器 | 狗急加速器 | hammer加速器 | trafficace | 原子加速器 | 葫芦加速器 | 麦旋风 | 油管加速器 | anycastly | INS加速器 | INS加速器免费版 | 免费vqn加速外网 | 旋风加速器 | 快橙加速器 | 啊哈加速器 | 迷雾通 | 优途加速器 | 海外播 | 坚果加速器 | 海外vqn加速 | 蘑菇加速器 | 毛豆加速器 | 接码平台 | 接码S | 西柚加速器 | 快柠檬加速器 | 黑洞加速 | falemon | 快橙加速器 | anycast加速器 | ibaidu | moneytreeblog | 坚果加速器 | 派币加速器 | 飞鸟加速器 | 毛豆APP | PIKPAK | 安卓vqn免费 | 一元机场加速器 | 一元机场 | 老王加速器 | 黑洞加速器 | 白石山 | 小牛加速器 | 黑洞加速 | 迷雾通官网 | 迷雾通 | 迷雾通加速器 | 十大免费加速神器 | 猎豹加速器 | 蚂蚁加速器 | 坚果加速器 | 黑洞加速 | 银河加速器 | 猎豹加速器 | 海鸥加速器 | 芒果加速器 | 小牛加速器 | 极光加速器 | 黑洞加速 | movabletype中文网 | 猎豹加速器官网 | 烧饼哥加速器官网 | 旋风加速器度器 | 哔咔漫画 | PicACG | 雷霆加速