标签: Layout

Android实现滑动的几种方式演示

一、前言
*近闲来无事,也不知道研究点什么比较好。就买了几本书,加强基础。这编博客是从徐宜生的Android群英传中总结而来的,非常好的一本书,推荐大家入手。

我将用这几种方式,实现一个可拖动的View。

二、 layout方式
我们都知道View绘制流程的主要三个步骤,onMeaure测量 -onLayout摆放-onDraw绘制。关于这方面的博文太多太多,我也就不再多说。

layout可以控制View在父布局中的摆放位置。
我们只需要监听View的事件,然后一直调用layout方法,让View跟随手指的位移即可。

/**
* Created by AItsuki on 2016/3/1.
*/
public class SlideByLayoutView extends View {

private int startX;
private int startY;

public SlideByLayoutView(Context context, AttributeSet attrs) {
super(context, attrs);
}

@Override
public boolean onTouchEvent(MotionEvent event) {
int action = event.getAction();
switch (action) {
case MotionEvent.ACTION_DOWN:
startX = (int) event.getX();
startY = (int) event.getY();
break;
case MotionEvent.ACTION_MOVE:
int endX = (int) event.getX();
int endY = (int) event.getY();
int dx = endX- startX;
int dy = endY – startY;
layout(getLeft() + dx, getTop() + dy, getRight() + dx, getBottom() + dy);
break;
}
return true;
}
}

%title插图%num
三、scrollTo和scrollBy
scrollTo(x,y):移动到具体位置
scrollBy(dx,dy):移动增量,相对于自身位置。
将二中的layout(getLeft() + dx, getTop() + dy, getRight() + dx, getBottom() + dy);替换成scrollBy(dx,dy)
会发现不能拖动方块,因为scroll移动的是View的内容,而不是自身。所以在使用scroll的时候,我们应该移动父布局的内容。

/**
* Created by AItsuki on 2016/3/1.
*/
public class SlideByScroll extends View {

private int startX;
private int startY;

public SlideByScroll(Context context, AttributeSet attrs) {
super(context, attrs);
}

@Override
public boolean onTouchEvent(MotionEvent event) {
int action = event.getAction();
switch (action) {
case MotionEvent.ACTION_DOWN:
startX = (int) event.getRawX();
startY = (int) event.getRawY();
break;
case MotionEvent.ACTION_MOVE:
int endX = (int) event.getRawX();
int endY = (int) event.getRawY();
int dx = endX – startX;
int dy = endY – startY;
// layout(getLeft() + dx, getTop() + dy, getRight() + dx, getBottom() + dy);
View parent = (View) getParent();
parent.scrollBy(dx, dy);

startX = endX;
startY = endY;
break;
}
return true;
}
}

注意这里不能使用getX(), 而需要获取getRawX()。因为getX是获取View自身内部的坐标,我们需要移动的是父布局,所以我们应该获取屏幕的坐标。

然后我们再次运行会发现,方块居然是反方向运行的。


%title插图%num


但是,为什么会这样呢?
因为scrollBy滚动的手机屏幕,看下面这张图给就可以很好的理解了(黑框请看作手机屏幕)。

%title插图%num

解决方式就是:在dx和dy前面加个负号就行了,parent.scrollBy(-dx, -dy);

3.1 Scroller
既然说到了scrollBy和scrollTo,那么这里就不能说一下scroller了。

如果我想实现这么个效果,当我点击方块的时候,让他平滑滚动一段距离,我们应该怎么做呢?
google提供了一个很方便的东西,那就是scroller。虽然属性动画也可以,但是我们现在就来说说scroller。

scroller是什么?
scroller可以模拟一个滚动过程,它有两个方法开启模拟效果。

public void startScroll(int startX, int startY, int dx, int dy)
public void startScroll(int startX, int startY, int dx, int dy, int duration)

其实scroller并没有作用于View,它只是模拟了一个过程而已。
实际滚动其实还需要我们自己调用scrollTo方法。

/**
* Created by AItsuki on 2016/3/1.
*/
public class ScrollerDemo extends View implements View.OnClickListener {

private final Scroller mScroller;

public ScrollerDemo(Context context, AttributeSet attrs) {
super(context, attrs);
mScroller = new Scroller(context);
setOnClickListener(this);
}

// computerScroll方法会在invalidate执行的时候调用。
@Override
public void computeScroll() {
super.computeScroll();
// 判断scroller是否执行完毕
if(mScroller.computeScrollOffset()) {
((View)getParent()).scrollTo(mScroller.getCurrX(), mScroller.getCurrY());
invalidate();
}
}

@Override
public void onClick(View v) {
View parent = (View) getParent();
mScroller.startScroll(parent.getScrollX(),parent.getScrollY(),-100,-100);
invalidate();
}
}

%title插图%num

四、属性动画
/**
* Created by AItsuki on 2016/3/2.
*/
public class SlideByAnimator extends View {

private float startX;
private float startY;

public SlideByAnimator(Context context, AttributeSet attrs) {
super(context, attrs);
}

@Override
public boolean onTouchEvent(MotionEvent event) {
int action = event.getAction();
switch (action) {
case MotionEvent.ACTION_DOWN:
startX = event.getRawX();
startY = event.getRawY();
break;
case MotionEvent.ACTION_MOVE:
float endX = event.getRawX();
float endY = event.getRawY();
float dx = endX – startX;
float dy = endY – startY;

ObjectAnimator.ofFloat(this, “translationX”, getTranslationX() + dx).setDuration(0).start();
ObjectAnimator.ofFloat(this, “translationY”, getTranslationY() + dy).setDuration(0).start();

startX = endX;
startY = endY;
break;
}
return true;
}

}

虽然属性动画会改变控件的位置,并且能获取到点击事件。
但是,实际上View的位置并没有改变,通过getLeft(),getTop()等方法获取的值也未曾改变。
属性动画会把你位移过的距离保存起来,所以可以通过getleft()+getTranslationX()获取到当前View显示的准确位置。

五、ViewDragHelper
ViewDragHelper是一个非常强大的类,可以帮我们处理复杂的拖动逻辑。
Android自带的侧边栏就用到了这个类,在这里我们也用它实现一个简单的侧边栏。

<?xml version=”1.0″ encoding=”utf-8″?>
<com.aitsuki.slidedemo.SimpleDrawerLayout xmlns:android=”http://schemas.android.com/apk/res/android”
xmlns:tools=”http://schemas.android.com/tools”
android:layout_width=”match_parent”
android:layout_height=”match_parent”
tools:context=”.MainActivity”>

<LinearLayout
android:layout_width=”match_parent”
android:layout_height=”match_parent”
android:background=”#000″>

<TextView
android:layout_width=”wrap_content”
android:layout_height=”wrap_content”
android:layout_gravity=”center_vertical”
android:text=”侧边栏”
android:textColor=”#fff”
android:textSize=”30dp” />

</LinearLayout>

<FrameLayout
android:layout_width=”match_parent”
android:layout_height=”match_parent”
android:background=”#fff”>

<TextView
android:layout_width=”wrap_content”
android:layout_height=”wrap_content”
android:layout_gravity=”center”
android:text=”主页面”
android:textColor=”#000″
android:textSize=”30dp” />

</FrameLayout>
</com.aitsuki.slidedemo.SimpleDrawerLayout>


/**
* Created by AItsuki on 2016/3/3.
*/
public class SimpleDrawerLayout extends FrameLayout {

private final ViewDragHelper mDragHelper;
private View mContent;
private int mMenuWidth;

public SimpleDrawerLayout(Context context, AttributeSet attrs) {
super(context, attrs);
mDragHelper = ViewDragHelper.create(this, mCallBack);
}

@Override
protected void onFinishInflate() {
super.onFinishInflate();
mContent = getChildAt(1);
}

@Override
protected void onSizeChanged(int w, int h, int oldw, int oldh) {
super.onSizeChanged(w, h, oldw, oldh);
mMenuWidth = w / 3 * 2;
}

@Override
public boolean onTouchEvent(MotionEvent event) {
mDragHelper.processTouchEvent(event);
return true;
}

@Override
public boolean onInterceptTouchEvent(MotionEvent ev) {
return mDragHelper.shouldInterceptTouchEvent(ev);
}

private ViewDragHelper.Callback mCallBack = new ViewDragHelper.Callback() {

// 触摸到View的时候就会回调这个方法。
// return true表示抓取这个View。
@Override
public boolean tryCaptureView(View child, int pointerId) {
return mContent == child;
}

@Override
public int clampViewPositionHorizontal(View child, int left, int dx) {

return left > 0 ? left > mMenuWidth ? mMenuWidth : left : 0; // 只能右划出菜单,并且菜单*大宽度为屏幕3分之2
}

@Override
public void onViewReleased(View releasedChild, float xvel, float yvel) {
super.onViewReleased(releasedChild, xvel, yvel);

if (xvel > 300) {
open();
} else if (xvel < -300) {
close();
} else {
if (mContent.getLeft() > mMenuWidth / 2) {
open();
} else {
close();
}
}
}
};

private void close() {
mDragHelper.smoothSlideViewTo(mContent, 0, 0);
invalidate();
}

private void open() {
mDragHelper.smoothSlideViewTo(mContent, mMenuWidth, 0);
invalidate();
}

@Override
public void computeScroll() {
super.computeScroll();
if (mDragHelper.continueSettling(true)) {
invalidate();
}
}
}
%title插图%num

————————————————

Layout新姿势—ConstraintLayout

Layout新姿势—ConstraintLayout。

突然发现as的创建新项目时,导入的默认布局是个新名词——ConstraintLayout。

这个新姿势:

本篇文章的主题是ConstraintLayout。其实ConstraintLayout是Android Studio 2.2中主要的新增功能之一,也是Google在I/O大会上重点宣传的一个功能。我们都知道,在传统的Android开发当中,界面基本都是靠编写XML代码完成的,虽然Android Studio也支持可视化的方式来编写界面,但是操作起来并不方便,我也一直都不推荐使用可视化的方式来编写Android应用程序的界面。

而ConstraintLayout就是为了解决这一现状而出现的。它和传统编写界面的方式恰恰相反,ConstraintLayout非常适合使用可视化的方式来编写界面,但并不太适合使用XML的方式来进行编写。当然,可视化操作的背后仍然还是使用的XML代码来实现的,只不过这些代码是由Android Studio根据我们的操作自动生成的。

另外,ConstraintLayout还有一个优点,它可以有效地解决布局嵌套过多的问题。我们平时编写界面,复杂的布局总会伴随着多层的嵌套,而嵌套越多,程序的性能也就越差。ConstraintLayout则是使用约束的方式来指定各个控件的位置和关系的,它有点类似于RelativeLayout,但远比RelativeLayout要更强大。

其实ConstraintLayout属于Android Studio 2.2的新特性,我在去年写《第二行代码》的时候就非常想要将这部分内容加入到新书里面,但是在尝试之后还是放弃了。因为ConstraintLayout的用法很多都是对控件进行拖拽,只用文字或者是一些静态图片实在太难将它的用法表达清楚了,因此不太适合写到书上。我当时的想法就是在博客上面写一篇ConstraintLayout的用法讲解,来弥补一下《第二行代码》中缺失的这部分新特性,那么今天这篇文章来了。

开始

下面我们开始用边学边练的方式来进行学习,首先打开你的Android Studio,并新建一个ConstraintLayoutTest项目。另外,确保你的Android Studio是2.2或以上版本。

为了要使用ConstraintLayout,我们需要在app/build.gradle文件中添加ConstraintLayout的依赖,如下所示。

  1. dependencies {
  2. compile ‘com.android.support.constraint:constraint-layout:1.0.0-beta4’
  3. }


目前ConstraintLayout库*新的版本是1.0.0-beta4,还没有推出正式稳定版本,不过这并不影响我们提前进行学习和使用。

现在打开res/layout/activity_main.xml文件,由于这是一个新建的空项目,Android Studio会自动帮我们创建好一个布局,如下图所示。

%title插图%num不过,Android Studio自动创建的这个布局默认使用的是RelativeLayout,我们可以通过如下操作将它转换成ConstraintLayout。
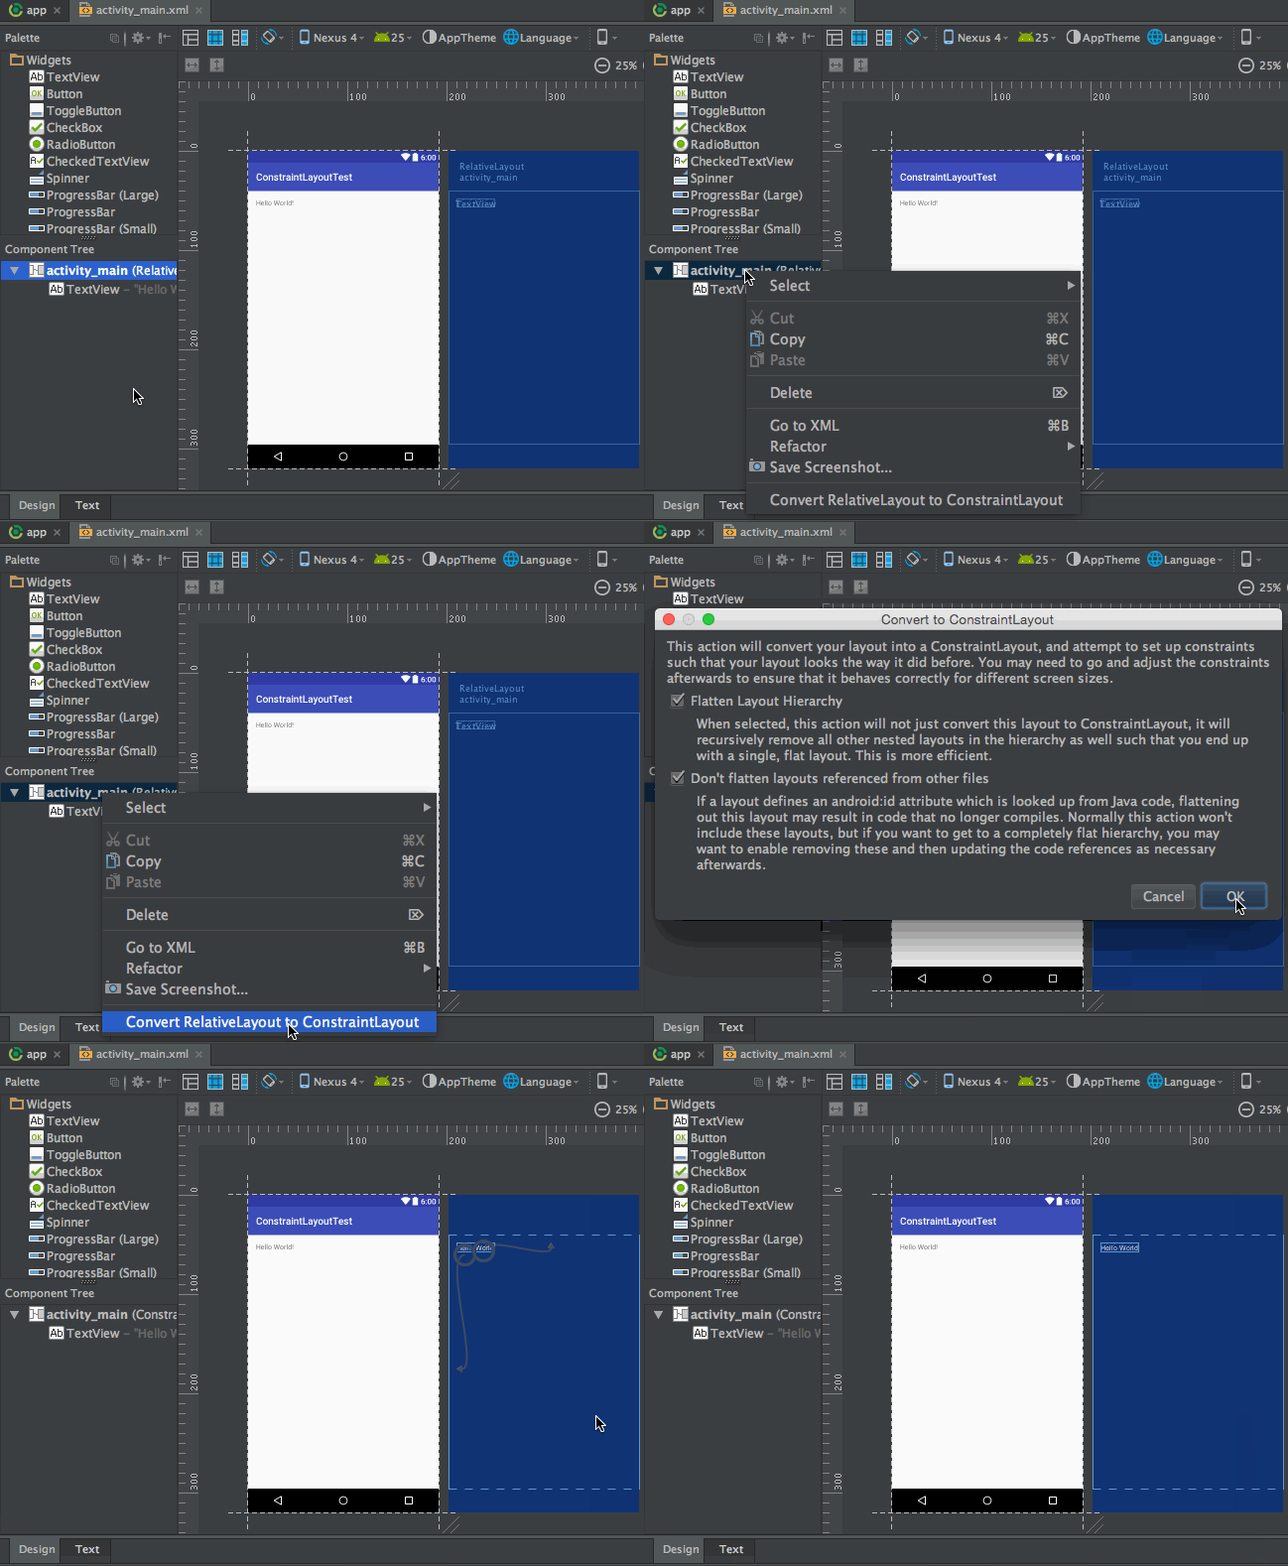
%title插图%num转换完成之后,原RelativeLayout中的内容也会自动转换到ConstraintLayout中,比如图中的TextView。如果你不需要它的话,可以选中这个控件,然后按键盘上的Delete键即可删除。
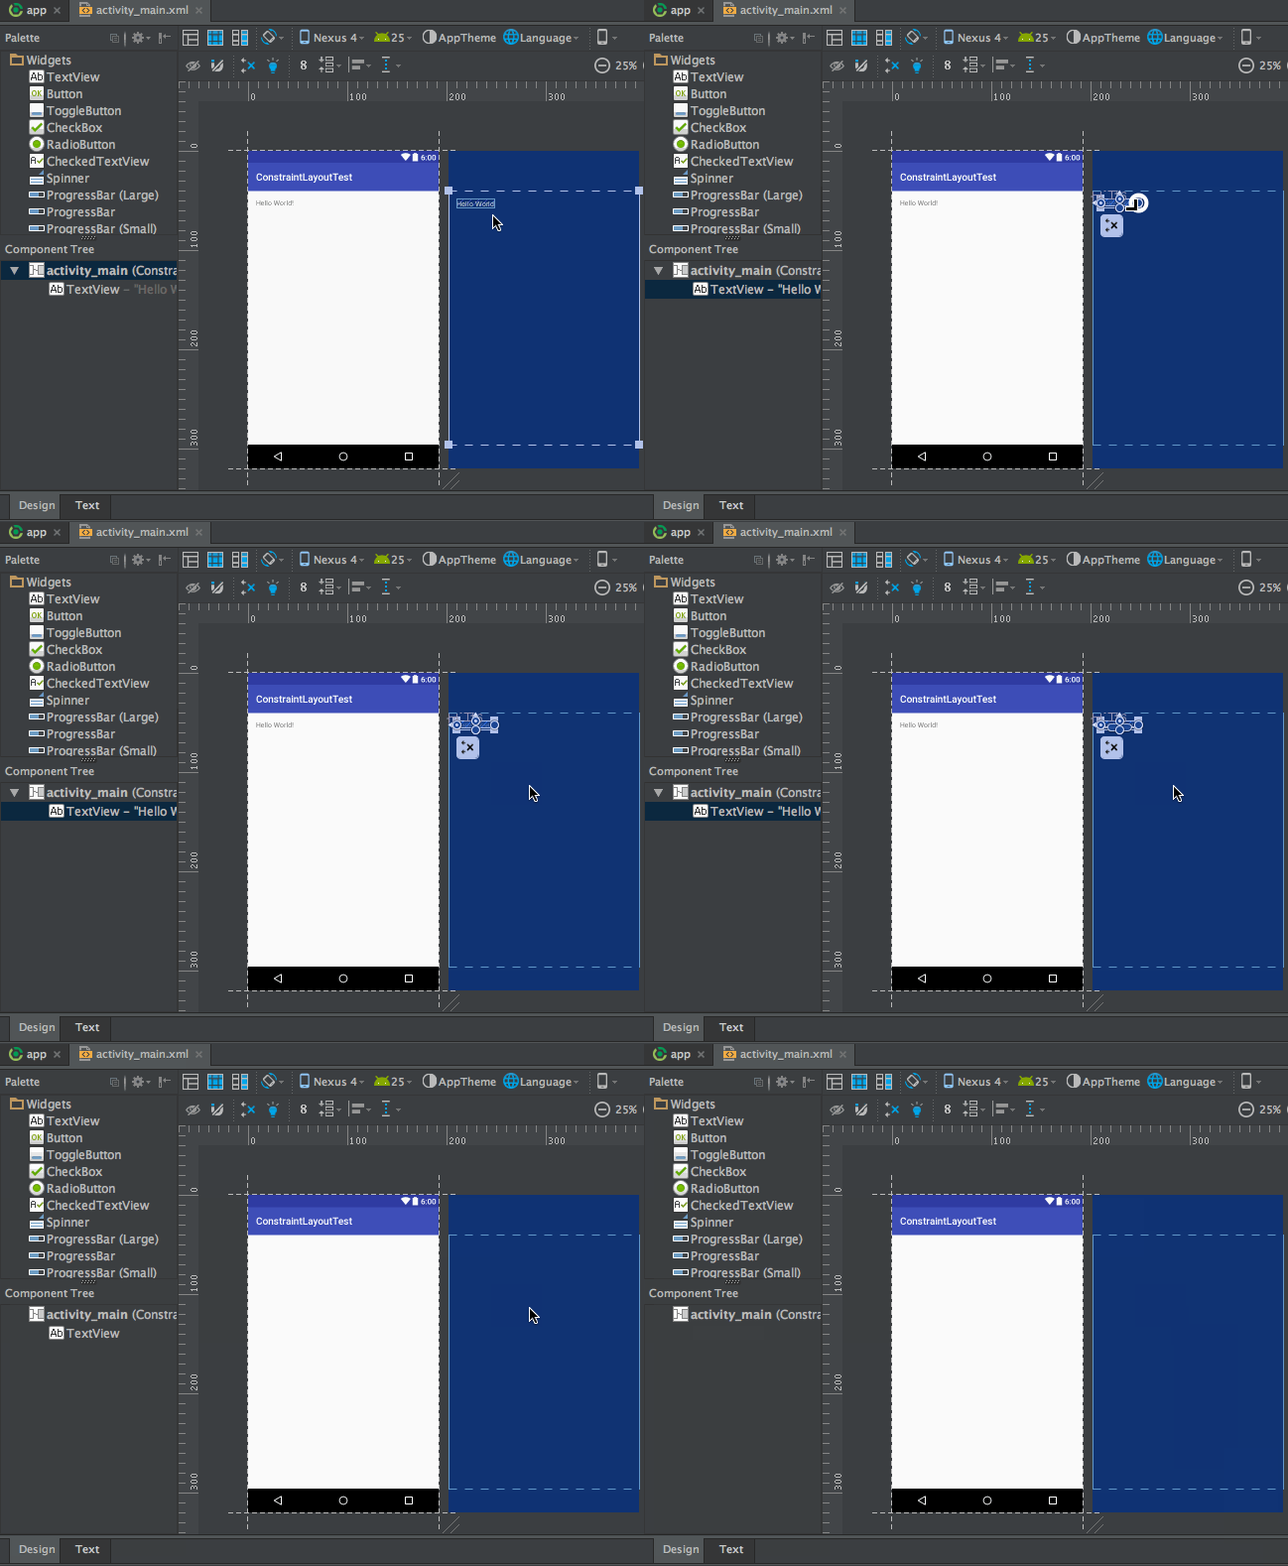
%title插图%num我们可以看到,现在主操作区域内有两个类似于手机屏幕的界面,左边的是预览界面,右边的是蓝图界面。这两部分都可以用于进行布局编辑工作,区别是左边部分主要用于预览*终的界面效果,右边部分主要用于观察界面内各个控件的约束情况。
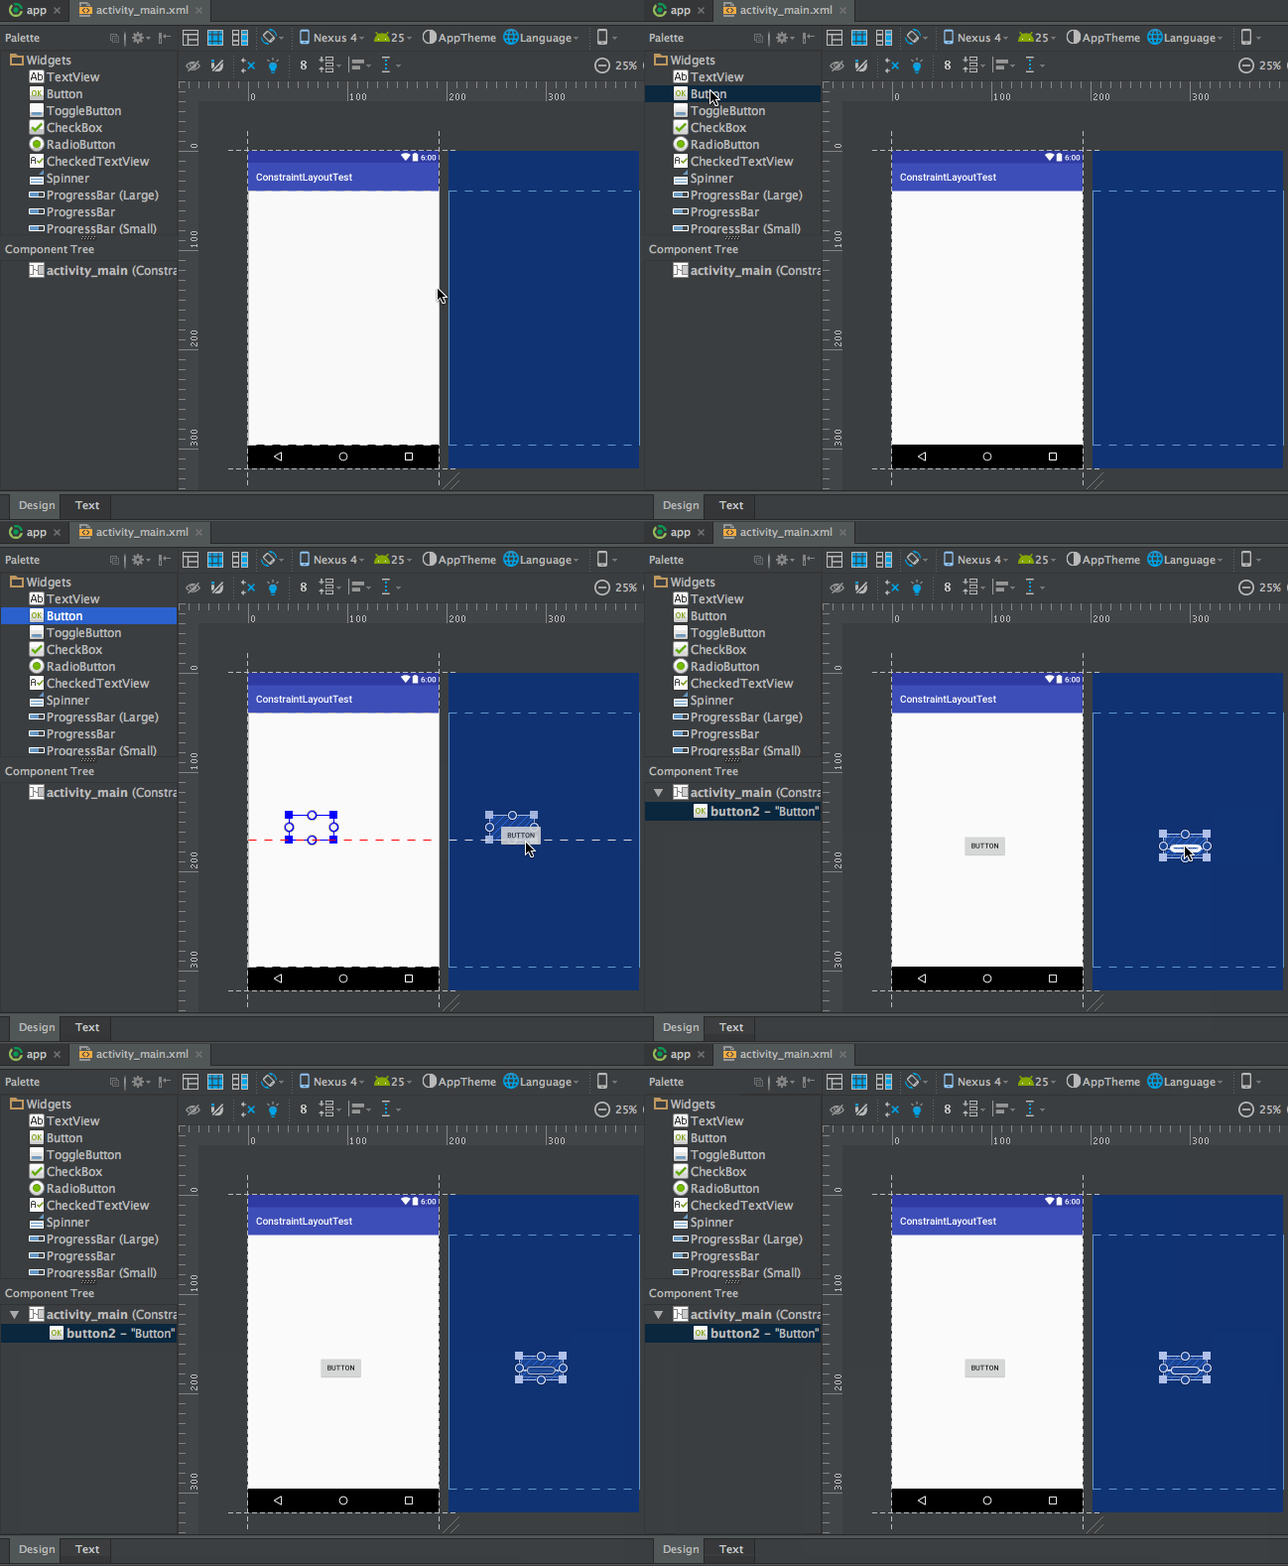
基本操作

下面我们来学习一些具体的操作吧,ConstraintLayout的基本用法很简单,比如我们想要向布局中添加一个按钮,那么只需要从左侧的Palette区域拖一个Button进去就可以了,如下图所示。

%title插图%num虽说现在Button已经添加到界面上了,但是由于我们还没有给Button添加任何的约束,因此Button并不知道自己应该出现在什么位置。现在我们在预览界面上看到的Button位置并不是它*终运行后的实际位置,如果一个控件没有添加任何约束的话,它在运行之后会自动位于界面的左上角。
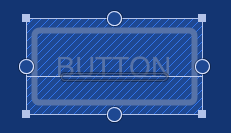
那么下面我们就来给Button添加约束,每个控件的约束都分为垂直和水平两类,一共可以在四个方向上给控件添加约束,如下图所示。

%title插图%num上图中Button的上下左右各有一个圆圈,这圆圈就是用来添加约束的,我们可以将约束添加到ConstraintLayout,也可以将约束添加到另一个控件。比如说,想让Button位于布局的右下角,就可以这样添加约束,如下图所示。
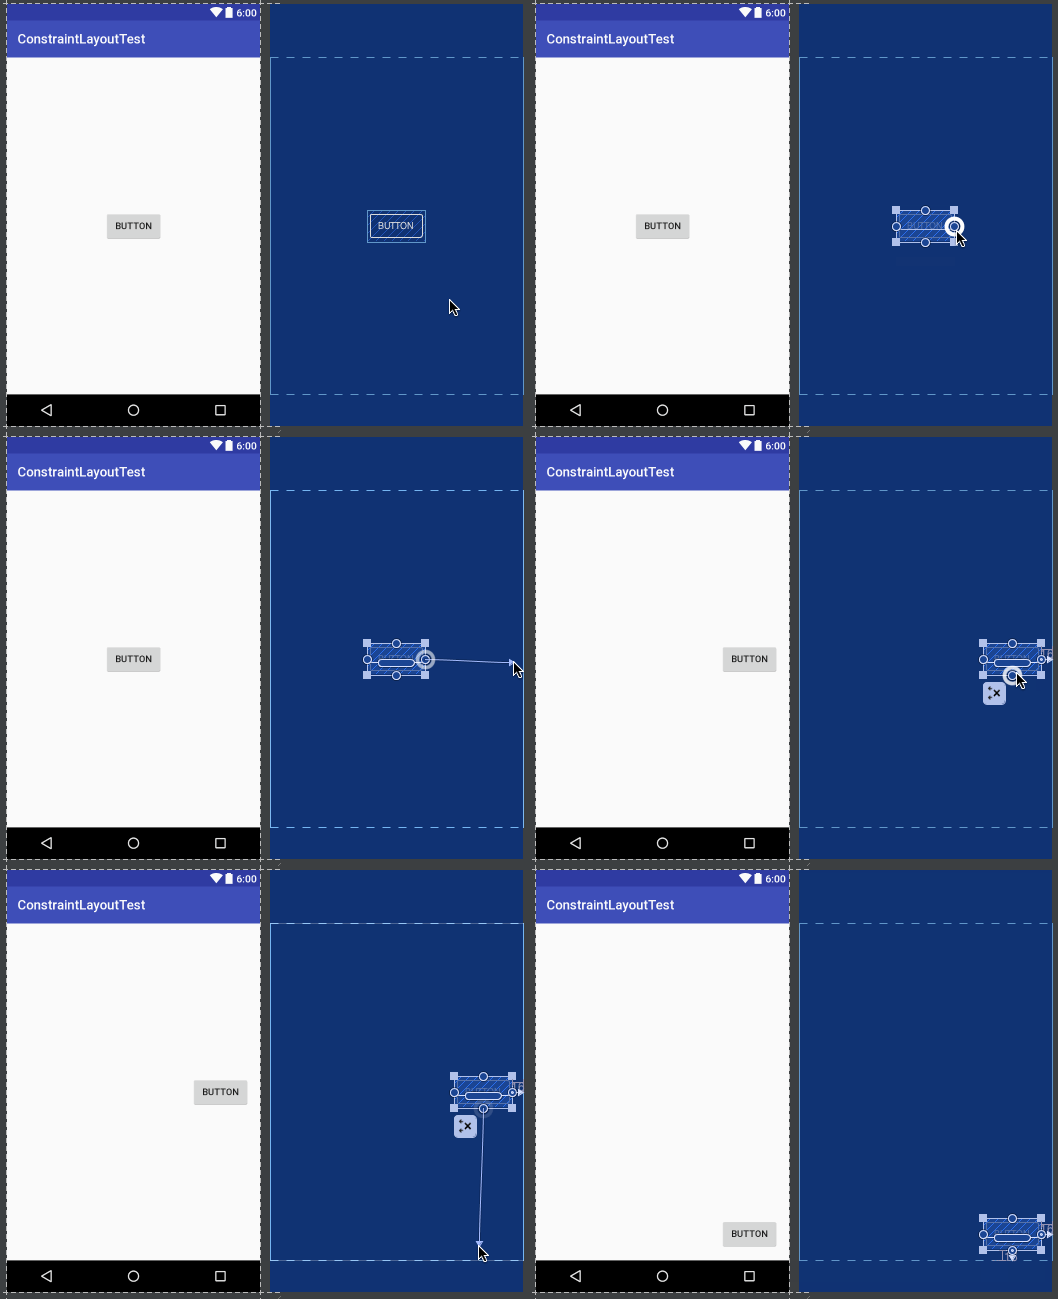
%title插图%num我们给Button的右边和下边添加了约束,因此Button就会将自己定位到布局的右下角了。类似地,如果我们想要让Button居中显示,那么就需要给它的上下左右都添加约束,如下图所示。
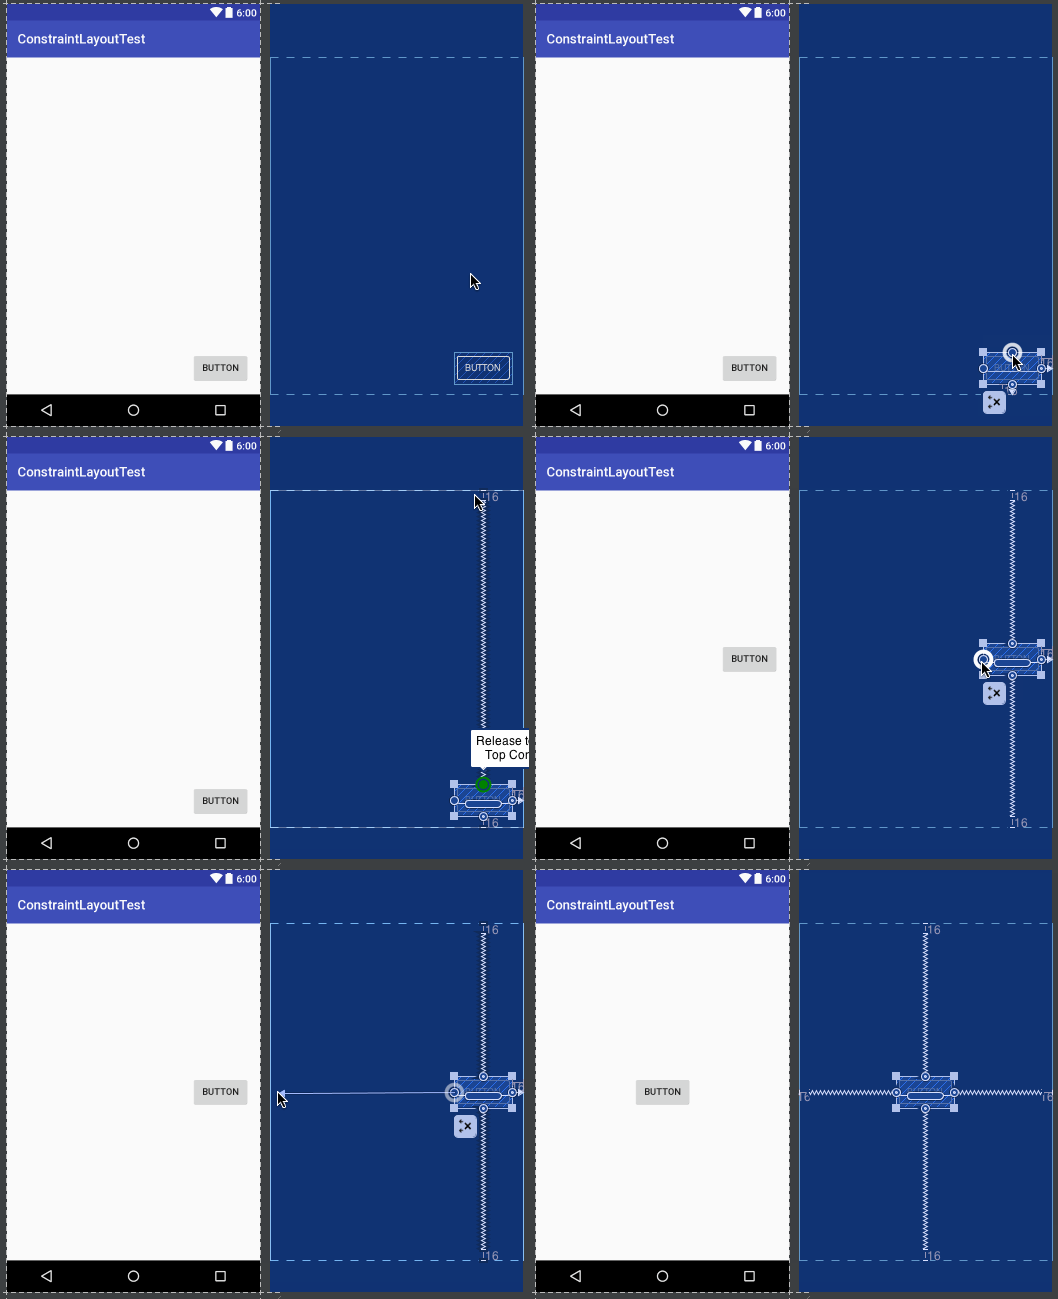
%title插图%num这就是添加约束*基本的用法了。

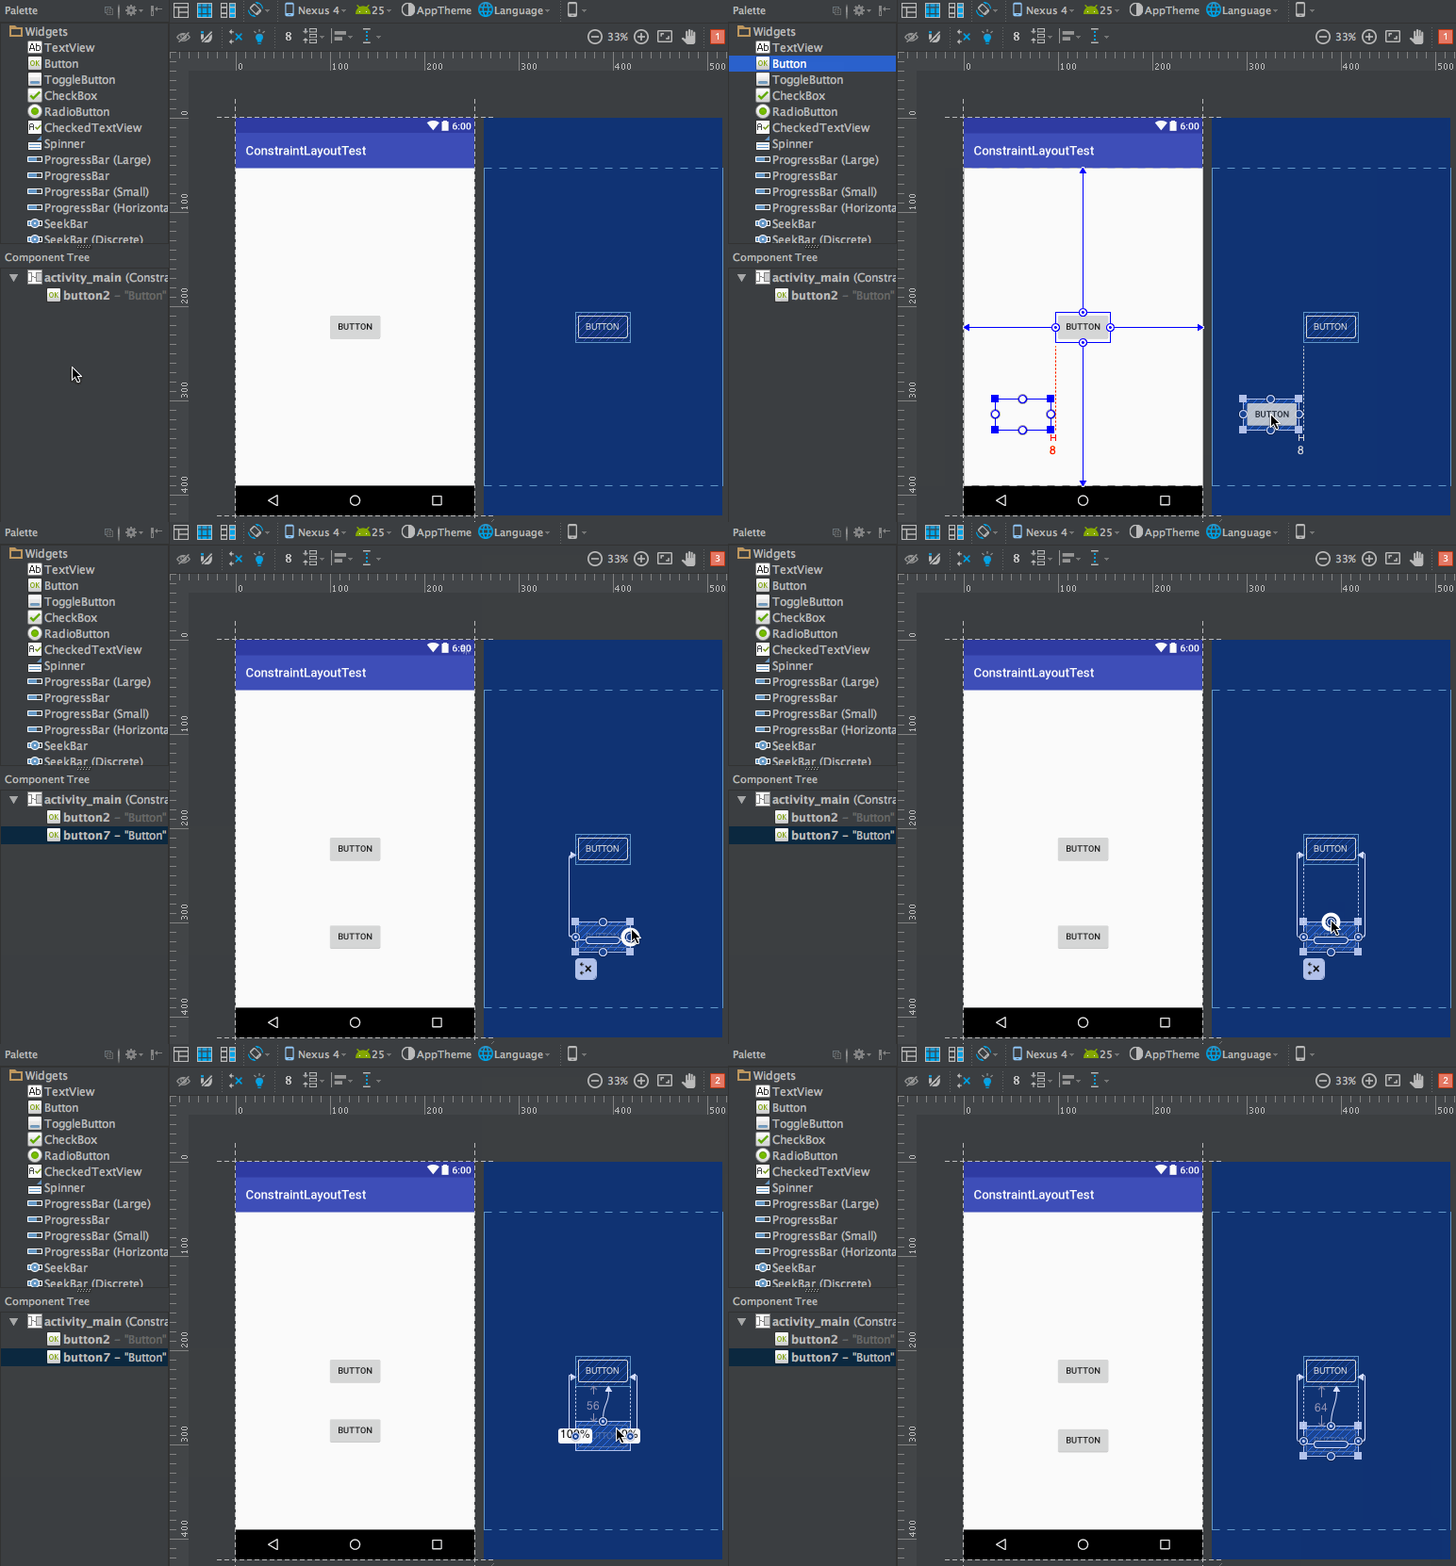
除此之外,我们还可以使用约束让一个控件相对于另一个控件进行定位。比如说,我们希望再添加一个Button,让它位于*个Button的正下方,并且间距64dp,那么操作如下所示。

%title插图%num现在添加约束的方式我们已经学完了,那么该怎样删除约束呢?其实也很简单,删除约束的方式一共有三种,*种用于删除一个单独的约束,将鼠标悬浮在某个约束的圆圈上,然后该圆圈会变成红色,这个时候单击一下就能删除了,如下图所示。
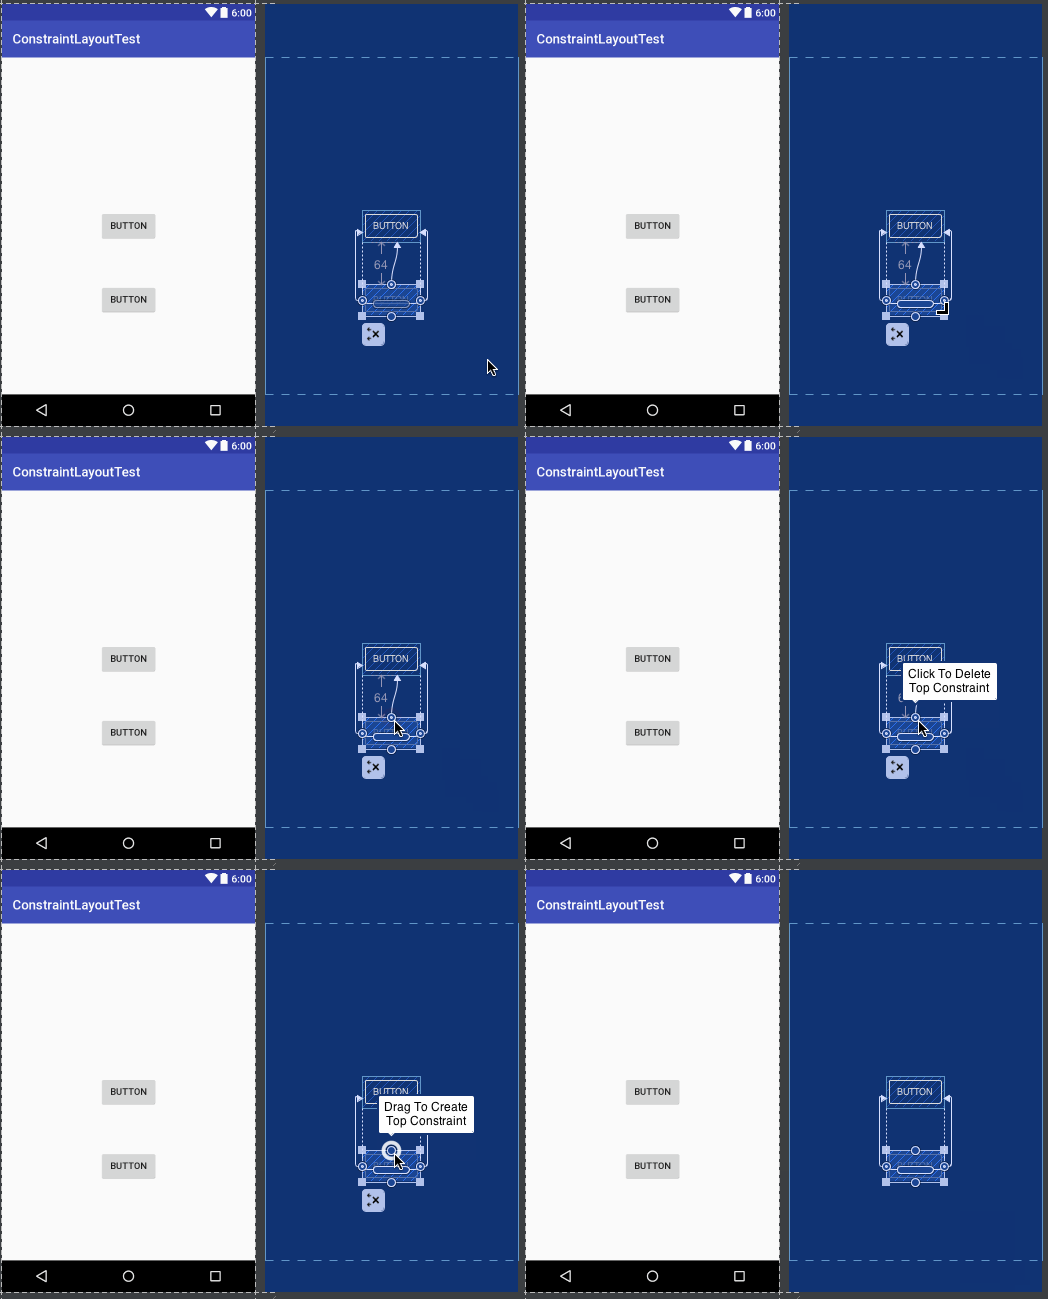
%title插图%num第二种用于删除某一个控件的所有约束,选中一个控件,然后它的左下角会出现一个删除约束的图标,点击该图标就能删除当前控件的所有约束了,如下所示。
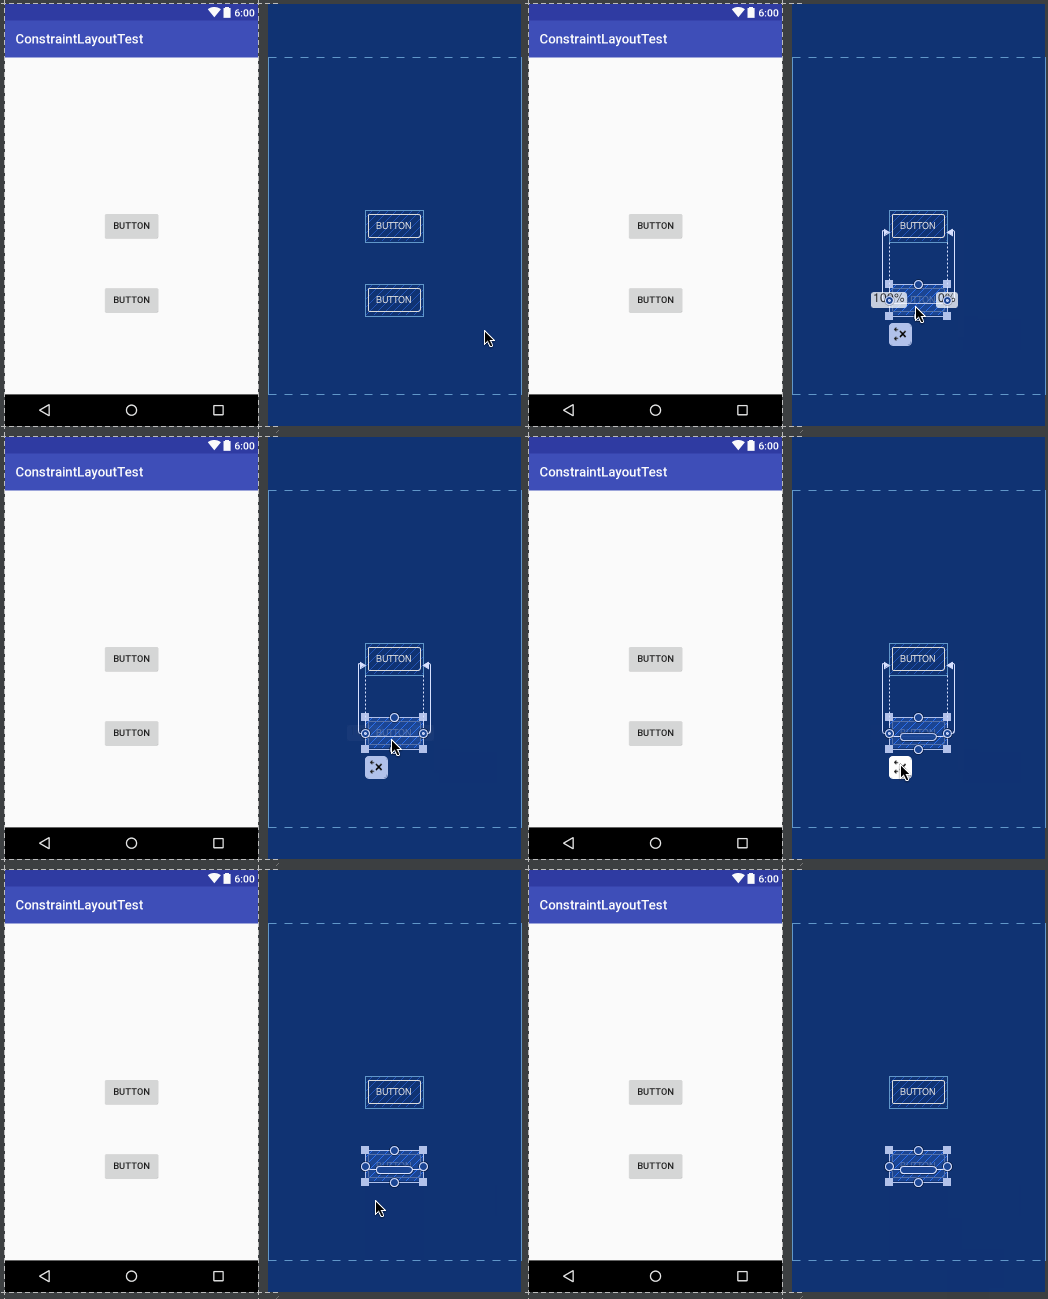
%title插图%num第三种用于删除当前界面中的所有约束,点击工具栏中的删除约束图标即可,如下图所示。
%title插图%num

Inspector

这样我们就把ConstraintLayout的基本用法学完了,接下来我们开始学习一些进阶的内容。

当你选中任意一个控件的时候,在右侧的Properties区域就会出现很多的属性选项,如下图所示。

%title插图%num在这里我们就可以设置当前控件的所有属性,如文本内容、颜色、点击事件等等。这些功能都非常简单,我就不再进行详细介绍,大家自己点一点就会操作了。
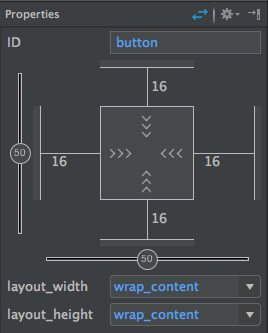
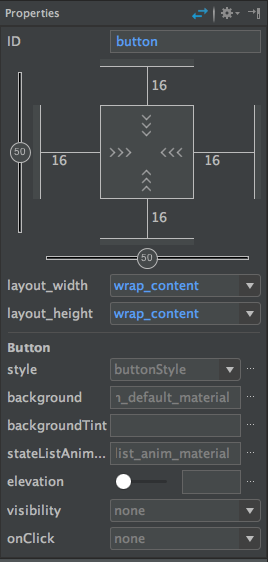
需要我们重点掌握的是Properties区域的上半部分,这部分也被称为Inspector。

%title插图%num首先可以看到,在Inspector中有一个纵向的轴和一个横向的轴,这两个轴也是用于确定控件的位置的。我们刚才给Button的上下左右各添加了一个约束,然后Button就能居中显示了,其实就是因为这里纵横轴的值都是50。如果调整了纵横轴的比例,那么Button的位置也会随之改变,如下图所示。
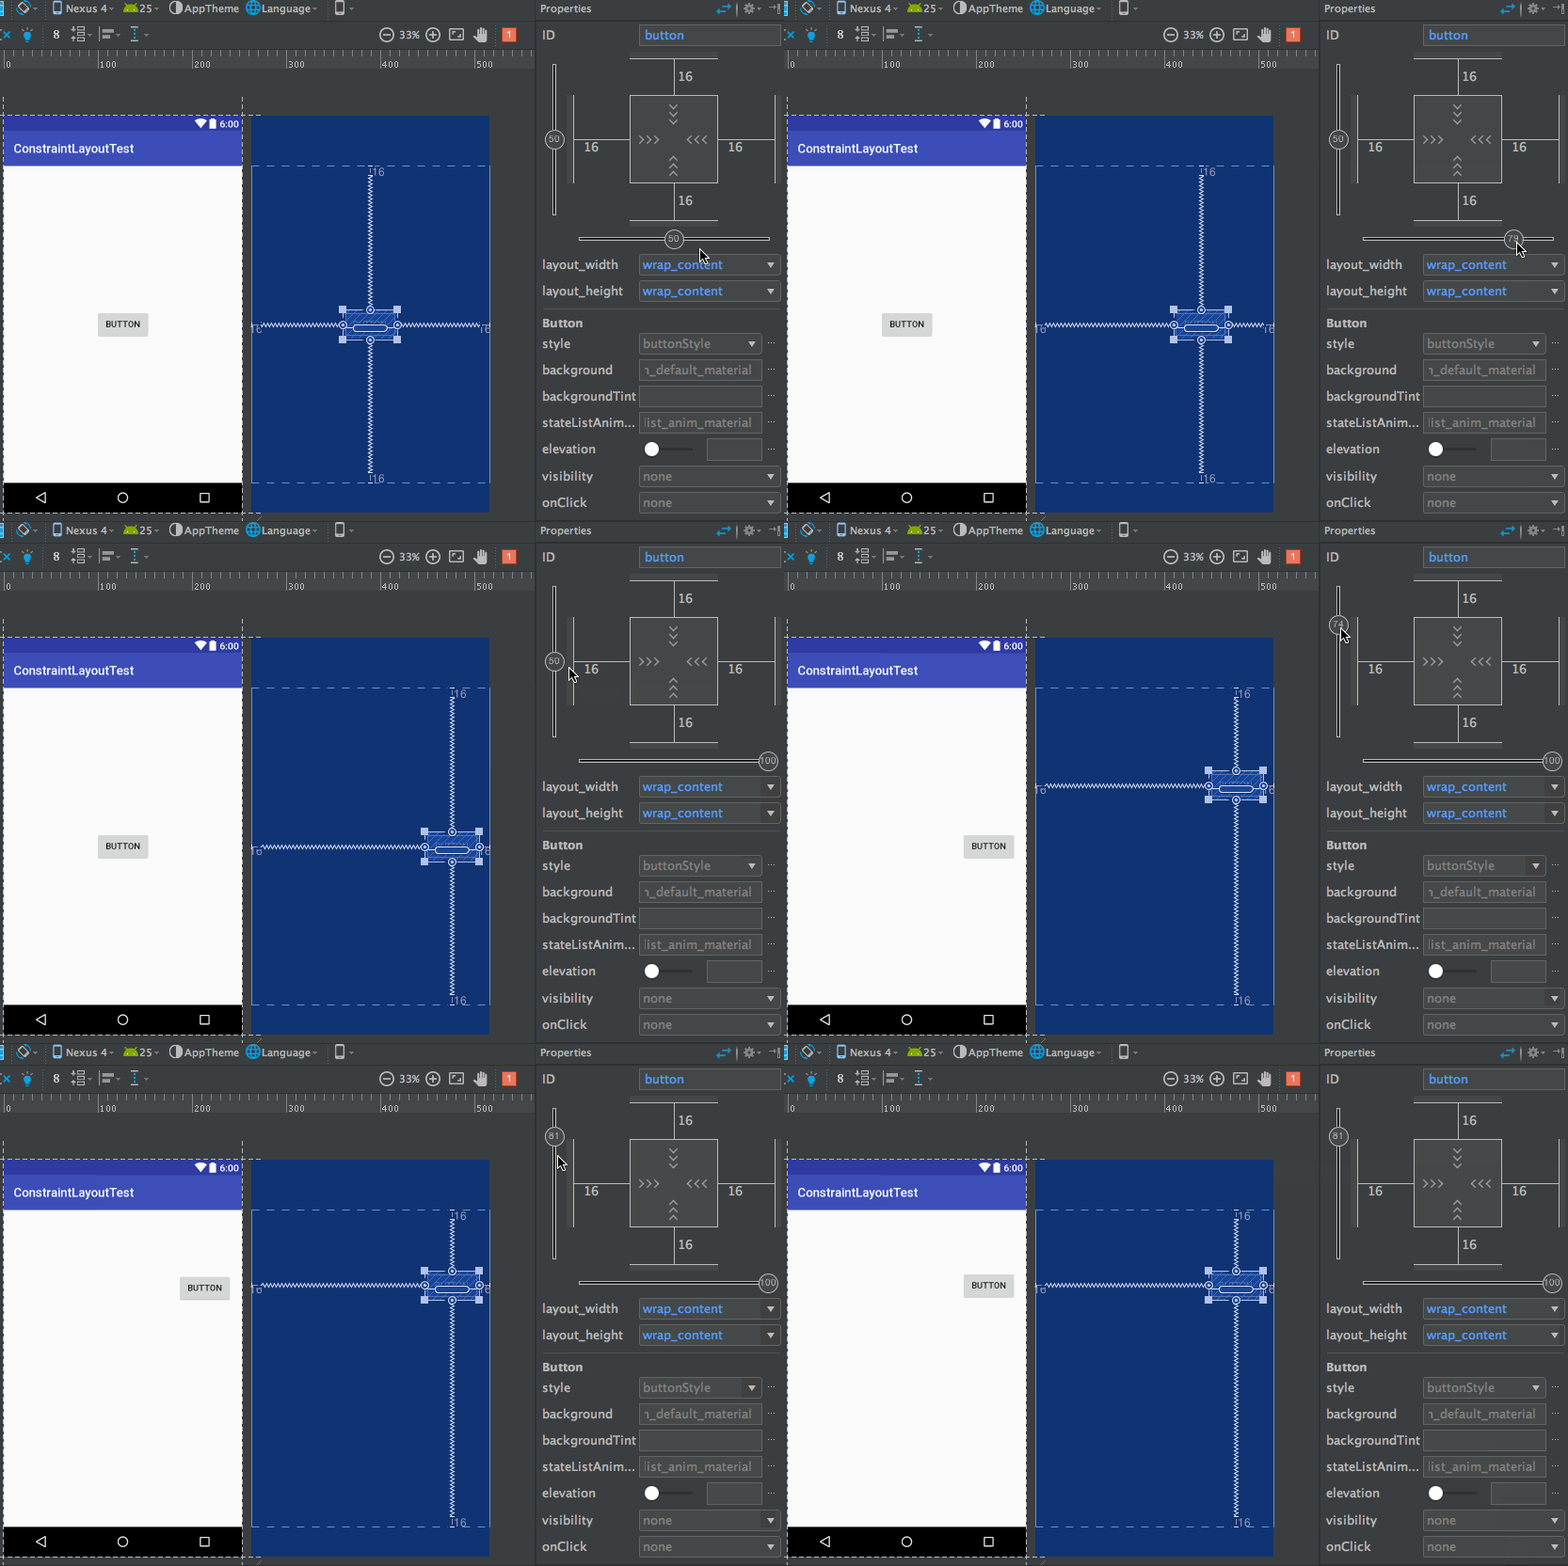
%title插图%num不过,虽然我们将横轴的值拖动到了100,但是Button并没有紧贴到布局的*右侧,这是为什么呢?实际上,Android Studio给控件的每个方向上的约束都默认添加了一个16dp的间距,从Inspector上面也可以明显地看出来这些间距的值。如果这些默认值并不是你想要的,可以直接在Inspector上进行修改,如下图所示:
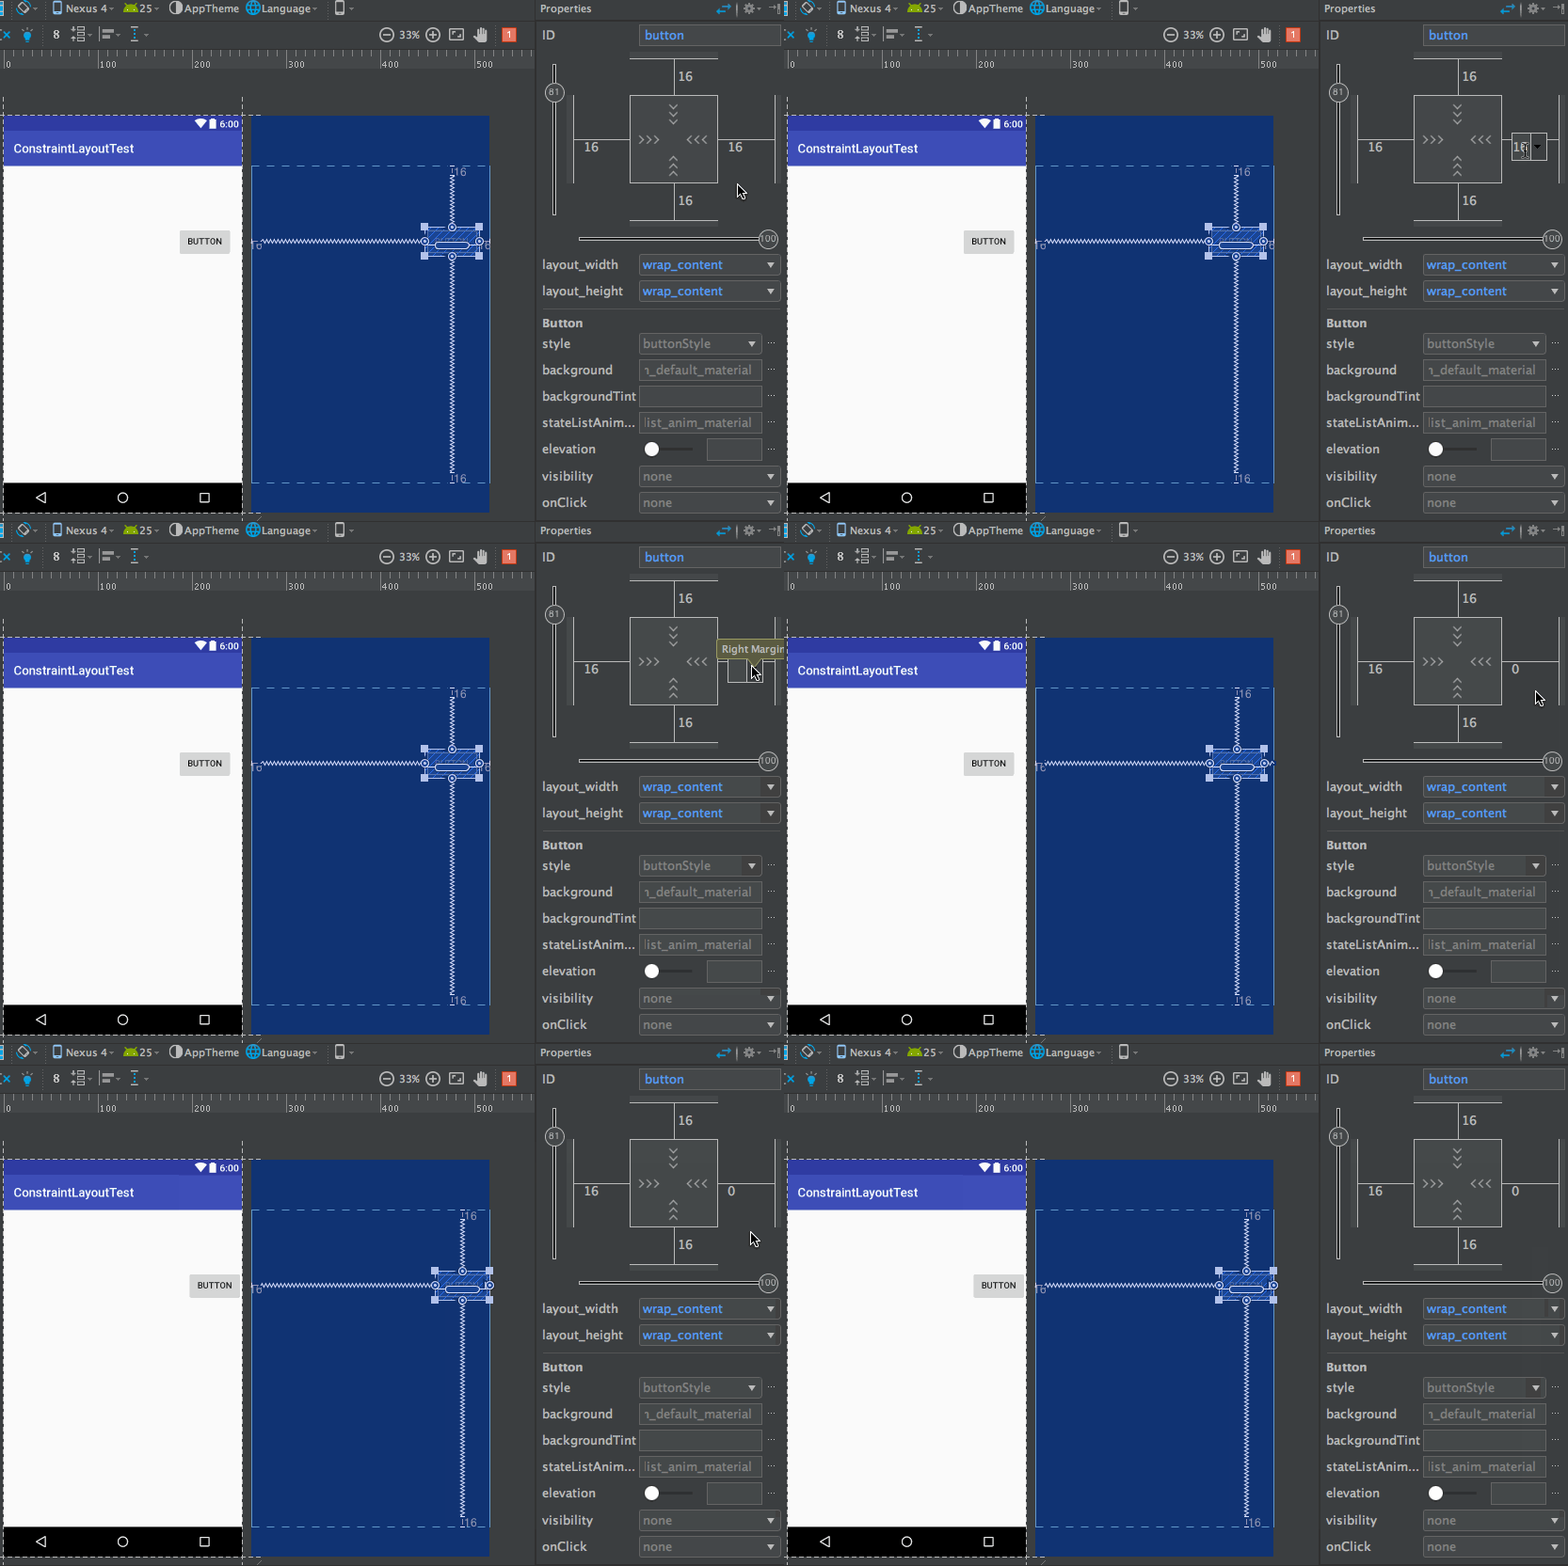
%title插图%num可以看到,修改成0之后Button右侧的间距就没了。

接下来我们再来学习一下位于Inspector*中间的那个正方形区域,它是用来控制控件大小的。一共有三种模式可选,每种模式都使用了一种不同的符号表示,点击符号即可进行切换。

  • %title插图%num 表示wrap content,这个我们很熟悉了,不需要进行什么解释。
  • %title插图%num 表示固定值,也就是给控件指定了一个固定的长度或者宽度值。
  • %title插图%num 表示any size,它有点类似于match parent,但和match parent并不一样,是属于ConstraintLayout中特有的一种大小控制方式,下面我们来重点讲解一下。
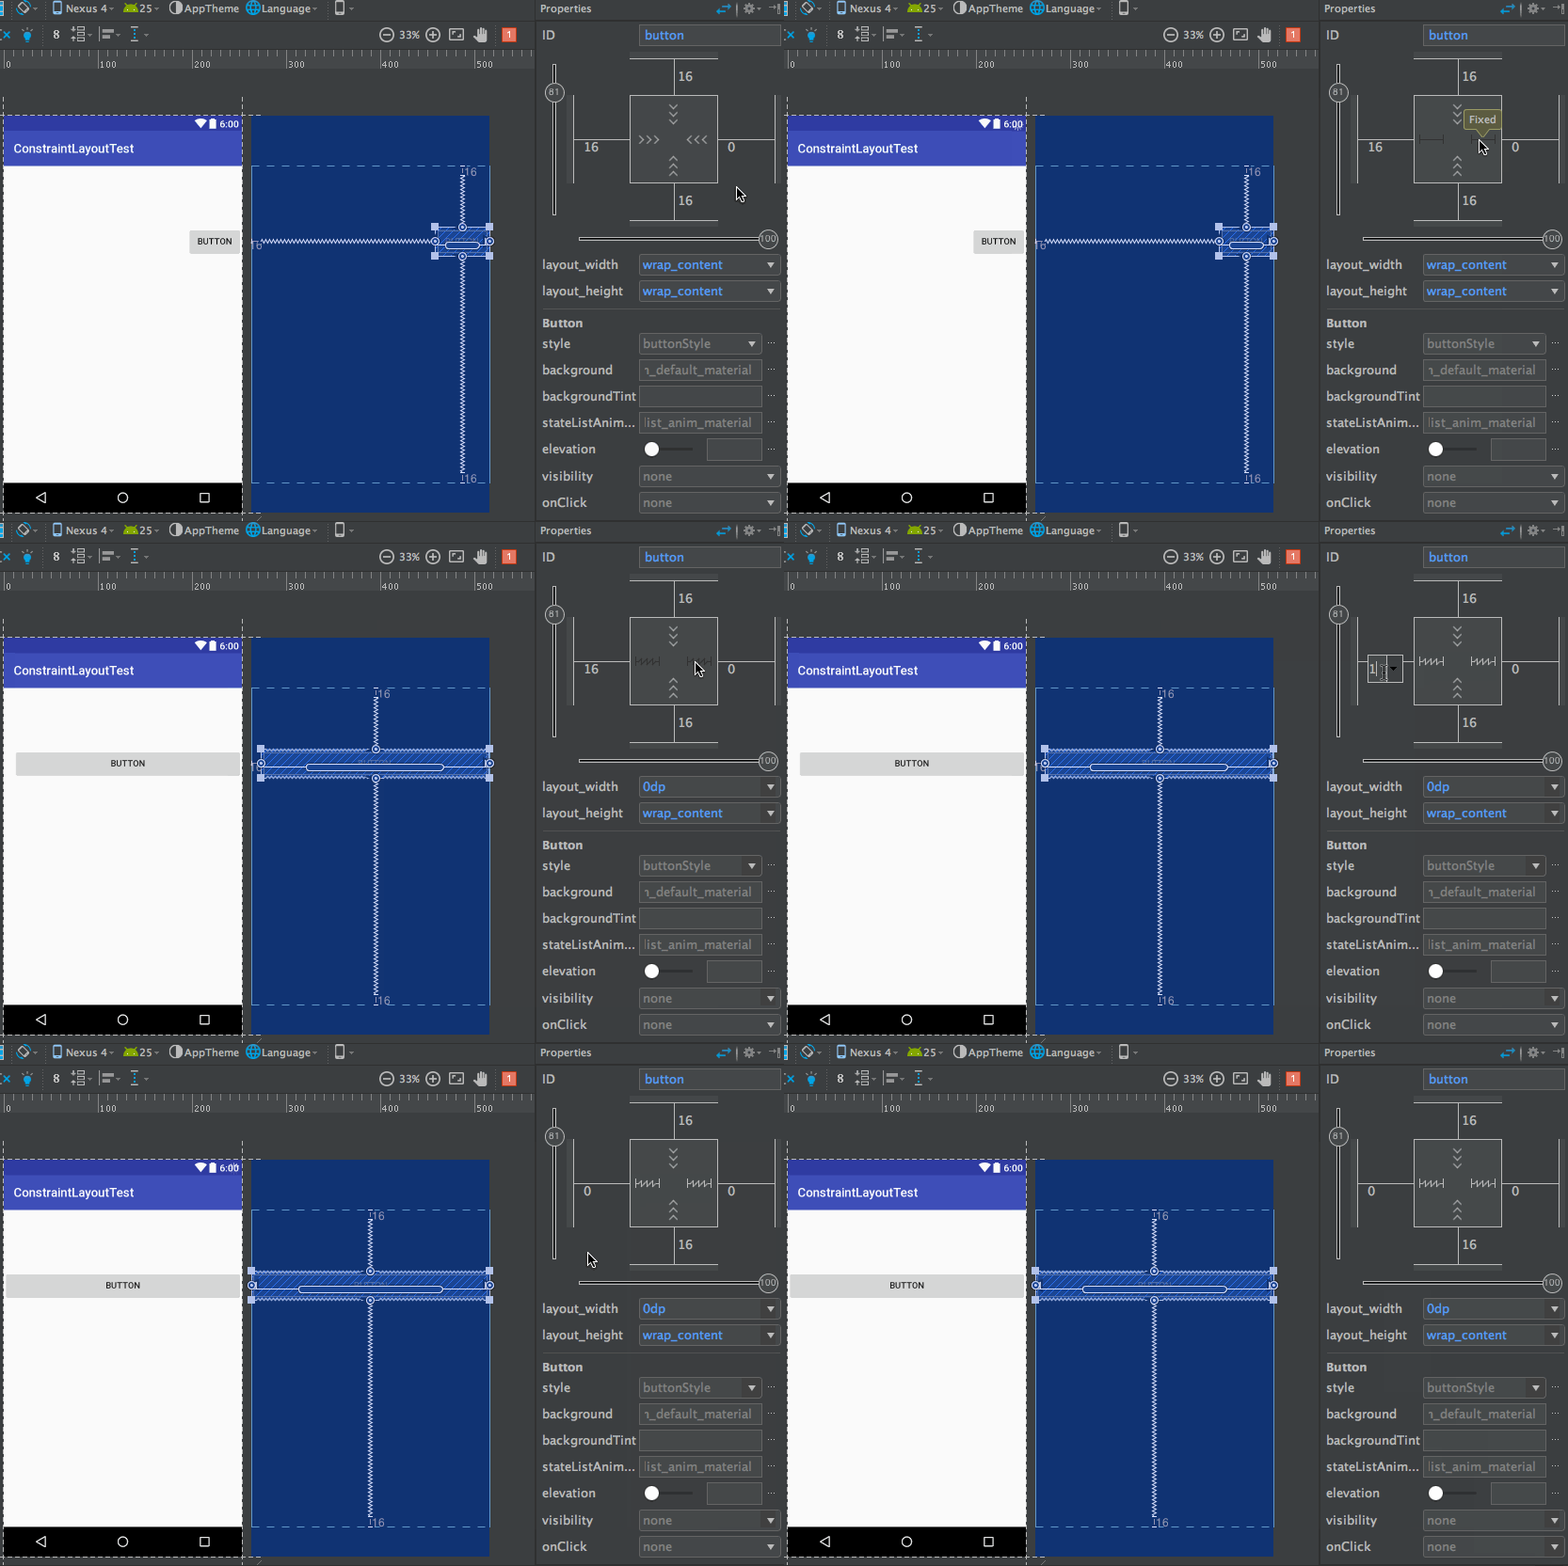
首先需要说明,在ConstraintLayout中是有match parent的,只不过用的比较少,因为ConstraintLayout的一大特点就是为了解决布局嵌套,既然没有了布局嵌套,那么match parent也就没有多大意义了。

而any size就是用于在ConstraintLayout中顶替match parent的,先看一下我们怎样使用any size实现和match parent同样的效果吧。比如说我想让Button的宽度充满整个布局,操作如下图所示。

%title插图%num可以看到,我们将Button的宽度指定成any size,它就会自动充满整个布局了。当然还要记得将Button左侧的间距设置成0才行。
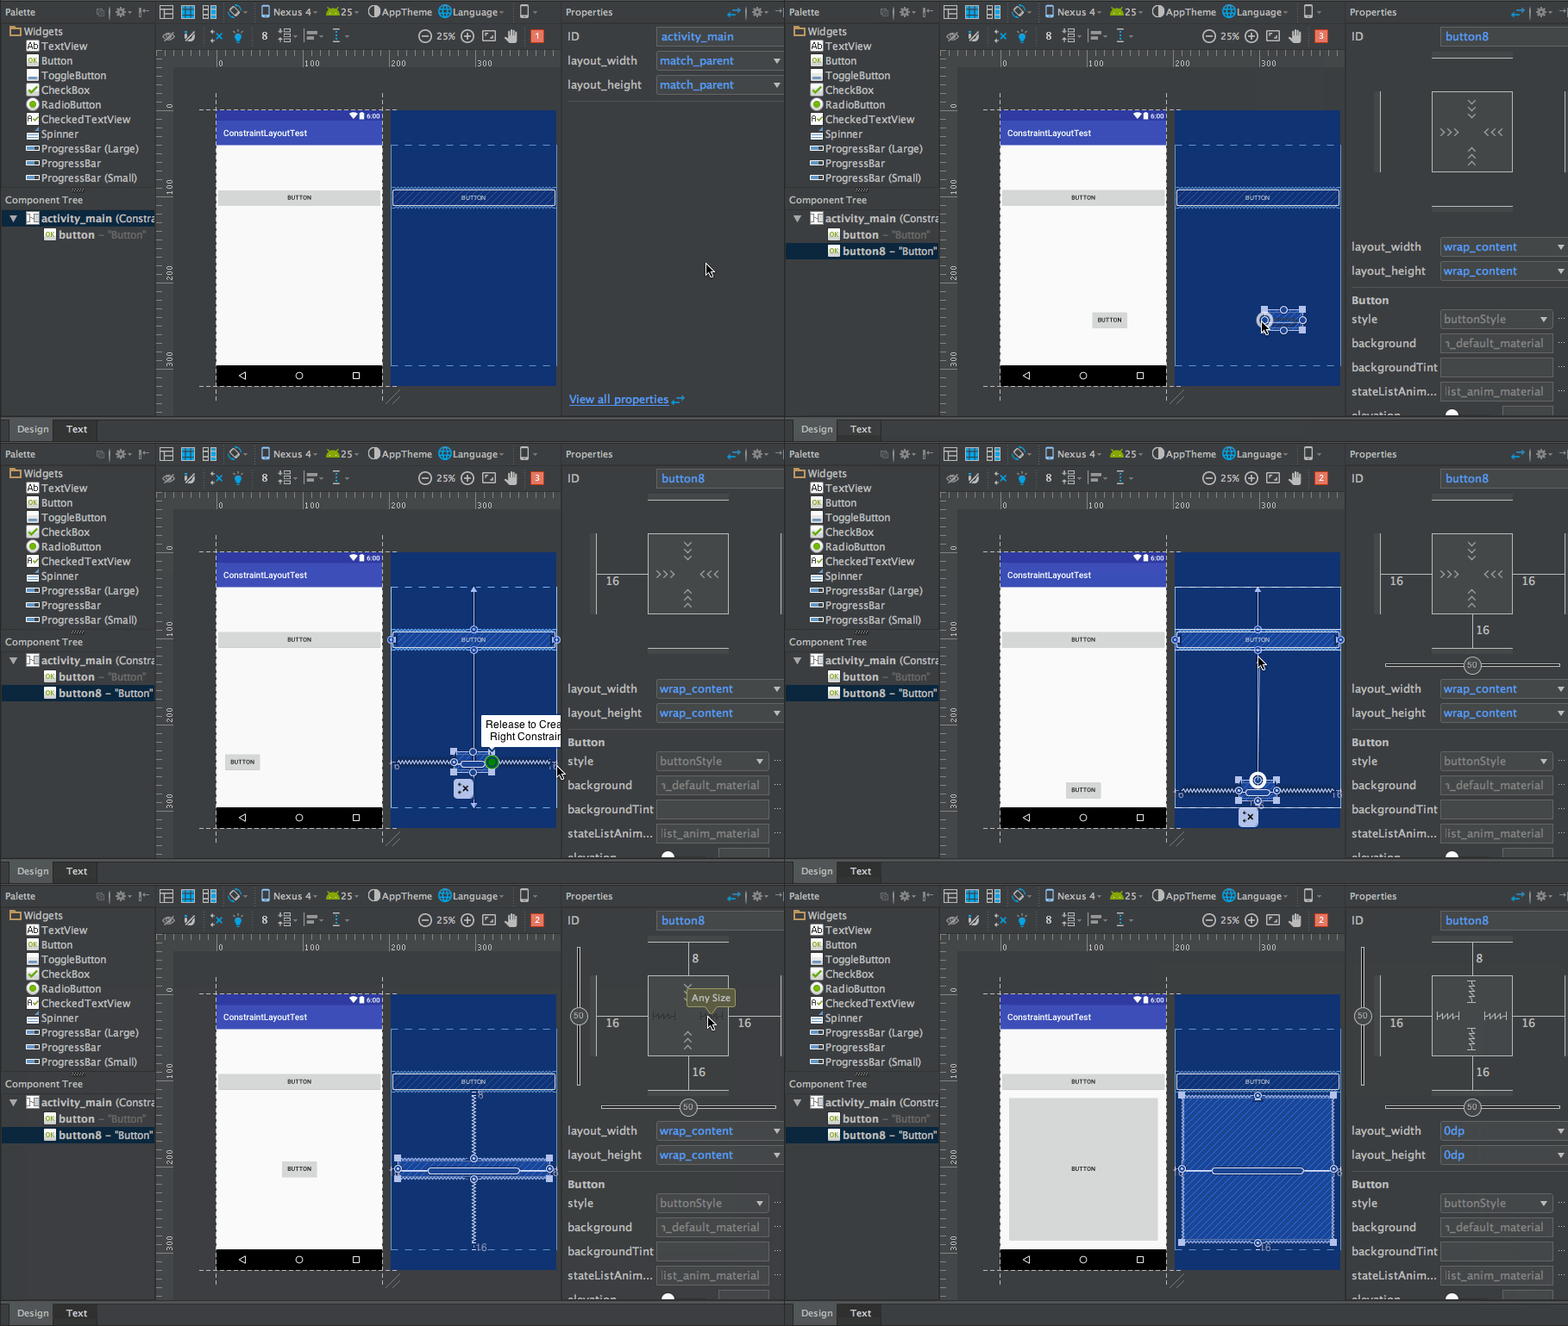
那有的朋友可能会问了,这和match parent有什么区别呢?其实*大的区别在于,match parent是用于填充满当前控件的父布局,而any size是用于填充满当前控件的约束规则。举个例子更好理解,如果我们有一个新的Button,它的其中一个约束是添加到当前这个Button上的,那么any size的效果也会发生改变,如下图所示。

%title插图%num通过上图的演示,相信你已经很好地理解any size的作用了。

Guidelines

现在你已经对ConstraintLayout比较熟悉,并且能使用ConstraintLayout来编写一些简单的界面了。不过目前有一个问题可能还比较头疼,刚才我们已经实现了让一个按钮居中对齐的功能,如果我们想让两个按钮共同居中对齐该怎么实现呢?

其实这个需求很常见,比如说在应用的登录界面,都会有一个登录按钮和一个注册按钮,不管它们是水平居中也好还是垂直居中也好,但肯定都是两个按钮共同居中的。

想要实现这个功能,仅仅用我们刚刚学的那些知识是不够的,这需要用到ConstraintLayout中的一个新的功能,Guidelines。

下面我们还是通过实际操作来学习一下Guidelines的用法吧。比如现在已经向界面中添加了登录和注册这两个按钮,如下图所示。

%title插图%num然后我们希望让这两个按钮在水平方向上居中显示,在垂直方向上都距离底部64dp,那么就需要先添加一个垂直方向上的Guideline,如下图所示。
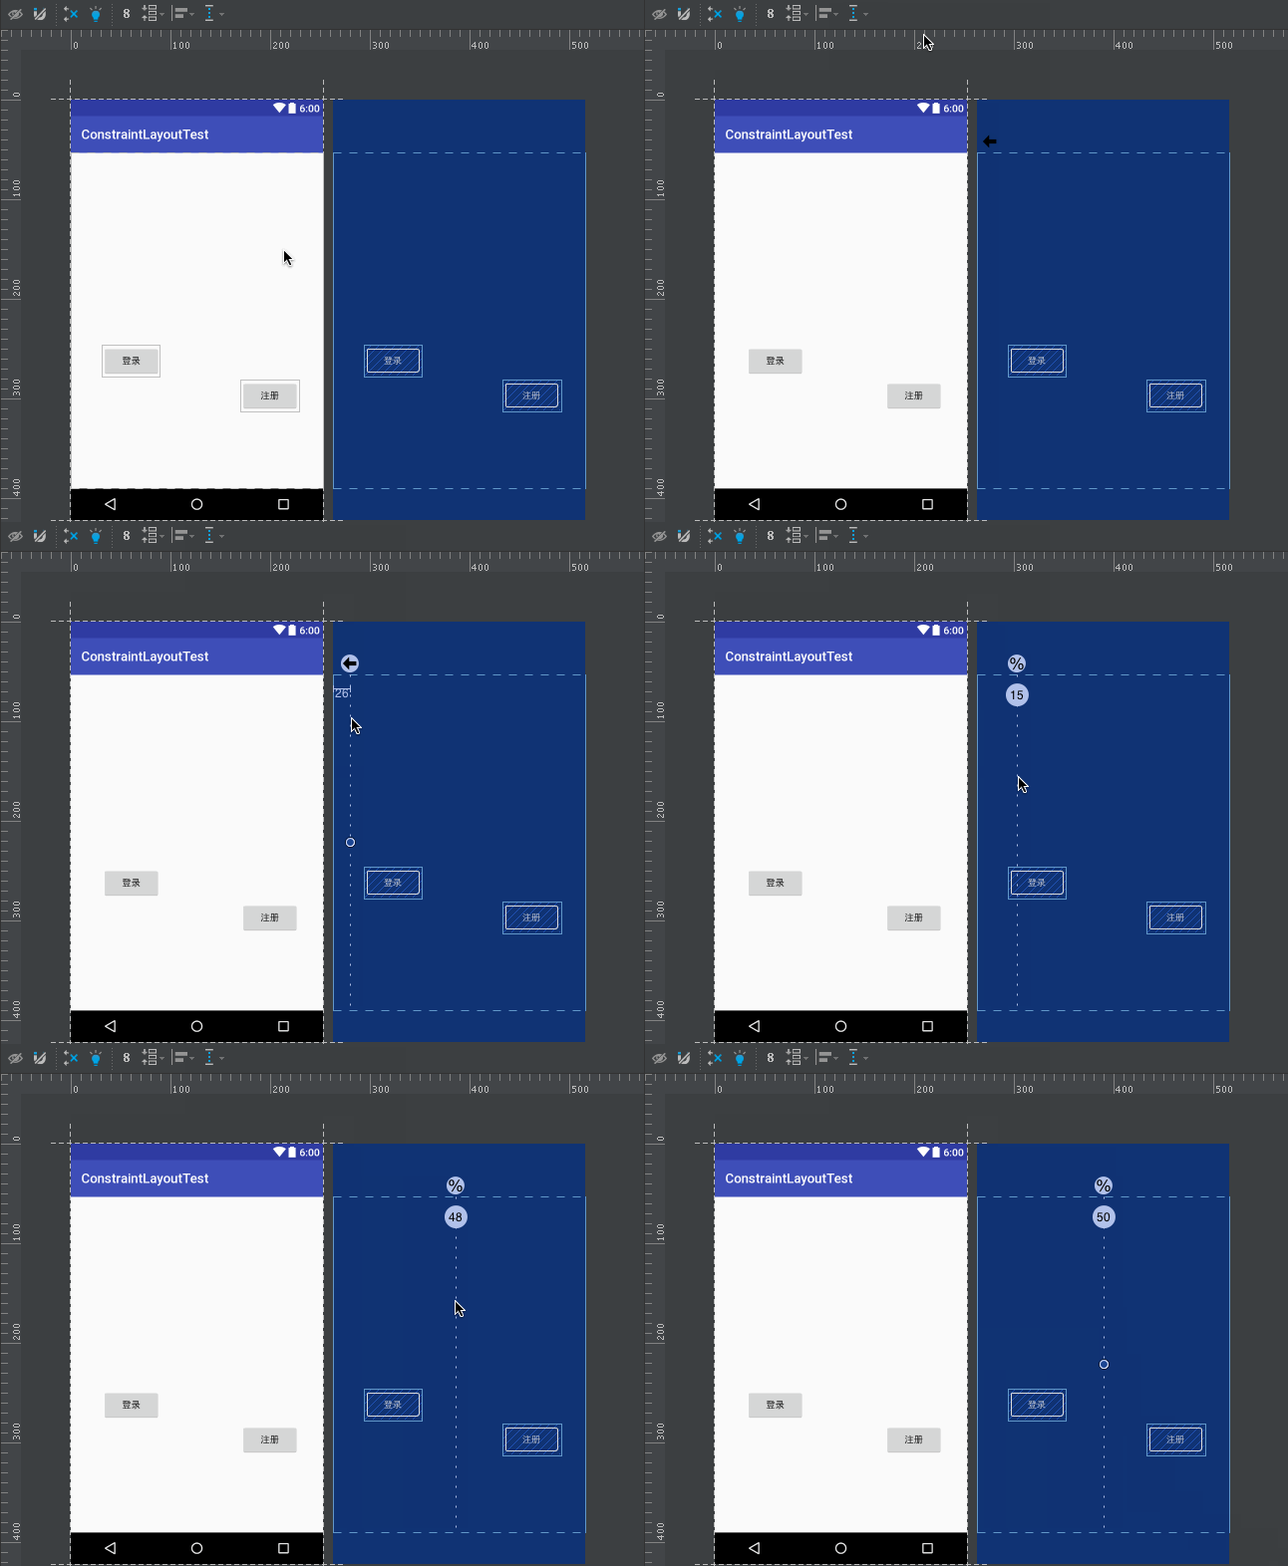
%title插图%num我来对上图中的操作进行一下解释。首先点击通知栏中的Guidelines图标可以添加一个垂直或水平方向上的Guideline,这里我们需要的是垂直方向上的。而Guideline默认是使用的dp尺,我们需要选中Guideline,并点击一下*上面的箭头图标将它改成百分比尺,然后将垂直方向上的Guideline调整到50%的位置,这样就将准备工作做好了。
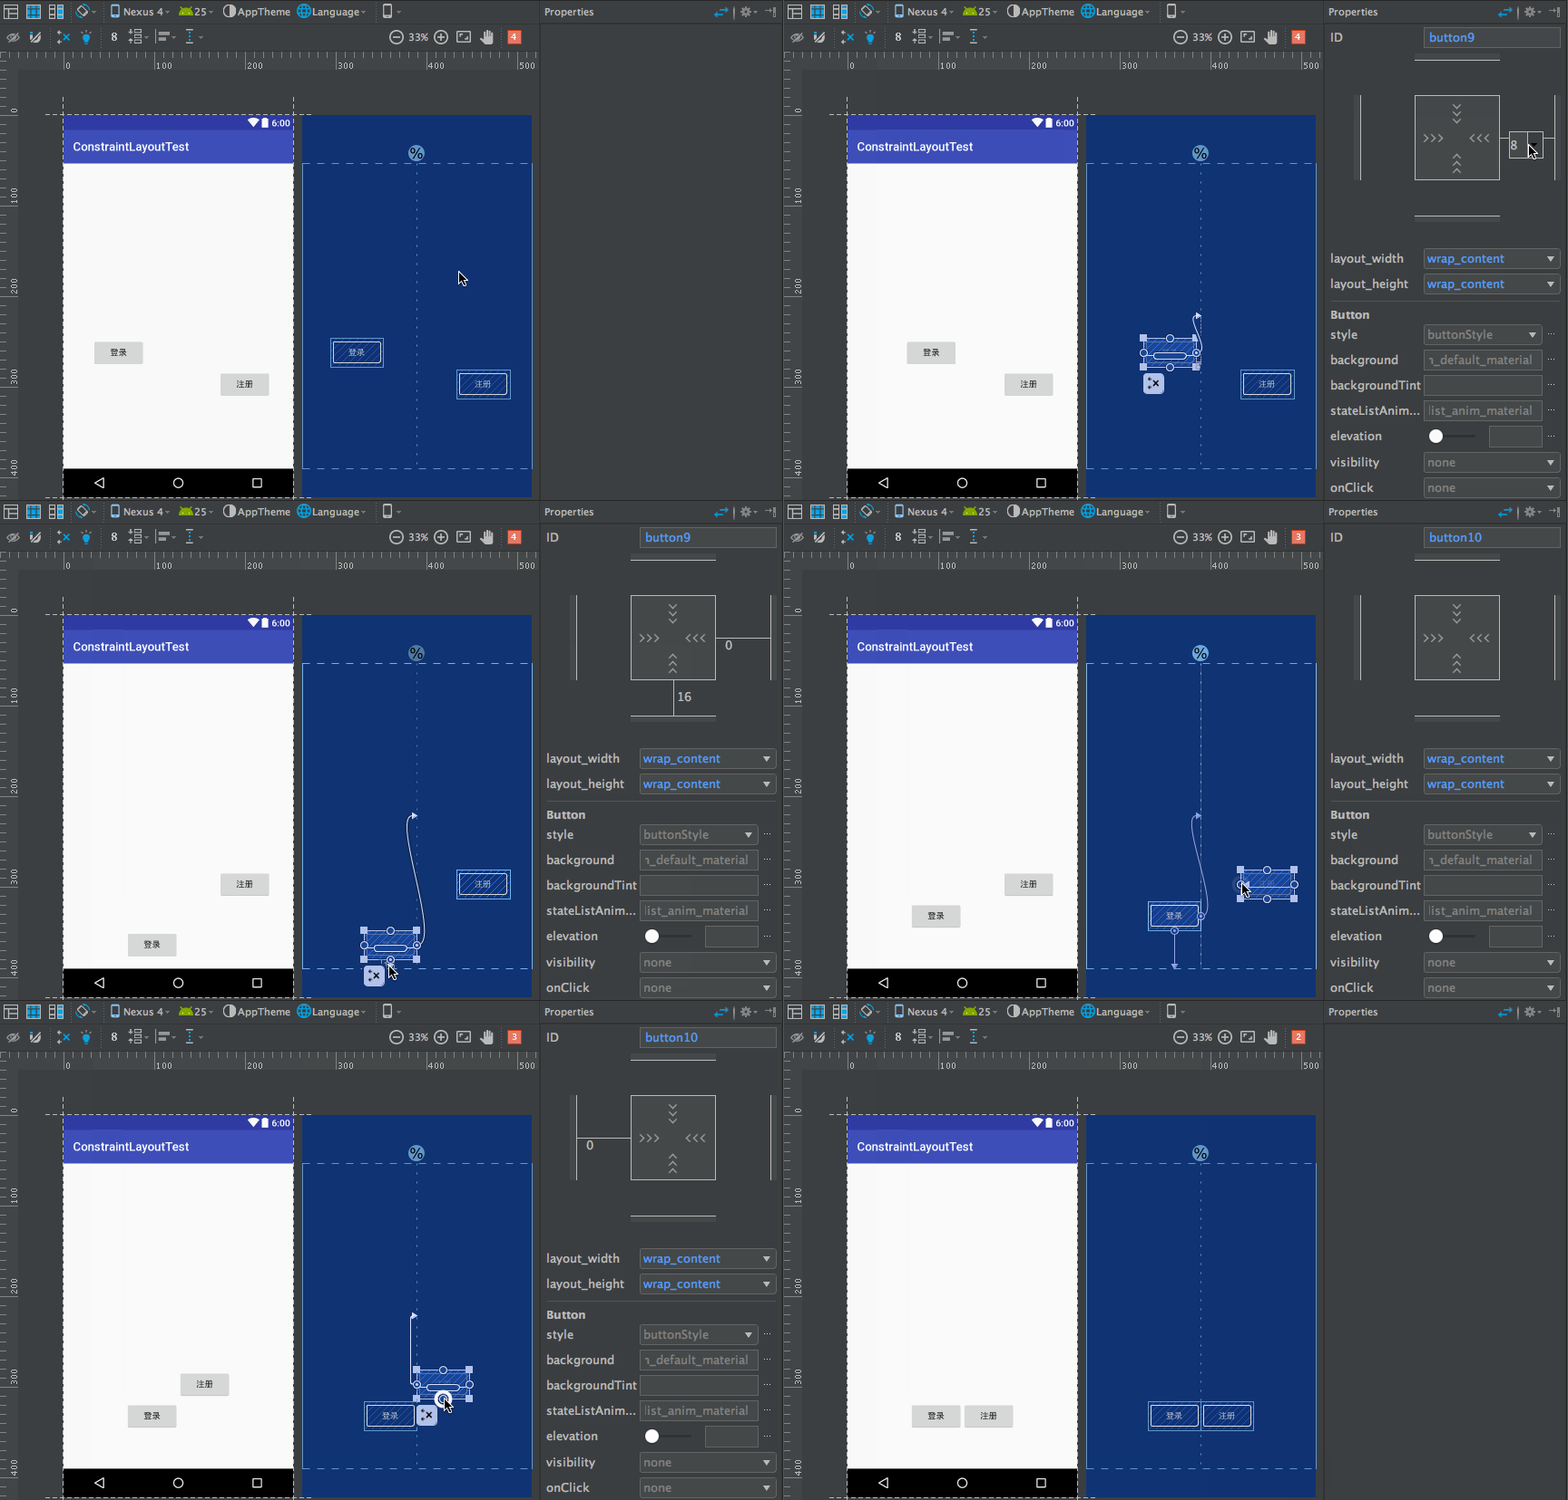
接下来我们开始实现让两个按钮在水平方向上居中显示,并距离底部64dp的功能,如下图所示。

%title插图%num可以看到,我们给登录按钮的右边向Guideline添加约束,登录按钮的下面向底部添加约束,并拖动按钮让它距离底部64dp。然后给注册按钮的左边向Guideline添加约束,注册按钮的下面向登录按钮的下面添加约束。这样就实现了让两个按钮在水平方向上居中显示,在垂直方向上都距离底部64dp的功能了。

自动添加约束

不过如果界面中的内容变得复杂起来,给每个控件一个个地添加约束也是一件很繁琐的事情。为此,ConstraintLayout中支持自动添加约束的功能,可以*大程度上简化那些繁琐的操作。

自动添加约束的方式主要有两种,一种叫Autoconnect,一种叫Inference,我们先来看*种。

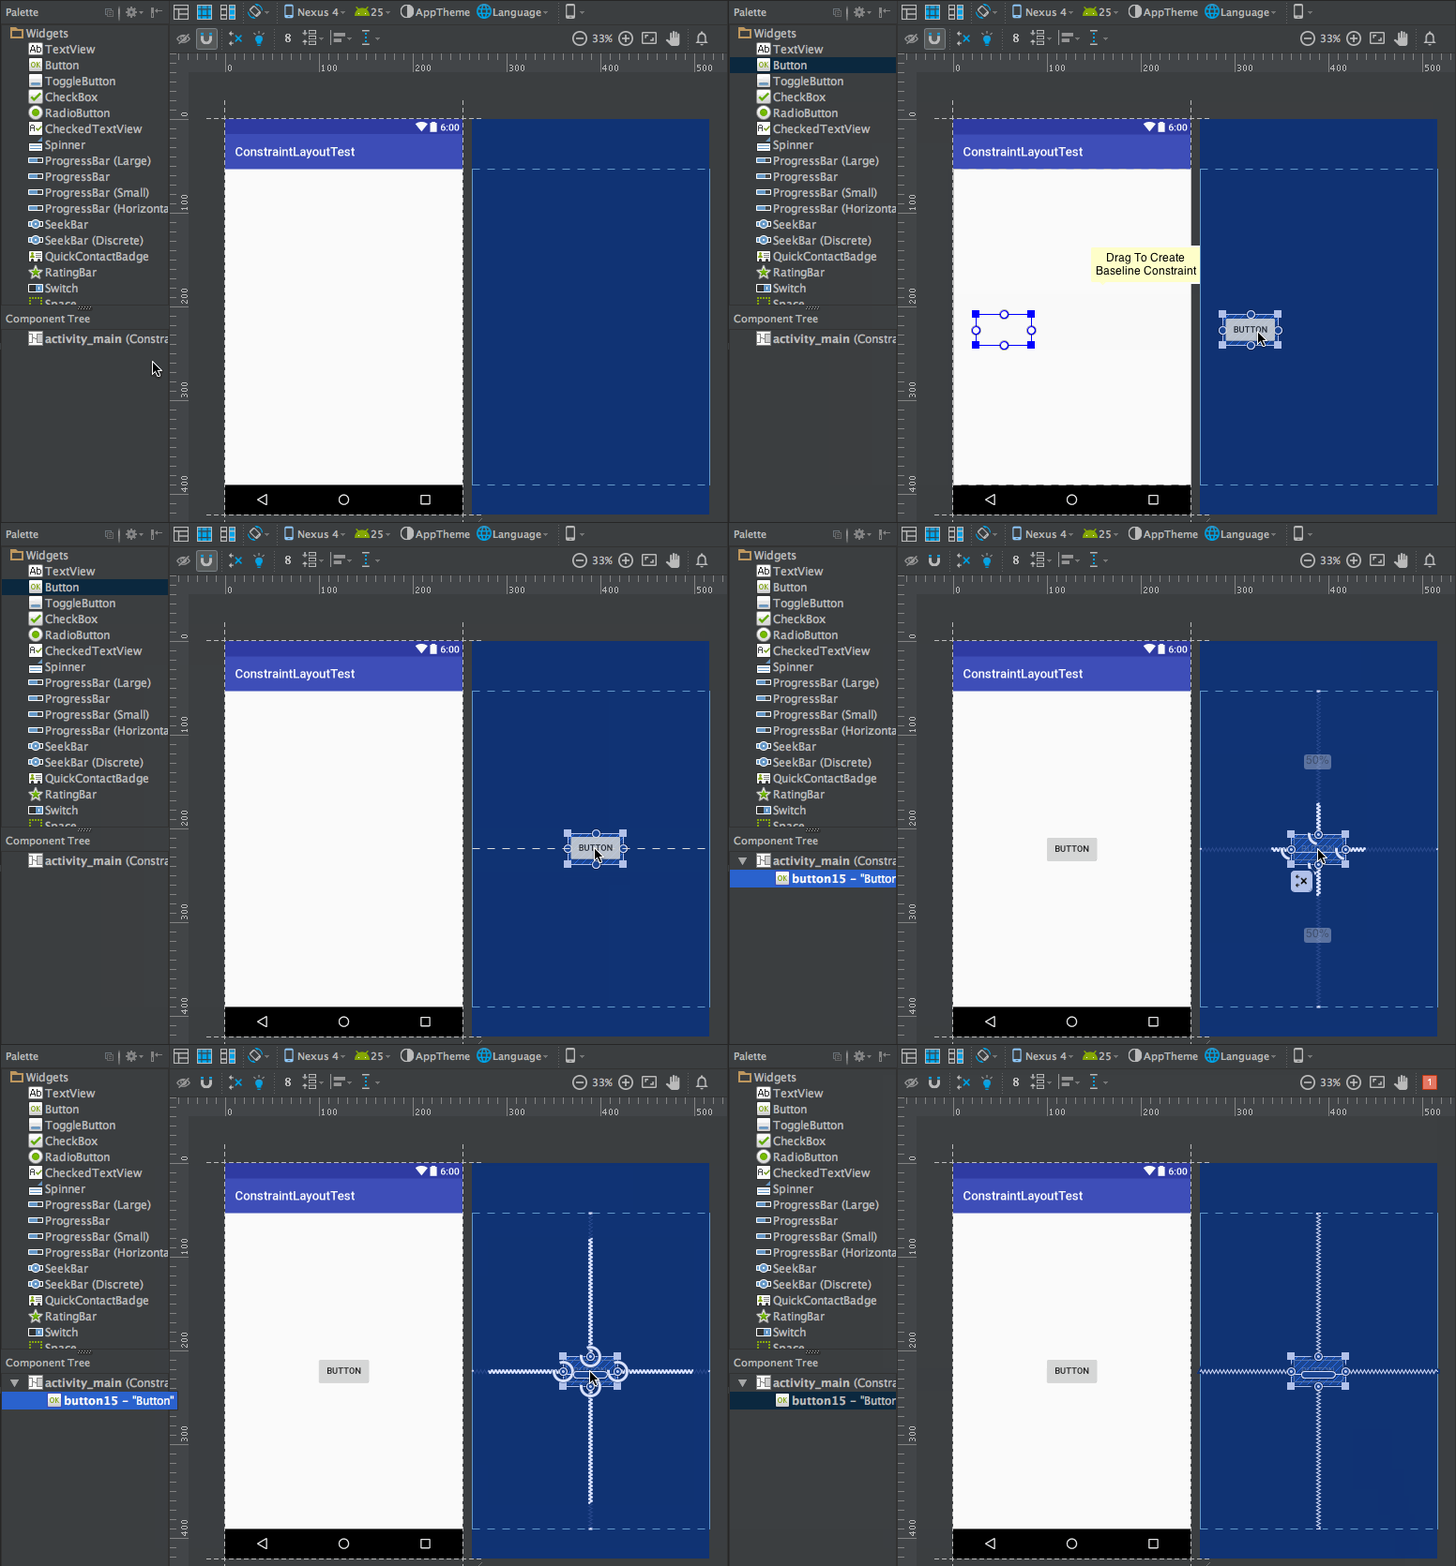
想要使用Autoconnect,首先需要在工具栏中将这个功能启用,默认情况下Autoconnect是不启用的,如下图所示。

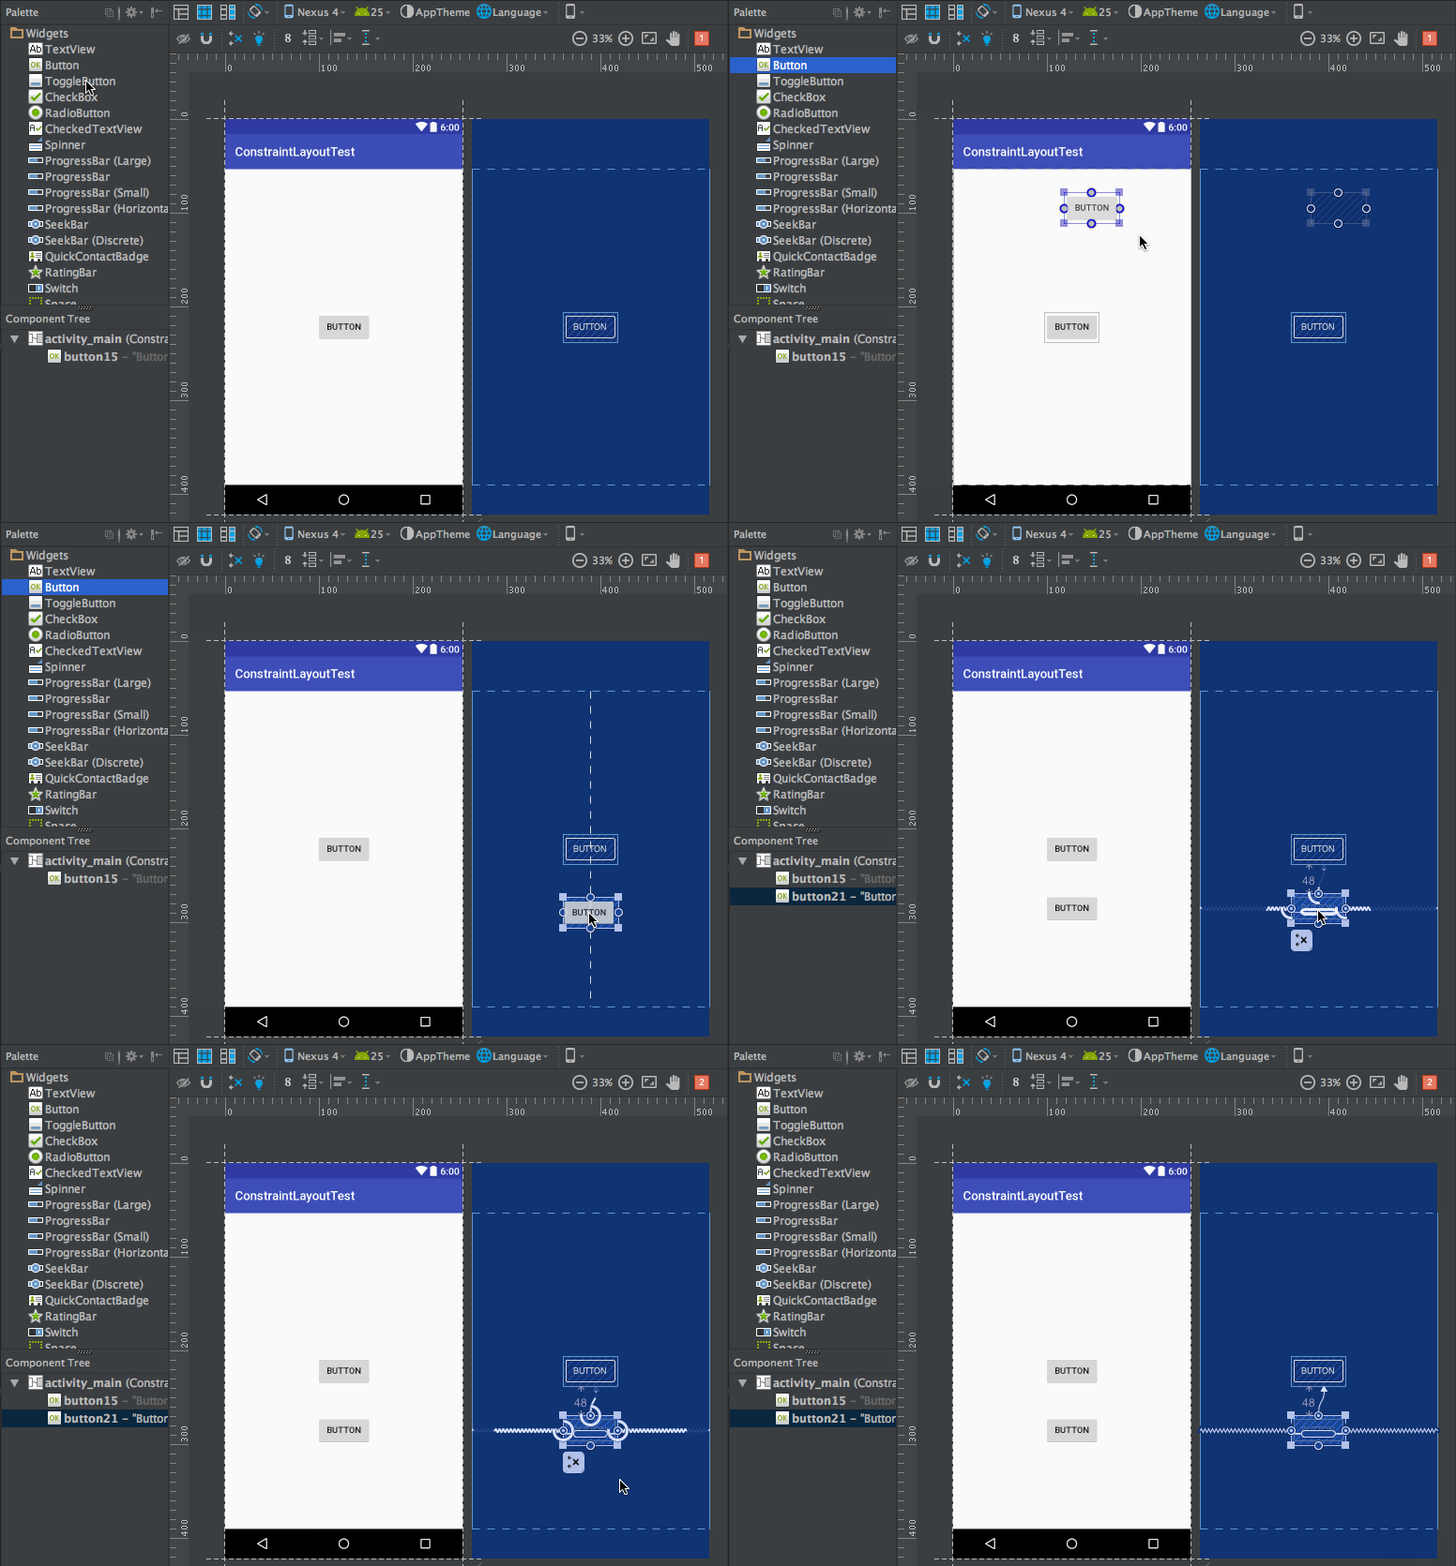
%title插图%numAutoconnect可以根据我们拖放控件的状态自动判断应该如何添加约束,比如我们将Button放到界面的正中央,那么它的上下左右都会自动地添加上约束,如下图所示。
%title插图%num然后我们在这个Button的下方再放置一个Button,效果如下。

%title插图%num可以看到,只需要将Button拖放到界面上,Autoconnect会判断我们的意图,并自动给控件添加约束。不过Autoconnect是无法保证百分百准确判断出我们的意图的,如果自动添加的约束并不是你想要的话,还可以在任何时候进行手动修改。总之,可以把它当成一个辅助工具,但不能完全靠它去添加控件的约束。

以上是Autoconnect的用法,接下来我们看一下Inference的用法。Inference也是用于自动添加约束的,但它比Autoconnect的功能要更为强大,因为AutoConnect只能给当前操作的控件自动添加约束,而Inference会给当前界面中的所有元素自动添加约束。因而Inference比较适合用来实现复杂度比较高的界面,它可以一键自动生成所有的约束。

下面我们就通过一个例子来演示一下Inference的用法,比如界面上现在有两个TextView,两个EditText,和两个Button,如下图所示。

%title插图%num接下来我们先将各个控件按照界面设计的位置进行摆放,摆放完成之后点击一下工具栏上的Infer Constraints按钮,就能为所有控件自动添加约束了,如下图所示。
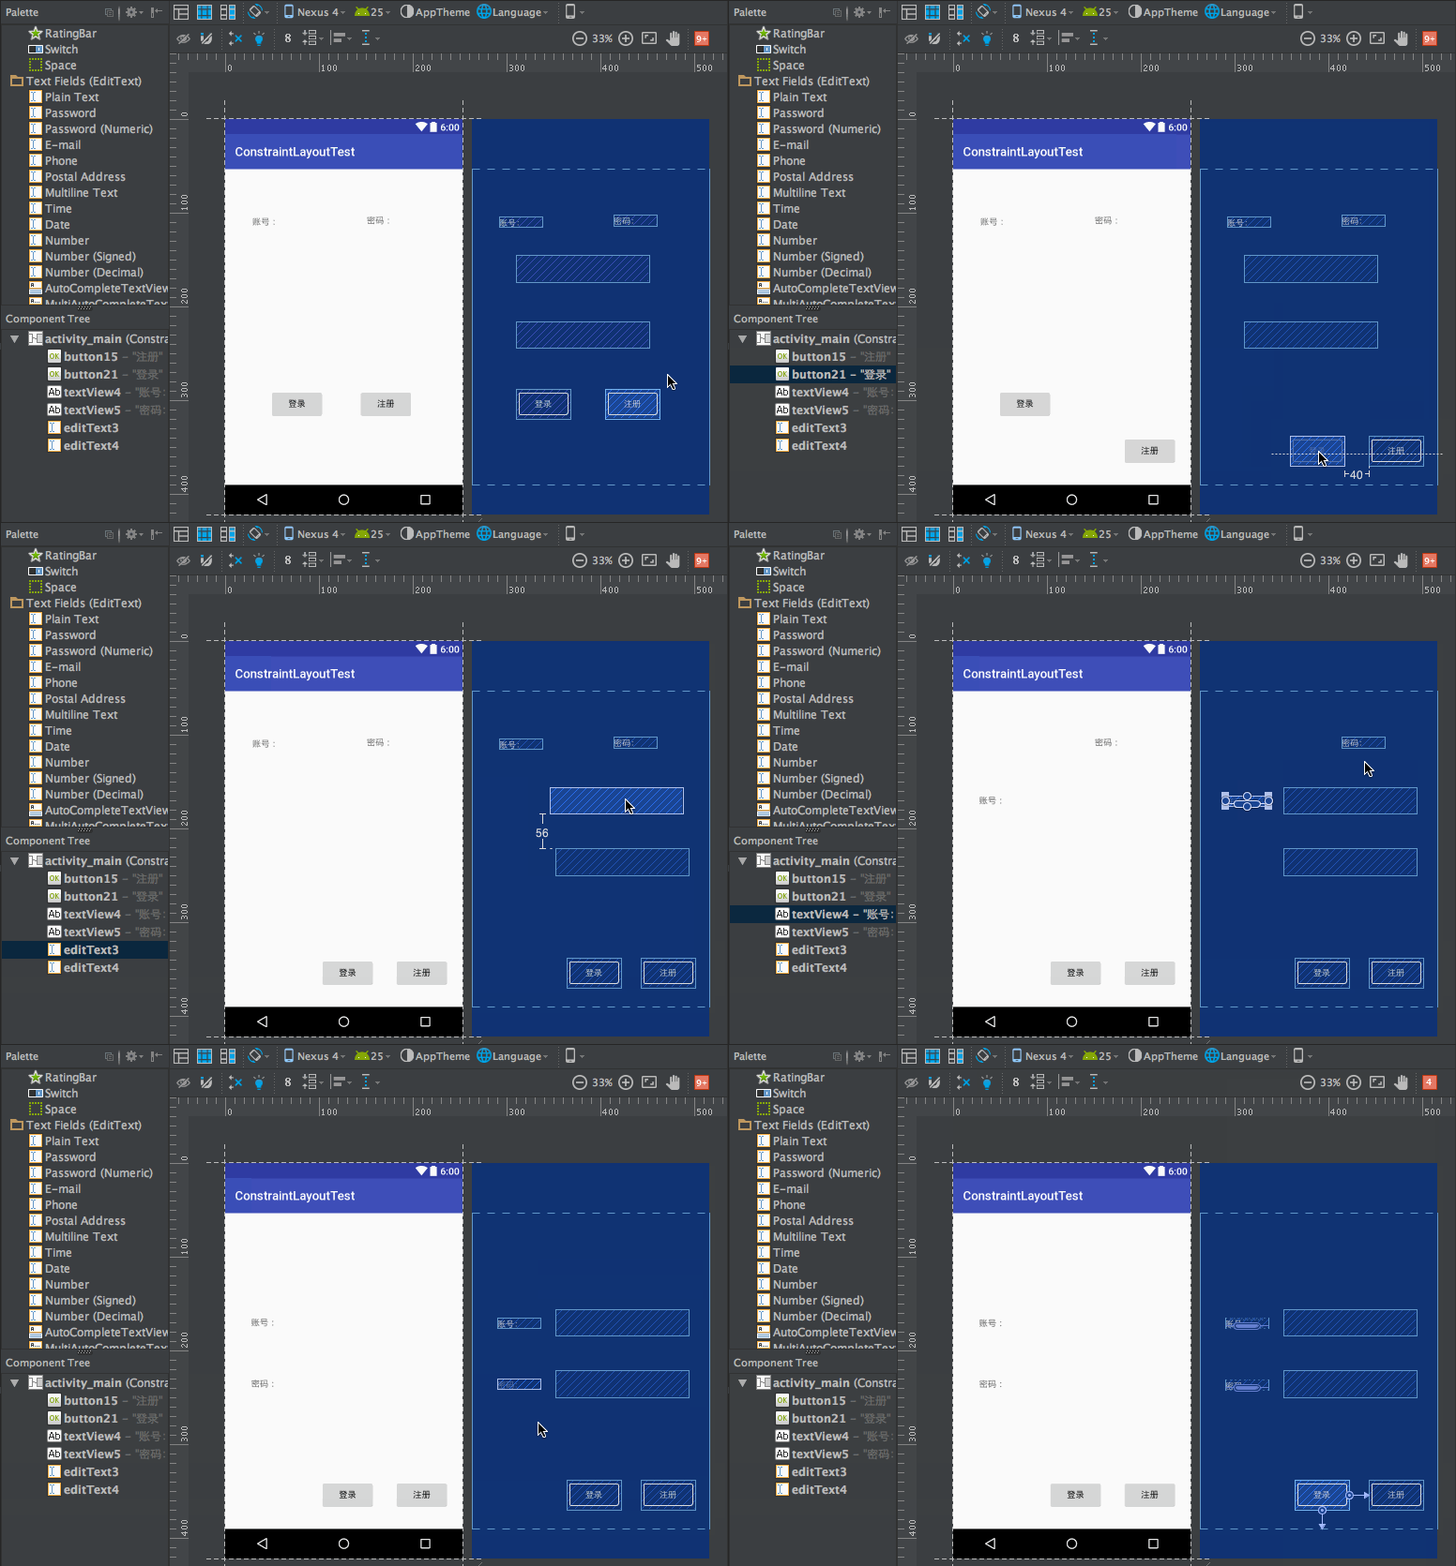
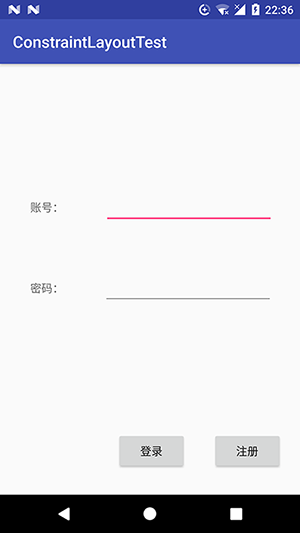
%title插图%num现在运行一下程序,*终效果如下图所示:

%title插图%num

Android系统五大布局详解Layout

我们知道Android系统应用程序一般是由多个Activity组成,而这些Activity以视图的形式展现在我们面前,视图都是由一个一个的组件构成的。组件就是我们常见的Button、TextEdit等等。那么我们平时看到的Android手机中那些漂亮的界面是怎么显示出来的呢?这就要用到Android的布局管理器了,网上有人比喻的很好:布局好比是建筑里的框架,组件按照布局的要求依次排列,就组成了用于看见的漂亮界面了。

在分析布局之前,我们首先看看控件:Android中任何可视化的控件都是从android.veiw.View继承而来的,系统提供了两种方法来设置视图:*种也是我们*常用的的使用XML文件来配置View的相关属性,然后在程序启动时系统根据配置文件来创建相应的View视图。第二种是我们在代码中直接使用相应的类来创建视图。

如何使用XML文件定义视图:

每个Android项目的源码目录下都有个res/layout目录,这个目录就是用来存放布局文件的。布局文件一般以对应activity的名字命名,以 .xml 为后缀。在xml中为创建组件时,需要为组件指定id,如:android:id=”@+id/名字”系统会自动在gen目录下创建相应的R资源类变量。

如何在代码中使用视图:

在代码中创建每个Activity时,一般是在onCreate()方法中,调用setContentView()来加载指定的xml布局文件,然后就可以通过findViewById()来获得在布局文件中创建的相应id的控件了,如Button等。

如:

[html]  view plain copy

  1. private Button btnSndMag;
  2. public void onCreate(Bundle savedInstanceState) {
  3.     super.onCreate(savedInstanceState);
  4.     setContentView(R.layout.main);  // 加载main.xml布局文件
  5.     btnSndMag = (Button)this.findViewById(R.id.btnSndMag); // 通过id找到对于的Button组件
  6.     ….
  7. }


下面我们来介绍Android系统中为我们提供的五大布局:LinearLayout(线性布局)、FrameLayout(单帧布局)、AbsoluteLayout(*对布局)、TablelLayout(表格布局)、RelativeLayout(相对布局)。其中*常用的的是LinearLayout、TablelLayout和RelativeLayout。这些布局都可以嵌套使用。

(1)LinearLayout 线性布局

线性布局是按照水平或垂直的顺序将子元素(可以是控件或布局)依次按照顺序排列,每一个元素都位于前面一个元素之后。线性布局分为两种:水平方向和垂直方向的布局。分别通过属性android:orientation=”vertical” 和 android:orientation=”horizontal”来设置。

android:layout_weight 表示子元素占据的空间大小的比例,有人说这个值大小和占据空间成正比,有人说反比。我在实际应用中设置和网上资料显示的刚好相反,这个问题后面会专门写一篇文章来分析。现在我们只需要按照正比例来设置就可以。

例如下面我们实现一个如图所示的简易计算器界面:

%title插图%num

代码:

[html]  view plain copy

  1. <LinearLayout xmlns:android=“http://schemas.android.com/apk/res/android”
  2.     xmlns:tools=“http://schemas.android.com/tools”
  3.     android:orientation=“vertical”
  4.     android:layout_width=“match_parent”
  5.     android:layout_height=“match_parent”
  6.     android:background=“#FFFFFF”
  7.     tools:context=“.MainActivity” >
  8.     // 这里*行显示标签为一个水平布局
  9.     <LinearLayout
  10.         android:layout_width=“match_parent”
  11.         android:layout_height=“wrap_content”
  12.         android:orientation=“horizontal” >
  13.         <EditText
  14.             android:id=“@+id/msg”
  15.             android:inputType=“number”
  16.             android:layout_width=“match_parent”
  17.             android:layout_height=“wrap_content”
  18.             android:text=“”>
  19.         </EditText>
  20.     </LinearLayout>
  21.     // 第二行为 mc m+ m- mr 四个Button构成一个水平布局
  22.     <LinearLayout
  23.         android:layout_width=“match_parent”
  24.         android:layout_height=“wrap_content”
  25.         android:orientation=“horizontal” >
  26.         <Button
  27.             android:layout_width=“match_parent”
  28.             android:layout_height=“wrap_content”
  29.             android:text=“mc” android:layout_weight=“1”>
  30.         </Button>
  31.         <Button
  32.             android:layout_width=“match_parent”
  33.             android:layout_height=“wrap_content”
  34.             android:text=“m+” android:layout_weight=“1”>
  35.         </Button>
  36.         <Button
  37.             android:layout_width=“match_parent”
  38.             android:layout_height=“wrap_content”
  39.             android:text=“m-“ android:layout_weight=“1”>
  40.         </Button>
  41.         <Button
  42.             android:layout_width=“match_parent”
  43.             android:layout_height=“wrap_content”
  44.             android:text=“mr” android:layout_weight=“1”>
  45.         </Button>
  46.     </LinearLayout>
  47.     // 同上 C +/-  / * 四个Button构成一个水平布局
  48.       <LinearLayout
  49.           android:layout_width=“match_parent”
  50.           android:layout_height=“wrap_content”
  51.           android:orientation=“horizontal” >
  52.           <Button
  53.               android:layout_width=“match_parent”
  54.               android:layout_height=“wrap_content”
  55.               android:layout_weight=“1”
  56.               android:text=“C” >
  57.           </Button>
  58.           <Button
  59.               android:layout_width=“match_parent”
  60.               android:layout_height=“wrap_content”
  61.               android:layout_weight=“1”
  62.               android:text=“+/-“ >
  63.           </Button>
  64.           <Button
  65.               android:layout_width=“match_parent”
  66.               android:layout_height=“wrap_content”
  67.               android:layout_weight=“1”
  68.               android:text=“/” >
  69.           </Button>
  70.           <Button
  71.               android:layout_width=“match_parent”
  72.               android:layout_height=“wrap_content”
  73.               android:layout_weight=“1”
  74.               android:text=“*” >
  75.           </Button>
  76.       </LinearLayout>
  77.       <LinearLayout
  78.         android:layout_width=“match_parent”
  79.         android:layout_height=“wrap_content”
  80.         android:orientation=“horizontal” >
  81.         <Button
  82.             android:layout_width=“match_parent”
  83.             android:layout_height=“wrap_content”
  84.             android:text=“7” android:layout_weight=“1”>
  85.         </Button>
  86.         <Button
  87.             android:layout_width=“match_parent”
  88.             android:layout_height=“wrap_content”
  89.             android:text=“8” android:layout_weight=“1”>
  90.         </Button>
  91.         <Button
  92.             android:layout_width=“match_parent”
  93.             android:layout_height=“wrap_content”
  94.             android:text=“9” android:layout_weight=“1”>
  95.         </Button>
  96.         <Button
  97.             android:layout_width=“match_parent”
  98.             android:layout_height=“wrap_content”
  99.             android:text=“-“ android:layout_weight=“1”>
  100.         </Button>
  101.     </LinearLayout>
  102.     <LinearLayout
  103.         android:layout_width=“match_parent”
  104.         android:layout_height=“wrap_content”
  105.         android:orientation=“horizontal” >
  106.         <Button
  107.             android:layout_width=“match_parent”
  108.             android:layout_height=“wrap_content”
  109.             android:layout_weight=“1”
  110.             android:text=“4” >
  111.         </Button>
  112.         <Button
  113.             android:layout_width=“match_parent”
  114.             android:layout_height=“wrap_content”
  115.             android:layout_weight=“1”
  116.             android:text=“5” >
  117.         </Button>
  118.         <Button
  119.             android:layout_width=“match_parent”
  120.             android:layout_height=“wrap_content”
  121.             android:layout_weight=“1”
  122.             android:text=“6” >
  123.         </Button>
  124.         <Button
  125.             android:layout_width=“match_parent”
  126.             android:layout_height=“wrap_content”
  127.             android:layout_weight=“1”
  128.             android:text=“+” >
  129.         </Button>
  130.     </LinearLayout>
  131.     // *外层是一个水平布局,由左边上面一行1 2 3三个Button,下面一行的0 . 两个Button 和 右边的=构成
  132.      <LinearLayout android:orientation=“horizontal”
  133.         android:layout_width=“match_parent”
  134.         android:layout_height=“wrap_content”>
  135.         // 这里 1 2 3 和 下面的 0 . 构成一个垂直布局
  136.         <LinearLayout android:orientation=“vertical”
  137.             android:layout_weight=“3”
  138.             android:layout_width=“wrap_content”
  139.             android:layout_height=“wrap_content”>
  140.             // 这里的 1 2 3 构成一个水平布局
  141.             <LinearLayout android:orientation=“horizontal”
  142.                 android:layout_width=“match_parent”
  143.                 android:layout_height=“wrap_content”>
  144.                 <Button
  145.                     android:layout_width=“wrap_content”
  146.                     android:layout_height=“wrap_content”
  147.                     android:layout_weight=“1”
  148.                     android:text=“1”></Button>
  149.                 <Button
  150.                     android:layout_width=“wrap_content”
  151.                     android:layout_height=“wrap_content”
  152.                     android:layout_weight=“1”
  153.                     android:text=“2”></Button>
  154.                 <Button
  155.                     android:layout_width=“wrap_content”
  156.                     android:layout_height=“wrap_content”
  157.                     android:layout_weight=“1”
  158.                     android:text=“3”></Button>
  159.             </LinearLayout>
  160.             // 这里的 0 和 . 构成一个水平布局,注意这里的android_weight参数设置
  161.             <LinearLayout android:orientation=“horizontal”
  162.                 android:layout_width=“match_parent”
  163.                 android:layout_height=“wrap_content”>
  164.                 <Button
  165.                     android:layout_width=“0px”
  166.                     android:layout_height=“wrap_content”
  167.                     android:layout_weight=“2”
  168.                     android:text=“0”></Button>
  169.                 <Button
  170.                     android:layout_width=“0px”
  171.                     android:layout_height=“wrap_content”
  172.                     android:layout_weight=“1”
  173.                     android:text=“.”></Button>
  174.             </LinearLayout>
  175.         </LinearLayout>
  176.         // 这里一个单独Button构成的垂直布局
  177.         <LinearLayout android:orientation=“vertical”
  178.             android:layout_weight=“1”
  179.             android:layout_width=“wrap_content”
  180.             android:layout_height=“match_parent”>
  181.             <Button
  182.                 android:layout_width=“match_parent”
  183.                 android:layout_height=“match_parent”
  184.                 android:text=“=”></Button>
  185.         </LinearLayout>
  186.      </LinearLayout>
  187. </LinearLayout>

(2)TableLayout 表格布局

表格布局,适用于多行多列的布局格式,每个TableLayout是由多个TableRow组成,一个TableRow就表示TableLayout中的每一行,这一行可以由多个子元素组成。实际上TableLayout和TableRow都是LineLayout线性布局的子类。但是TableRow的参数android:orientation属性值固定为horizontal,且android:layout_width=MATCH_PARENT,android:layout_height=WRAP_CONTENT。所以TableRow实际是一个横向的线性布局,且所以子元素宽度和高度一致。

注意:在TableLayout中,单元格可以为空,但是不能跨列,意思是只能不能有相邻的单元格为空。

在TableLayout布局中,一列的宽度由该列中*宽的那个单元格指定,而该表格的宽度由父容器指定。可以为每一列设置以下属性:

Shrinkable  表示该列的宽度可以进行收缩,以使表格能够适应父容器的大小

Stretchable 表示该列的宽度可以进行拉伸,以使能够填满表格中的空闲空间

Collapsed  表示该列会被隐藏

TableLayout中的特有属性:

android:collapseColumns

android:shrinkColumns

android:stretchColumns = “0,1,2,3”// 表示产生4个可拉伸的列

Demo:我们想设计一个如下所以的一个三行三列的表格,但是第二行我们只想显示2个表格:

%title插图%num

[java]  view plain copy

  1. <?xml version=“1.0” encoding=“utf-8”?>
  2. <TableLayout xmlns:android=“http://schemas.android.com/apk/res/android”
  3.     android:orientation=“vertical”
  4.     android:shrinkColumns=“0,1,2”  // 设置三列都可以收缩  
  5.     android:stretchColumns=“0,1,2” // 设置三列都可以拉伸 如果不设置这个,那个显示的表格将不能填慢整个屏幕
  6.     android:layout_width=“fill_parent”
  7.     android:layout_height=“fill_parent” >
  8.     <TableRow android:layout_width=“fill_parent”
  9.         android:layout_height=“wrap_content”>
  10.         <Button android:gravity=“center”
  11.             android:padding=“10dp”
  12.             android:text=“Button1”>
  13.         </Button>
  14.         <Button android:gravity=“center”
  15.             android:padding=“10dp”
  16.             android:text=“Button2”>
  17.         </Button>
  18.         <Button android:gravity=“center”
  19.             android:padding=“10dp”
  20.             android:text=“Button3”>
  21.         </Button>
  22.     </TableRow>
  23.     <TableRow android:layout_width=“fill_parent”
  24.         android:layout_height=“wrap_content”>
  25.         <Button android:gravity=“center”
  26.             android:padding=“10dp”
  27.             android:text=“Button4”>
  28.         </Button>
  29.         <Button android:gravity=“center”
  30.             android:padding=“10dp”
  31.             android:text=“Button5”>
  32.         </Button>
  33.     </TableRow>
  34.     <TableRow android:layout_width=“fill_parent”
  35.         android:layout_height=“wrap_content”>
  36.         <Button android:gravity=“center”
  37.             android:padding=“10dp”
  38.             android:text=“Button6”>
  39.         </Button>
  40.         <Button android:gravity=“center”
  41.             android:padding=“10dp”
  42.             android:text=“Button7”>
  43.         </Button>
  44.         <Button android:gravity=“center”
  45.             android:padding=“10dp”
  46.             android:text=“Button8”>
  47.         </Button>
  48.     </TableRow>
  49. </TableLayout>


(3)RelativeLayout 相对布局

RelativeLayout继承于android.widget.ViewGroup,其按照子元素之间的位置关系完成布局的,作为Android系统五大布局中*灵活也是*常用的一种布局方式,非常适合于一些比较复杂的界面设计。

注意:在引用其他子元素之前,引用的ID必须已经存在,否则将出现异常。

常用的位置属性:


[java]  view plain copy

  1. android:layout_toLeftOf         该组件位于引用组件的左方
  2. android:layout_toRightOf        该组件位于引用组件的右方
  3. android:layout_above            该组件位于引用组件的上方
  4. android:layout_below                该组件位于引用组件的下方
  5. android:layout_alignParentLeft      该组件是否对齐父组件的左端
  6. android:layout_alignParentRight     该组件是否齐其父组件的右端
  7. android:layout_alignParentTop       该组件是否对齐父组件的顶部
  8. android:layout_alignParentBottom    该组件是否对齐父组件的底部
  9. android:layout_centerInParent       该组件是否相对于父组件居中
  10. android:layout_centerHorizontal     该组件是否横向居中
  11. android:layout_centerVertical       该组件是否垂直居中


Demo:利用相对布局设计一个如下图所示的界面:

%title插图%num

源码:

[html]  view plain copy

  1. <?xml version=“1.0” encoding=“utf-8”?>
  2. <RelativeLayout xmlns:android=“http://schemas.android.com/apk/res/android”
  3.     android:layout_width=“fill_parent”
  4.     android:layout_height=“fill_parent” >
  5.     <Button android:id=“@+id/btn1”
  6.         android:layout_width=“wrap_content”
  7.         android:layout_height=“wrap_content”
  8.         android:layout_centerInParent=“true”
  9.         android:layout_centerHorizontal=“true”
  10.         android:text=“Button1”
  11.         ></Button>
  12.     <Button android:id=“@+id/btn2”
  13.         android:layout_width=“wrap_content”
  14.         android:layout_height=“wrap_content”
  15.         android:layout_toLeftOf=“@id/btn1”
  16.         android:layout_above=“@id/btn1”
  17.         android:text=“Button2”
  18.         ></Button>
  19.     <Button android:id=“@+id/btn3”
  20.         android:layout_width=“wrap_content”
  21.         android:layout_height=“wrap_content”
  22.         android:layout_toRightOf=“@id/btn1”
  23.         android:layout_above=“@id/btn1”
  24.         android:text=“Button3”
  25.         ></Button>
  26.     <Button android:id=“@+id/btn4”
  27.         android:layout_width=“wrap_content”
  28.         android:layout_height=“wrap_content”
  29.         android:layout_toRightOf=“@id/btn2”
  30.         android:layout_toLeftOf=“@id/btn3”
  31.         android:layout_above=“@id/btn2”
  32.         android:text=“Button4”
  33.         ></Button>
  34. </RelativeLayout>

(4)FrameLayout 框架布局

将所有的子元素放在整个界面的左上角,后面的子元素直接覆盖前面的子元素,所以用的比较少。

(5) AbsoluteLayou *对布局

*对布局中将所有的子元素通过设置android:layout_x 和 android:layout_y属性,将子元素的坐标位置固定下来,即坐标(android:layout_x, android:layout_y) ,layout_x用来表示横坐标,layout_y用来表示纵坐标。屏幕左上角为坐标(0,0),横向往右为正方,纵向往下为正方。实际应用中,这种布局用的比较少,因为Android终端一般机型比较多,各自的屏幕大小。分辨率等可能都不一样,如果用*对布局,可能导致在有的终端上显示不全等。

除上面讲过之外常用的几个布局的属性:
(1)layout_margin 
用于设置控件边缘相对于父控件的边距
android:layout_marginLeft
android:layout_marginRight
android:layout_marginTop
android:layout_marginBottom

(2) layout_padding 
用于设置控件内容相对于控件边缘的边距
android:layout_paddingLeft
android:layout_paddingRight
android:layout_paddingTop
android:layout_paddingBottom

(3) layout_width/height
用于设置控件的高度和宽度
wrap_content 内容包裹,表示这个控件的里面文字大小填充
fill_parent 跟随父窗口
match_parent

(4) gravity 
用于设置View组件里面内容的对齐方式
top bottom   left   right   center等

(5) android:layout_gravity  
用于设置Container组件的对齐方式
android:layout_alignTop 本元素的上边缘和某元素的的上边缘对齐
android:layout_alignLeft 本元素的左边缘和某元素的的左边缘对齐
android:layout_alignBottom 本元素的下边缘和某元素的的下边缘对齐
android:layout_alignRight 本元素的右边缘和某元素的的右边缘对齐

友情链接: SITEMAP | 旋风加速器官网 | 旋风软件中心 | textarea | 黑洞加速器 | jiaohess | 老王加速器 | 烧饼哥加速器 | 小蓝鸟 | tiktok加速器 | 旋风加速度器 | 旋风加速 | quickq加速器 | 飞驰加速器 | 飞鸟加速器 | 狗急加速器 | hammer加速器 | trafficace | 原子加速器 | 葫芦加速器 | 麦旋风 | 油管加速器 | anycastly | INS加速器 | INS加速器免费版 | 免费vqn加速外网 | 旋风加速器 | 快橙加速器 | 啊哈加速器 | 迷雾通 | 优途加速器 | 海外播 | 坚果加速器 | 海外vqn加速 | 蘑菇加速器 | 毛豆加速器 | 接码平台 | 接码S | 西柚加速器 | 快柠檬加速器 | 黑洞加速 | falemon | 快橙加速器 | anycast加速器 | ibaidu | moneytreeblog | 坚果加速器 | 派币加速器 | 飞鸟加速器 | 毛豆APP | PIKPAK | 安卓vqn免费 | 一元机场加速器 | 一元机场 | 老王加速器 | 黑洞加速器 | 白石山 | 小牛加速器 | 黑洞加速 | 迷雾通官网 | 迷雾通 | 迷雾通加速器 | 十大免费加速神器 | 猎豹加速器 | 蚂蚁加速器 | 坚果加速器 | 黑洞加速 | 银河加速器 | 猎豹加速器 | 海鸥加速器 | 芒果加速器 | 小牛加速器 | 极光加速器 | 黑洞加速 | movabletype中文网 | 猎豹加速器官网 | 烧饼哥加速器官网 | 旋风加速器度器 | 哔咔漫画 | PicACG | 雷霆加速