Dialog详解(包括进度条、PopupWindow、自定义view、自定义样式的对话框)
Dialog详解(包括进度条、PopupWindow、自定义view、自定义样式的对话框)
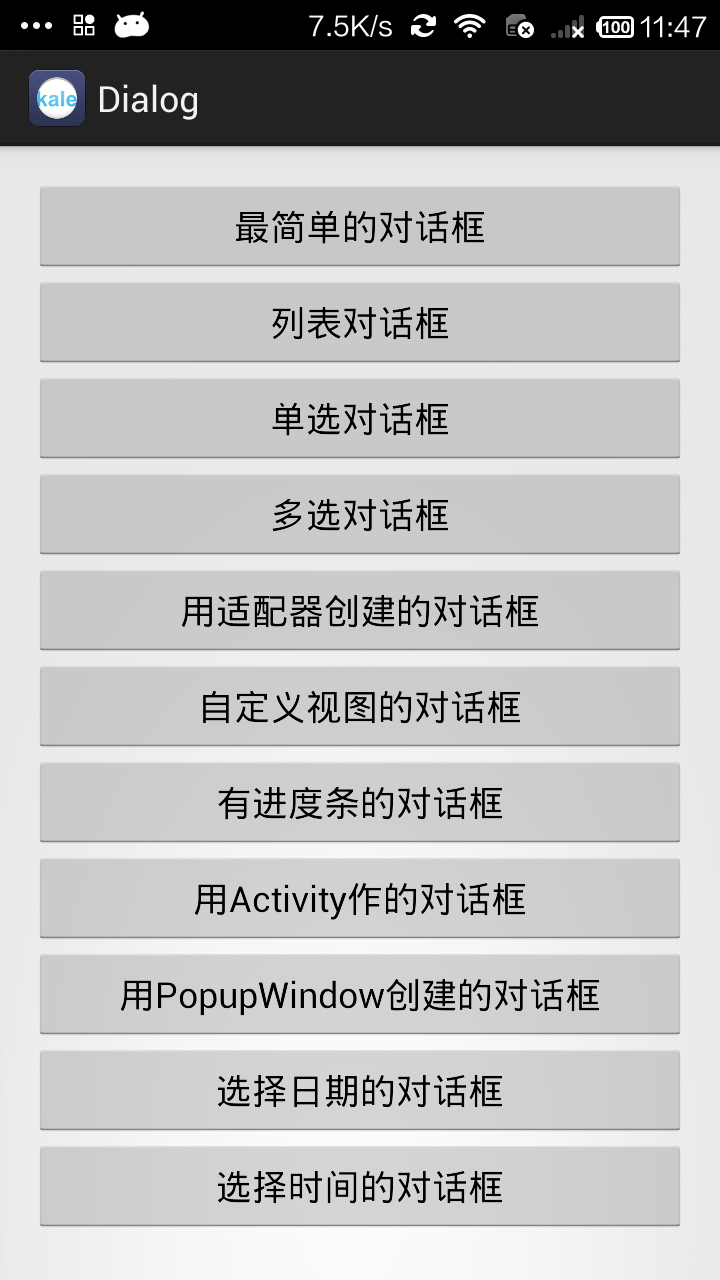
Android中提供了多种对话框,在实际应用中我们可能会需要修改这些已有的对话框。本实例就是从实际出发,展现了andorid中大部分对话框,代码中用了一个对话框管理类来做封装,其中还定义了对话框的动画、自定义样式等等。
主布局文件(全是button)
<LinearLayout xmlns:android="http://schemas.android.com/apk/res/android"
    xmlns:tools="http://schemas.android.com/tools"
    android:layout_width="match_parent"
    android:layout_height="match_parent"
    android:orientation="vertical"
    android:padding="16dp" >

    <ScrollView
        android:id="@+id/scrollView1"
        android:layout_width="match_parent"
        android:layout_height="wrap_content" >

        <LinearLayout
            android:layout_width="match_parent"
            android:layout_height="match_parent"
            android:orientation="vertical" >

            <Button
                android:id="@+id/simple_button_id"
                android:layout_width="match_parent"
                android:layout_height="wrap_content"
                android:onClick="buttonListener"
                android:text="*简单的对话框" />

            <Button
                android:id="@+id/list_button_id"
                android:layout_width="match_parent"
                android:layout_height="wrap_content"
                android:onClick="buttonListener"
                android:text="列表对话框" />

            <Button
                android:id="@+id/singleChoice_button_id"
                android:layout_width="match_parent"
                android:layout_height="wrap_content"
                android:onClick="buttonListener"
                android:text="单选对话框" />

            <Button
                android:id="@+id/multiChoice_button_id"
                android:layout_width="match_parent"
                android:layout_height="wrap_content"
                android:onClick="buttonListener"
                android:text="多选对话框" />

            <Button
                android:id="@+id/adapter_button_id"
                android:layout_width="match_parent"
                android:layout_height="wrap_content"
                android:onClick="buttonListener"
                android:text="用适配器创建的对话框" />

            <Button
                android:id="@+id/view_button_id"
                android:layout_width="match_parent"
                android:layout_height="wrap_content"
                android:onClick="buttonListener"
                android:text="自定义视图的对话框" />

            <Button
                android:id="@+id/progress_button_id"
                android:layout_width="match_parent"
                android:layout_height="wrap_content"
                android:onClick="buttonListener"
                android:text="有进度条的对话框" />

            <Button
                android:id="@+id/activity_button_id"
                android:layout_width="match_parent"
                android:layout_height="wrap_content"
                android:onClick="buttonListener"
                android:text="用Activity作的对话框" />

            <Button
                android:id="@+id/popup_button_id"
                android:layout_width="match_parent"
                android:layout_height="wrap_content"
                android:onClick="buttonListener"
                android:text="用PopupWindow创建的对话框" />

            <Button
                android:id="@+id/date_button_id"
                android:layout_width="match_parent"
                android:layout_height="wrap_content"
                android:onClick="buttonListener"
                android:text="选择日期的对话框" />

            <Button
                android:id="@+id/time_button_id"
                android:layout_width="match_parent"
                android:layout_height="wrap_content"
                android:onClick="buttonListener"
                android:text="选择时间的对话框" />
        </LinearLayout>
    </ScrollView>

</LinearLayout>
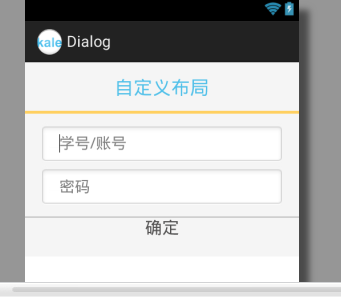
自定义对话框视图
<?xml version="1.0" encoding="utf-8"?>
<RelativeLayout xmlns:android="http://schemas.android.com/apk/res/android"
    android:layout_width="match_parent"
    android:layout_height="match_parent">

    <LinearLayout
        android:layout_width="wrap_content"
        android:layout_height="wrap_content"
        android:background="#f5f5f5"
        android:orientation="vertical" >

        <RelativeLayout
            android:layout_width="match_parent"
            android:layout_height="60dp" >

            <ImageView
                android:id="@+id/dialog_imageView_id"
                android:layout_width="match_parent"
                android:layout_height="3dp"
                android:layout_alignParentBottom="true"
                android:layout_alignParentLeft="true"
                android:background="#ffd060" />

            <TextView
                android:id="@+id/dialog_textView_id"
                android:layout_width="wrap_content"
                android:layout_height="wrap_content"
                android:layout_centerHorizontal="true"
                android:layout_centerVertical="true"
                android:text="自定义布局"
                android:textAppearance="?android:attr/textAppearanceLarge"
                android:textColor="#50c0e9" />
        </RelativeLayout>

        <LinearLayout
            android:layout_width="match_parent"
            android:layout_height="wrap_content"
            android:layout_marginLeft="20dp"
            android:layout_marginRight="20dp"
            android:layout_marginTop="10dp"
            android:background="@drawable/my_input_box"
            android:paddingLeft="20dp"
            android:paddingRight="20dp" >

            <EditText
                android:id="@+id/dialog_username_EditText_id"
                android:layout_width="match_parent"
                android:layout_height="wrap_content"
                android:layout_gravity="center_vertical"
                android:background="@null"
                android:ems="10"
                android:hint="学号/账号"
                android:inputType="number" >

                <requestFocus />
            </EditText>
        </LinearLayout>

        <LinearLayout
            android:layout_width="match_parent"
            android:layout_height="wrap_content"
            android:layout_marginLeft="20dp"
            android:layout_marginRight="20dp"
            android:background="@drawable/my_input_box"
            android:paddingLeft="20dp"
            android:paddingRight="20dp" >

            <EditText
                android:id="@+id/dialog_password_EditText_id"
                android:layout_width="match_parent"
                android:layout_height="wrap_content"
                android:layout_gravity="center_vertical"
                android:background="@null"
                android:ems="10"
                android:hint="密码"
                android:password="true" />
        </LinearLayout>

        <ImageView
            android:layout_width="match_parent"
            android:layout_height="1dp"
            android:layout_marginTop="10dp"
            android:background="#bababa" />

        <Button
            android:id="@+id/dialog_logout_button_id"
            android:layout_width="match_parent"
            android:layout_height="45dp"
            android:background="@drawable/layout_selector"
            android:gravity="center_horizontal"
            android:text="确定"
            android:textColor="#535252"
            android:textSize="20sp" />
    </LinearLayout>

</RelativeLayout>
MainActivity.java
package com.kale.dialog;

import android.app.Activity;
import android.content.Intent;
import android.os.Bundle;
import android.view.View;


public class MainActivity extends Activity {

    DialogManager dm;
    String msg = "内容";
    String[] str = new String[] { "android", "java", "ios" };

    @Override
    protected void onCreate(Bundle savedInstanceState) {
        super.onCreate(savedInstanceState);
        setContentView(R.layout.activity_main);
        dm = new DialogManager(this);


    }

    public void buttonListener(View v) {
        dm = new DialogManager(this);
        switch (v.getId()) {
        case R.id.simple_button_id:
            dm.simpleDialog("*简单的对话框", msg);
            break;
        case R.id.list_button_id:
            dm.listDialog("列表对话框", str);
            break;
        case R.id.singleChoice_button_id:
            dm.singleChoiceDialog("单选对话框", str);
            break;
        case R.id.multiChoice_button_id:
            dm.MultiChoiceDialog("多选对话框", str);
            break;
        case R.id.adapter_button_id:
            dm.adapterDialog("用适配器建立的对话框", str);
            break;
        case R.id.view_button_id:
            dm.viewDialog("采用自定义视图的对话框");
            break;
        case R.id.progress_button_id:
            dm.progressDialog("含进度条的对话框",msg);
            break;
        case R.id.activity_button_id:
            startActivity(new Intent(MainActivity.this,DialogActivity.class));
            break;
        case R.id.popup_button_id:
            dm.popupWindowDialog("PopupWindows对话框", v);
            break;
        case R.id.date_button_id:
            dm.dateDialog();
            break;
        case R.id.time_button_id:
            dm.timeDialog();
            break;
        default:
            break;
        }
    }

}
现在我们分步讲解下各种对话框:
首先是一个公用的初始化设置和监听器设置
private Context mContext;
    private AlertDialog.Builder builder;

    public DialogManager(Context context) {
        mContext = context;
        builder = new AlertDialog.Builder(mContext);
    }

    /**
     * 设置对话框的标题+图标+按钮
     *
     * @param title
     */
    private void setButton(String title) {
        builder.setTitle(title).setIcon(R.drawable.ic_launcher)
                .setPositiveButton("好", new positiveListener())
                .setNeutralButton("中", new NeutralListener())
                .setNegativeButton("差", new NegativeListener());
        // .setCancelable(false);//设置点击空白处,不能消除该对话框
    }

    /**
     * @author:Jack Tony
     * @tips : 监听器
     * @date :2014-7-25
     */
    private class positiveListener implements DialogInterface.OnClickListener {
        @Override
        public void onClick(DialogInterface dialog, int which) {

            // dialog.dismiss();//设置对话框强制退出
            showToast("好");

        }
    }

    private class NeutralListener implements DialogInterface.OnClickListener {
        @Override
        public void onClick(DialogInterface dialog, int which) {
            showToast("中");
        }
    }

    private class NegativeListener implements DialogInterface.OnClickListener {
        @Override
        public void onClick(DialogInterface dialog, int which) {
            showToast("差");
        }
    }

    private void showToast(String msg) {
        Toast.makeText(mContext, msg, 0).show();
    }
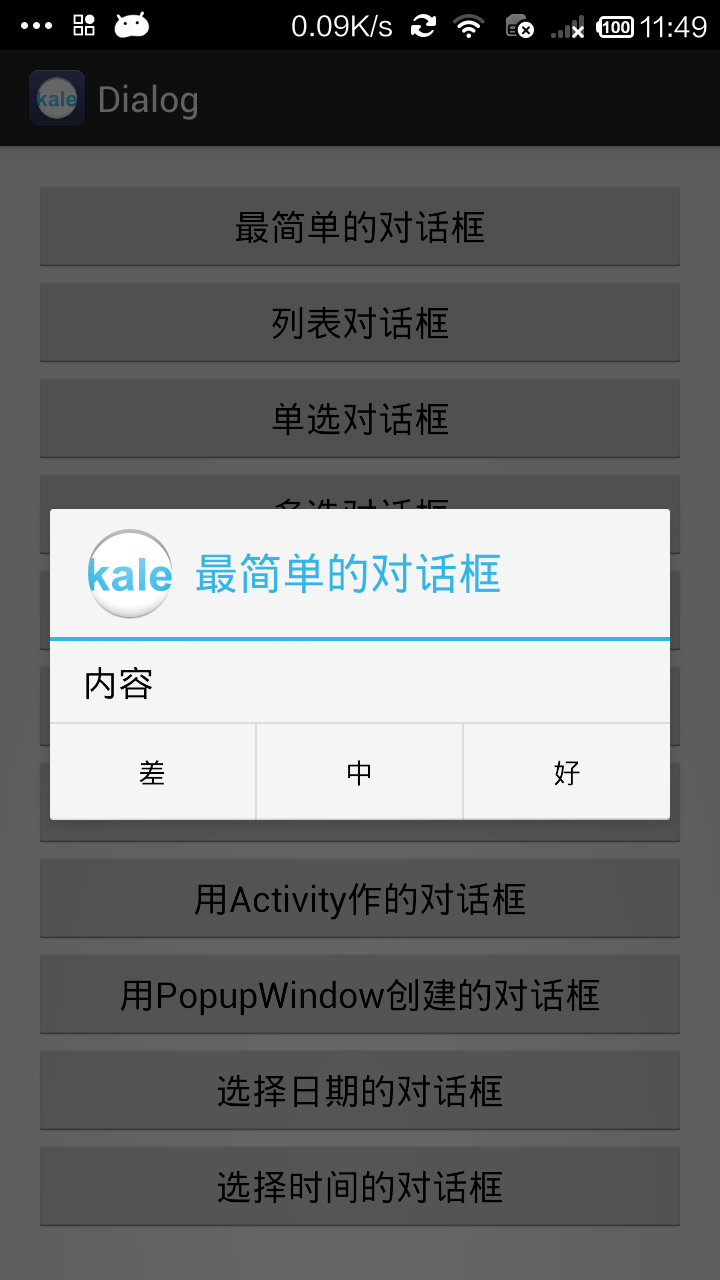
简易对话框
    /**
     * 简易对话框
     *
     * @param title
     * @param msg
     */
    public void simpleDialog(String title, String msg) {
        setButton(title);
        builder.setMessage(msg).create().show();
    }
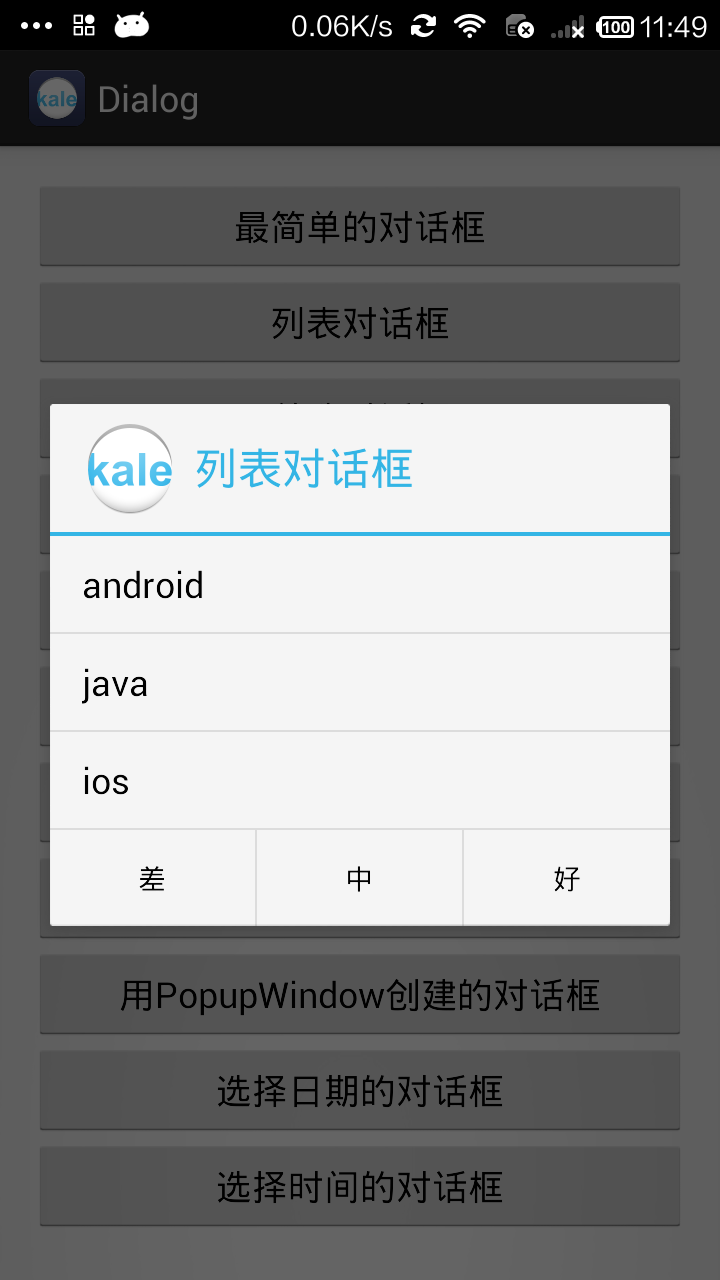
列表对话框
/**
     * 列表对话框
     *
     * @param title
     * @param str
     */
    public void listDialog(String title, final String[] str) {
        setButton(title);
        // 设置了列表就不能设置内容了,否则就会出问题
        builder.setItems(str, new OnClickListener() {
            @Override
            public void onClick(DialogInterface dialog, int which) {
                showToast("选中了:" + str[which]);
            }
        }).create().show();
    }
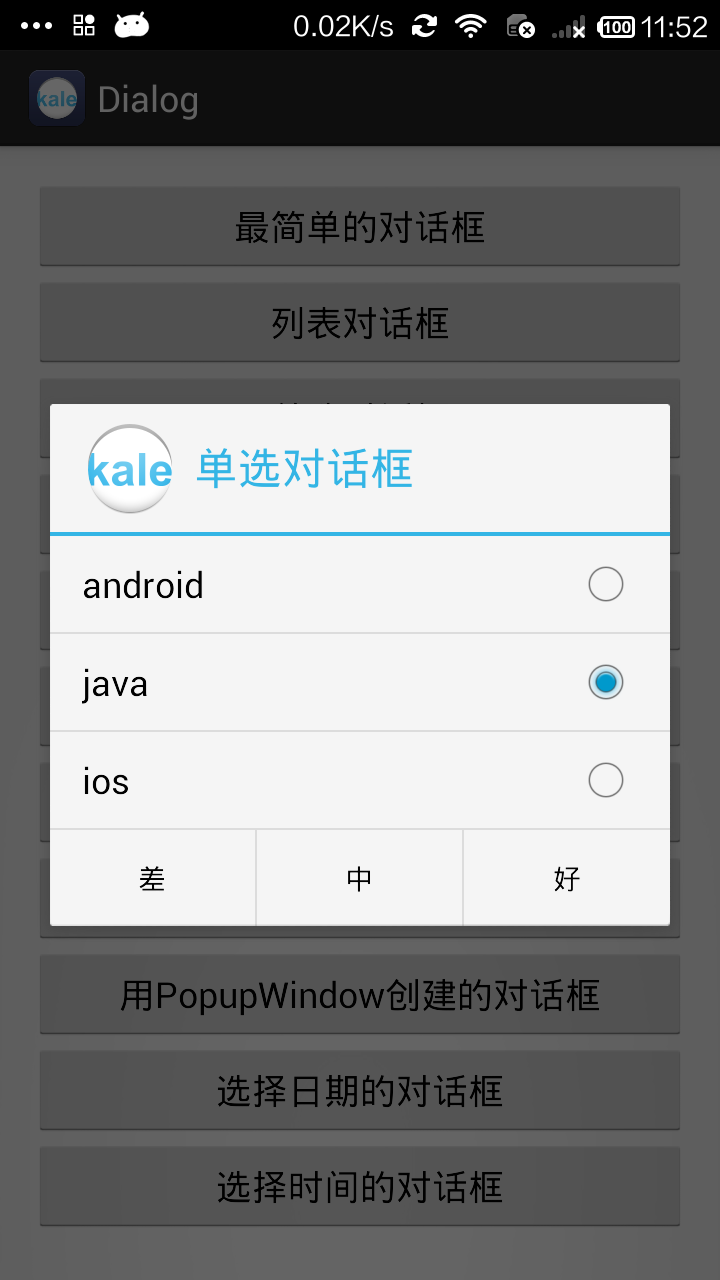
单选对话框
/**
     * 单选对话框
     *
     * @param title
     * @param str
     */
    public void singleChoiceDialog(String title, final String[] str) {
        setButton(title);
        builder
        // 设置选中了第二项
        .setSingleChoiceItems(str, 1, new OnClickListener() {
            @Override
            public void onClick(DialogInterface dialog, int which) {
                showToast("选中了:" + str[which]);
            }
        }).create().show();
    }
多选对话框

    /**
     * 多选对话框
     *
     * @param title
     * @param str
     */
    public void MultiChoiceDialog(String title, final String[] str) {
        setButton(title);
        builder
        // 默认选中几项
        .setMultiChoiceItems(str, new boolean[] { true, false, true },
                new OnMultiChoiceClickListener() {
                    @Override
                    public void onClick(DialogInterface dialog, int which,
                            boolean isChecked) {
                        showToast("你选择的id为" + which + " , " + "选中了:"
                                + str[which]);
                    }
                }).create().show();
    }
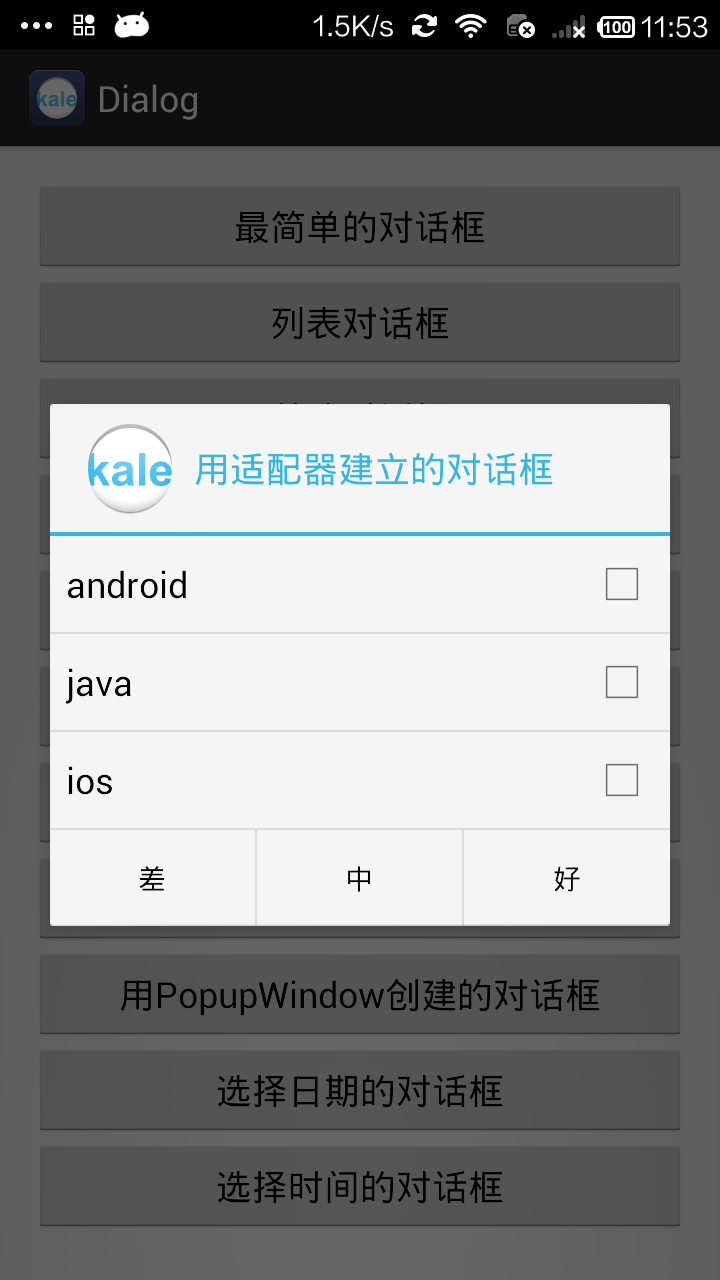
适配器对话框(可以用各种适配器,比如SimpleAdapter)
    /**
     * 适配器对话框
     *
     * @param title
     * @param str
     */
    public void adapterDialog(String title, final String[] str) {
        setButton(title);
        builder.setAdapter(
                new ArrayAdapter<String>(mContext,
                        android.R.layout.simple_list_item_multiple_choice, str),
                new OnClickListener() {
                    @Override
                    public void onClick(DialogInterface dialog, int which) {
                        showToast("选中了:" + str[which]);
                    }
                }).create().show();
    }
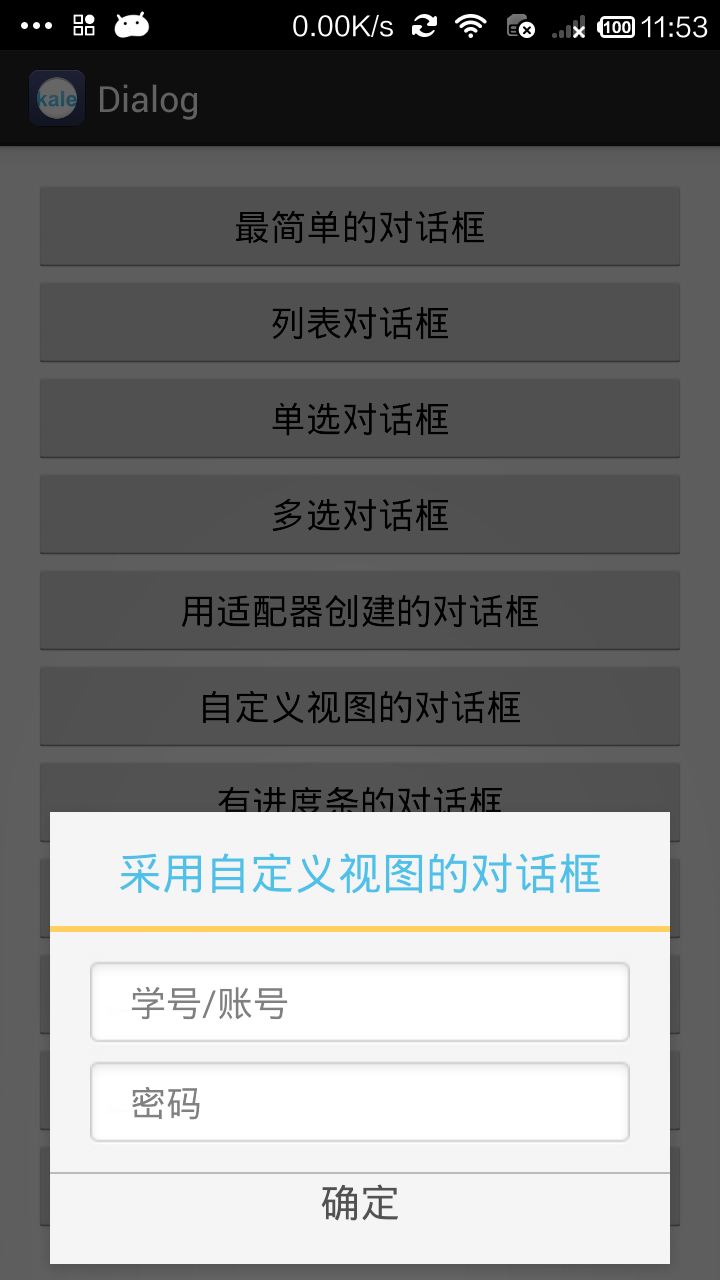
自定义视图的对话框
/**
     * 自定义视图对话框
     *
     * @param title
     */
    public void viewDialog(String title) {
        // LayoutInflater是用来找layout文件夹下的xml布局文件,并且实例化
        LayoutInflater factory = LayoutInflater.from(mContext);
        // 把activity_login中的控件定义在View中
        View view = factory.inflate(R.layout.dialog_layout, null);
        // 将LoginActivity中的控件显示在对话框中

        // 获取用户输入的“用户名”,“密码”
        // 注意:view.findViewById很重要,因为上面factory.inflate(R.layout.activity_login,
        // null)将页面布局赋值给了view了
        TextView titleTv = (TextView) view
                .findViewById(R.id.dialog_textView_id);
        titleTv.setText(title);
        Button btn = (Button) view.findViewById(R.id.dialog_logout_button_id);
        btn.setOnClickListener(new View.OnClickListener() {
            @Override
            public void onClick(View arg0) {
                showToast("按下自定义视图的按钮了~");
            }
        });

        builder
        // 设定显示的View
        .setView(view);
        // 设置dialog是否为模态,false表示模态,true表示非模态
        // ab.setCancelable(false);
        // 对话框的创建、显示,这里显示的位置是在屏幕的*下面,但是很不推荐这个种做法,因为距底部有一段空隙
        AlertDialog dialog = builder.create();
        Window window = dialog.getWindow();
        window.setGravity(Gravity.BOTTOM); // 此处可以设置dialog显示的位置
        window.setWindowAnimations(R.style.myAnimationstyle); // 添加动画
        dialog.show();
    }
进度条对话框(这里可以定义显示精准进度的、模糊进度的、圆形模糊进度的进度条)

    /**
     * 进度条对话框
     *
     * @param title
     * @param msg
     */
    public void progressDialog(String title, String msg) {
        final ProgressDialog dialog = new ProgressDialog(mContext);
        dialog.setTitle(title);
        dialog.setMessage(msg);
        dialog.setCancelable(false);// 设置点击空白处也不能关闭该对话框

        dialog.setProgressStyle(ProgressDialog.STYLE_HORIZONTAL);
        // dialog.setProgressStyle(ProgressDialog.STYLE_SPINNER);//设置采用圆形进度条

        dialog.setMax(100);
        // dialog.setIndeterminate(true);//设置不显示明确的进度
        dialog.setIndeterminate(false);// 设置显示明确的进度

        dialog.setButton(ProgressDialog.BUTTON_POSITIVE, "确定",
                new DialogInterface.OnClickListener() {
                    public void onClick(DialogInterface dialog, int whichButton) {
                        // 这里添加点击后的逻辑
                    }
                });
        dialog.setButton(ProgressDialog.BUTTON_NEUTRAL, "中立",
                new DialogInterface.OnClickListener() {
                    public void onClick(DialogInterface dialog, int whichButton) {
                        // 这里添加点击后的逻辑
                    }
                });
        dialog.setButton(ProgressDialog.BUTTON_NEGATIVE, "取消",
                new DialogInterface.OnClickListener() {
                    public void onClick(DialogInterface dialog, int whichButton) {
                        // 这里添加点击后的逻辑
                    }
                });
        dialog.show();

        //启动线程,模拟一个耗时的操作
        new Thread(new Runnable() {
            @Override
            public void run() {
                int Progress = 0;
                while (Progress < 100) {
                    try {
                        Thread.sleep(100);
                        Progress++;
                        // dialog.setProgress(Progress);
                        dialog.incrementProgressBy(1);// 进度条一次加10
                    } catch (InterruptedException e) {
                        e.printStackTrace();
                    }
                }
                dialog.dismiss();// 完成后消失
            }
        }).start();
    }
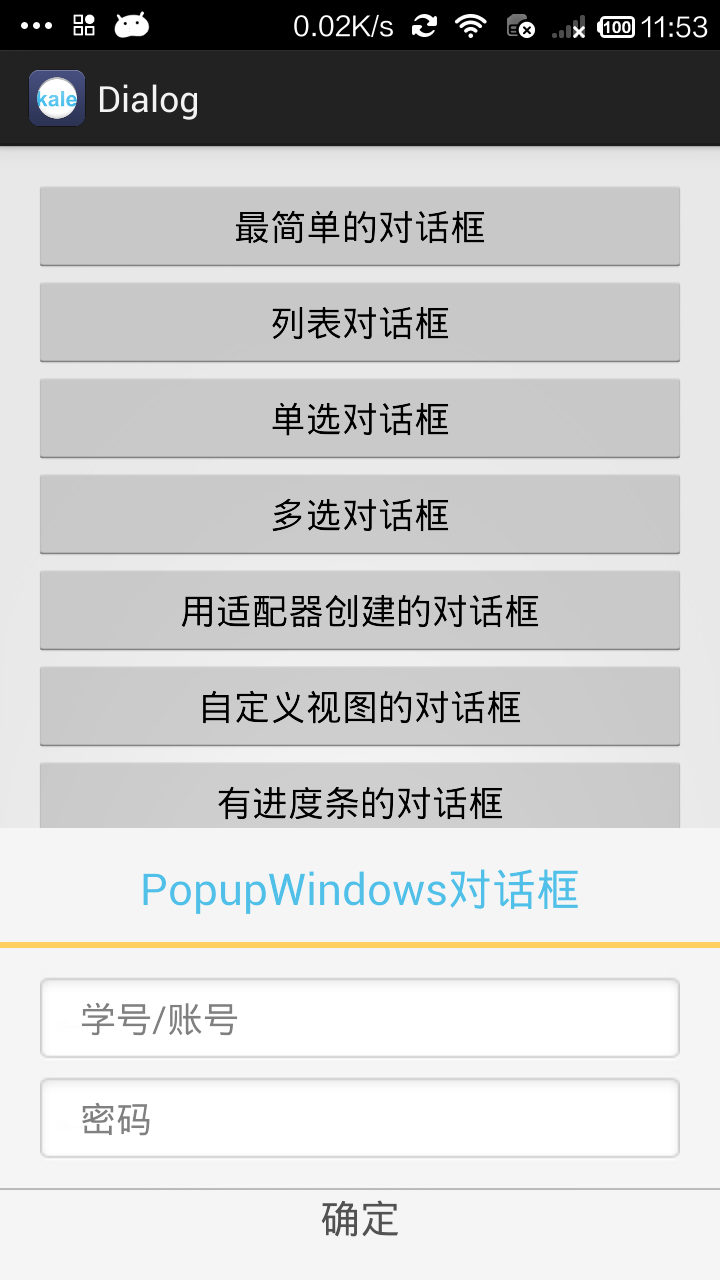
用PopupWindow做的对话框,PopupWindow特别适合显示从特定位置弹出的的菜单。我这里设置对话框是从底部弹出,用了一些动画效果。
/**
     * PopupWindow做的对话框 感谢: http://www.apkbus.com/android-56965-1-1.html
     * http://blog.csdn.net/zhufuing/article/details/17783333
     * http://www.open-open.com/lib/view/open1379383271818.html
     *
     * @param title
     * @param v
     */
    public void popupWindowDialog(String title, View v) {
        // 装载布局文件
        View view = LayoutInflater.from(mContext).inflate(
                R.layout.dialog_layout, null);
        // 创建PopupWindow对象,添加视图,设置宽高,*后一个参数为设置点击屏幕空白处(按返回键)对话框消失。
        // 也可以用.setFocusable(true);.
        final PopupWindow pWindow = new PopupWindow(view,
                LayoutParams.MATCH_PARENT, LayoutParams.WRAP_CONTENT, true);
        pWindow.setBackgroundDrawable(new BitmapDrawable());// 为了让对话框点击空白处消失,必须有这条语句
        pWindow.setSoftInputMode(WindowManager.LayoutParams.SOFT_INPUT_ADJUST_RESIZE);// 出现输入法时,重新布局
        pWindow.setAnimationStyle(R.style.myAnimationstyle);// 设置动画

        TextView titleTv = (TextView) view
                .findViewById(R.id.dialog_textView_id);
        titleTv.setText(title);
        Button btn = (Button) view.findViewById(R.id.dialog_logout_button_id);
        btn.setOnClickListener(new View.OnClickListener() {
            @Override
            public void onClick(View arg0) {
                showToast("按下PopupWindow中的按钮了~");
                pWindow.dismiss();
            }
        });
        // 用下拉方式显示
        // pWindow.showAsDropDown(v);
        pWindow.showAtLocation(v, Gravity.BOTTOM, 0, 0);
    }
动画效果和style文件
动画文件的目录 res/anim
dialog_enter.xml
<?xml version="1.0" encoding="utf-8"?>
<set xmlns:android="http://schemas.android.com/apk/res/android" >

    <translate
        android:duration="200"
        android:fromYDelta="100%p"
        android:toYDelta="0" />

</set>
dialog_exit.xml
<?xml version="1.0" encoding="utf-8"?>
<set xmlns:android="http://schemas.android.com/apk/res/android" >

    <translate
        android:duration="200"
        android:fromYDelta="0"
        android:toYDelta="50%p" />

</set>
样式文件的目录:values/styles.xml
<resources>

     <style name="myAnimationstyle" parent="android:Animation">
        <item name="@android:windowEnterAnimation">@anim/dialog_enter</item>
        <item name="@android:windowExitAnimation">@anim/dialog_exit</item>
    </style>
</resources>
日期对话框
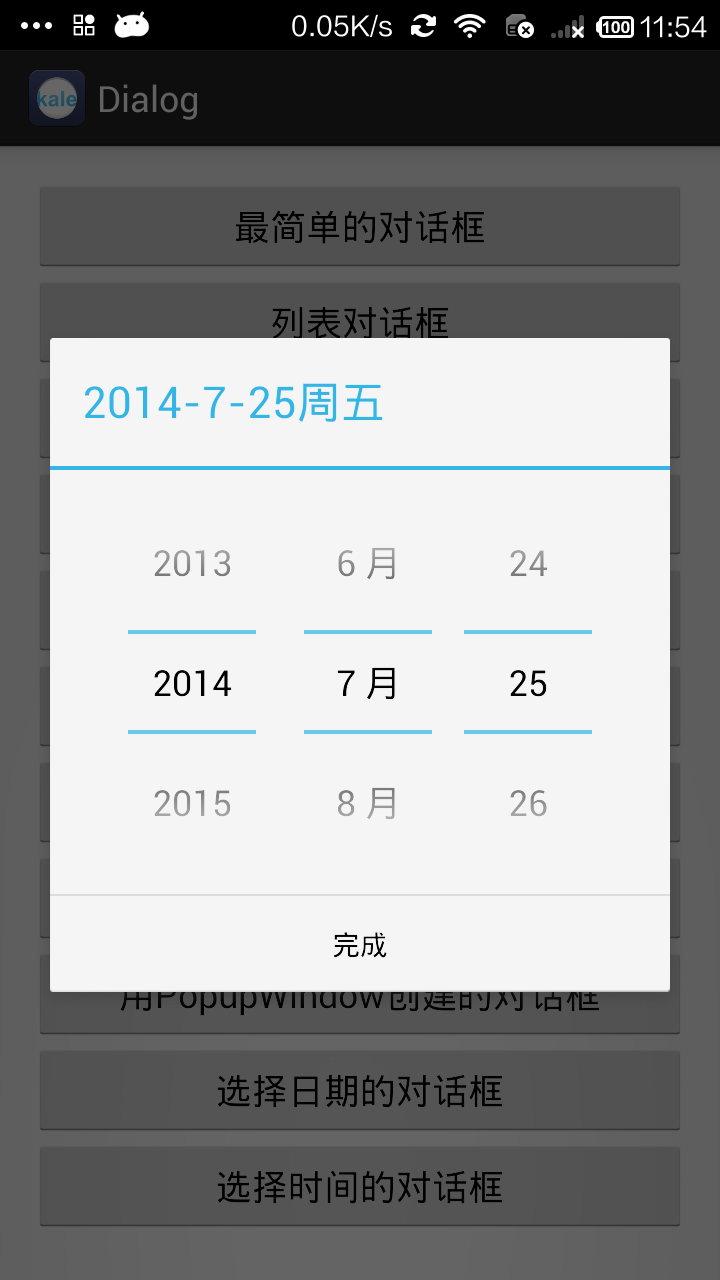
/**
     * 日期对话框
     */
    public void dateDialog() {
        Calendar c = Calendar.getInstance();
        DatePickerDialog dialog = new DatePickerDialog(mContext,
                new DatePickerDialog.OnDateSetListener() {

                    @Override
                    public void onDateSet(DatePicker dp, int year, int month,
                            int dayOfMonth) {
                        showToast(year + "-" + (month + 1) + "-" + dayOfMonth);
                    }
                }, c.get(Calendar.YEAR), c.get(Calendar.MONTH),
                c.get(Calendar.DAY_OF_MONTH));
        dialog.show();
    }
时间对话框
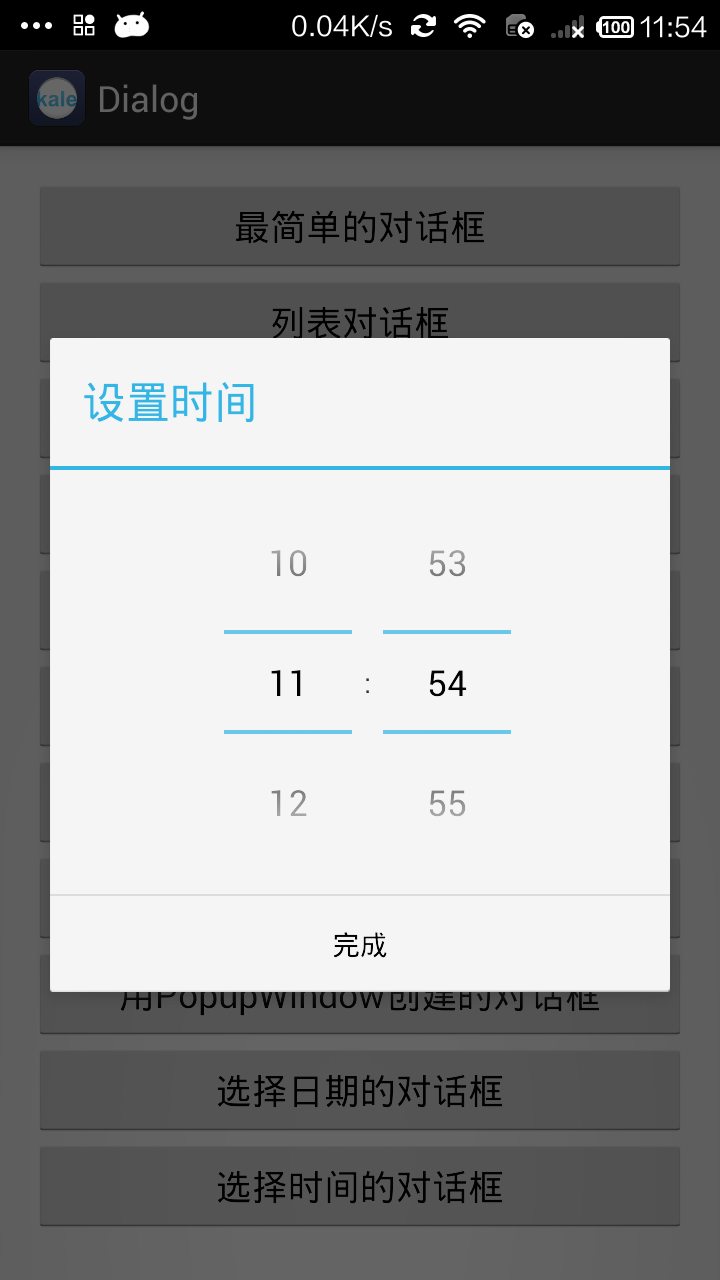
    /**
     * 时间对话框
     */
    public void timeDialog() {
        Calendar c = Calendar.getInstance();
        new TimePickerDialog(mContext,
                new TimePickerDialog.OnTimeSetListener() {

                    @Override
                    public void onTimeSet(TimePicker arg0, int hourOfDay,
                            int minute) {
                        showToast(hourOfDay + ":" + minute);
                    }
                }, c.get(Calendar.HOUR_OF_DAY), c.get(Calendar.MINUTE), true)
                .show();
    }
用Activit做的对话框
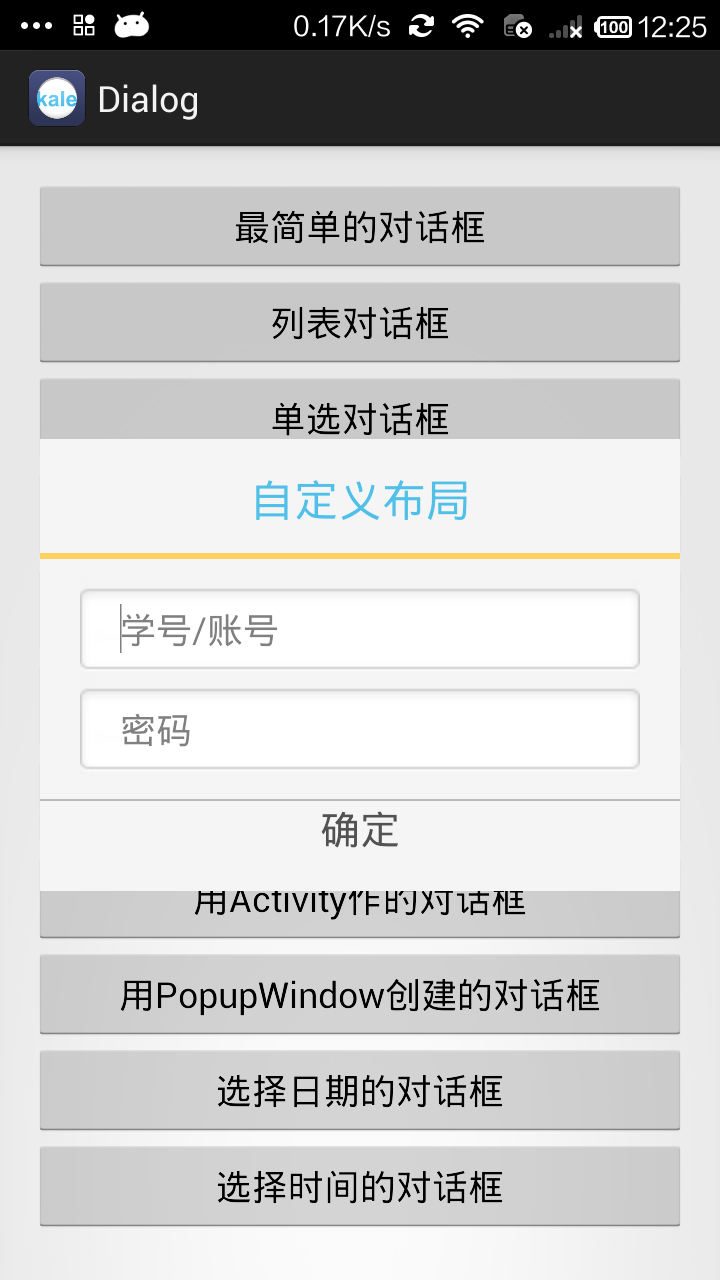
DialogActivity.java
package com.kale.dialog;

import android.app.Activity;
import android.os.Bundle;

public class DialogActivity extends Activity{

    @Override
    protected void onCreate(Bundle savedInstanceState) {
        super.onCreate(savedInstanceState);
        setContentView(R.layout.dialog_layout);
    }
}
首先,定义风格
    <!-- android Dialog去掉标题栏 和边框 -->
     <style name="myDialogTheme" parent="android:Theme.Dialog">
        <item name="android:windowFrame">@null</item><!--边框-->
        <item name="android:windowIsFloating">true</item><!--是否浮现在activity之上-->
        <item name="android:windowIsTranslucent">true</item> <!-- 是否透明 -->
        <item name="android:windowNoTitle">true</item><!--除去title-->
        <item name="android:windowContentOverlay">@null</item> <!-- 对话框是否有遮盖 -->
        <item name="android:backgroundDimEnabled">false</item><!-- 不允许对话框的背景变暗 -->
        <item name="android:windowBackground">@null</item><!--除去背景色-->
    </style>
然后,在AndroidManifest.xml中给activity设置风格
        <activity
            android:name="com.kale.dialog.DialogActivity"
            android:theme="@style/myDialogTheme">
        </activity>
*后,启动这个activity即可
startActivity(new Intent(MainActivity.this,DialogActivity.class));
下面是DialogManager.java工具类的全部代码
package com.kale.dialog;

import java.util.Calendar;

import android.app.AlertDialog;
import android.app.DatePickerDialog;
import android.app.ProgressDialog;
import android.app.TimePickerDialog;
import android.content.Context;
import android.content.DialogInterface;
import android.content.DialogInterface.OnClickListener;
import android.content.DialogInterface.OnMultiChoiceClickListener;
import android.graphics.drawable.BitmapDrawable;
import android.view.Gravity;
import android.view.LayoutInflater;
import android.view.View;
import android.view.ViewGroup.LayoutParams;
import android.view.Window;
import android.view.WindowManager;
import android.widget.ArrayAdapter;
import android.widget.Button;
import android.widget.DatePicker;
import android.widget.PopupWindow;
import android.widget.TextView;
import android.widget.TimePicker;
import android.widget.Toast;

public class DialogManager {

    private Context mContext;
    private AlertDialog.Builder builder;

    public DialogManager(Context context) {
        mContext = context;
        builder = new AlertDialog.Builder(mContext);
    }

    /**
     * 简易对话框
     *
     * @param title
     * @param msg
     */
    public void simpleDialog(String title, String msg) {
        setButton(title);
        builder.setMessage(msg).create().show();
    }

    /**
     * 列表对话框
     *
     * @param title
     * @param str
     */
    public void listDialog(String title, final String[] str) {
        setButton(title);
        // 设置了列表就不能设置内容了,否则就会出问题
        builder.setItems(str, new OnClickListener() {
            @Override
            public void onClick(DialogInterface dialog, int which) {
                showToast("选中了:" + str[which]);
            }
        }).create().show();
    }

    /**
     * 单选对话框
     *
     * @param title
     * @param str
     */
    public void singleChoiceDialog(String title, final String[] str) {
        setButton(title);
        builder
        // 设置选中了第二项
        .setSingleChoiceItems(str, 1, new OnClickListener() {
            @Override
            public void onClick(DialogInterface dialog, int which) {
                showToast("选中了:" + str[which]);
            }
        }).create().show();
    }

    /**
     * 多选对话框
     *
     * @param title
     * @param str
     */
    public void MultiChoiceDialog(String title, final String[] str) {
        setButton(title);
        builder
        // 默认选中几项
        .setMultiChoiceItems(str, new boolean[] { true, false, true },
                new OnMultiChoiceClickListener() {
                    @Override
                    public void onClick(DialogInterface dialog, int which,
                            boolean isChecked) {
                        showToast("你选择的id为" + which + " , " + "选中了:"
                                + str[which]);
                    }
                }).create().show();
    }

    /**
     * 适配器对话框
     *
     * @param title
     * @param str
     */
    public void adapterDialog(String title, final String[] str) {
        setButton(title);
        builder.setAdapter(
                new ArrayAdapter<String>(mContext,
                        android.R.layout.simple_list_item_multiple_choice, str),
                new OnClickListener() {
                    @Override
                    public void onClick(DialogInterface dialog, int which) {
                        showToast("选中了:" + str[which]);
                    }
                }).create().show();
    }

    /**
     * 自定义视图对话框
     *
     * @param title
     */
    public void viewDialog(String title) {
        // LayoutInflater是用来找layout文件夹下的xml布局文件,并且实例化
        LayoutInflater factory = LayoutInflater.from(mContext);
        // 把activity_login中的控件定义在View中
        View view = factory.inflate(R.layout.dialog_layout, null);
        // 将LoginActivity中的控件显示在对话框中

        // 获取用户输入的“用户名”,“密码”
        // 注意:view.findViewById很重要,因为上面factory.inflate(R.layout.activity_login,
        // null)将页面布局赋值给了view了
        TextView titleTv = (TextView) view
                .findViewById(R.id.dialog_textView_id);
        titleTv.setText(title);
        Button btn = (Button) view.findViewById(R.id.dialog_logout_button_id);
        btn.setOnClickListener(new View.OnClickListener() {
            @Override
            public void onClick(View arg0) {
                showToast("按下自定义视图的按钮了~");
            }
        });

        builder
        // 设定显示的View
        .setView(view);
        // 设置dialog是否为模态,false表示模态,true表示非模态
        // ab.setCancelable(false);
        // 对话框的创建、显示,这里显示的位置是在屏幕的*下面,但是很不推荐这个种做法,因为距底部有一段空隙
        AlertDialog dialog = builder.create();
        Window window = dialog.getWindow();
        window.setGravity(Gravity.BOTTOM); // 此处可以设置dialog显示的位置
        window.setWindowAnimations(R.style.myAnimationstyle); // 添加动画
        dialog.show();
    }

    /**
     * 进度条对话框
     *
     * @param title
     * @param msg
     */
    public void progressDialog(String title, String msg) {
        final ProgressDialog dialog = new ProgressDialog(mContext);
        dialog.setTitle(title);
        dialog.setMessage(msg);
        dialog.setCancelable(false);// 设置点击空白处也不能关闭该对话框

        dialog.setProgressStyle(ProgressDialog.STYLE_HORIZONTAL);
        // dialog.setProgressStyle(ProgressDialog.STYLE_SPINNER);//设置采用圆形进度条

        dialog.setMax(100);
        // dialog.setIndeterminate(true);//设置不显示明确的进度
        dialog.setIndeterminate(false);// 设置显示明确的进度

        dialog.setButton(ProgressDialog.BUTTON_POSITIVE, "确定",
                new DialogInterface.OnClickListener() {
                    public void onClick(DialogInterface dialog, int whichButton) {
                        // 这里添加点击后的逻辑
                    }
                });
        dialog.setButton(ProgressDialog.BUTTON_NEUTRAL, "中立",
                new DialogInterface.OnClickListener() {
                    public void onClick(DialogInterface dialog, int whichButton) {
                        // 这里添加点击后的逻辑
                    }
                });
        dialog.setButton(ProgressDialog.BUTTON_NEGATIVE, "取消",
                new DialogInterface.OnClickListener() {
                    public void onClick(DialogInterface dialog, int whichButton) {
                        // 这里添加点击后的逻辑
                    }
                });
        dialog.show();

        //启动线程,模拟一个耗时的操作
        new Thread(new Runnable() {
            @Override
            public void run() {
                int Progress = 0;
                while (Progress < 100) {
                    try {
                        Thread.sleep(100);
                        Progress++;
                        // dialog.setProgress(Progress);
                        dialog.incrementProgressBy(1);// 进度条一次加10
                    } catch (InterruptedException e) {
                        e.printStackTrace();
                    }
                }
                dialog.dismiss();// 完成后消失
            }
        }).start();
    }

    /**
     * PopupWindow做的对话框 感谢: http://www.apkbus.com/android-56965-1-1.html
     * http://blog.csdn.net/zhufuing/article/details/17783333
     * http://www.open-open.com/lib/view/open1379383271818.html
     *
     * @param title
     * @param v
     */
    public void popupWindowDialog(String title, View v) {
        // 装载布局文件
        View view = LayoutInflater.from(mContext).inflate(
                R.layout.dialog_layout, null);
        // 创建PopupWindow对象,添加视图,设置宽高,*后一个参数为设置点击屏幕空白处(按返回键)对话框消失。
        // 也可以用.setFocusable(true);.
        final PopupWindow pWindow = new PopupWindow(view,
                LayoutParams.MATCH_PARENT, LayoutParams.WRAP_CONTENT, true);
        pWindow.setBackgroundDrawable(new BitmapDrawable());// 为了让对话框点击空白处消失,必须有这条语句
        pWindow.setSoftInputMode(WindowManager.LayoutParams.SOFT_INPUT_ADJUST_RESIZE);// 出现输入法时,重新布局
        pWindow.setAnimationStyle(R.style.myAnimationstyle);// 设置动画

        TextView titleTv = (TextView) view
                .findViewById(R.id.dialog_textView_id);
        titleTv.setText(title);
        Button btn = (Button) view.findViewById(R.id.dialog_logout_button_id);
        btn.setOnClickListener(new View.OnClickListener() {
            @Override
            public void onClick(View arg0) {
                showToast("按下PopupWindow中的按钮了~");
                pWindow.dismiss();
            }
        });
        // 用下拉方式显示
        // pWindow.showAsDropDown(v);
        pWindow.showAtLocation(v, Gravity.BOTTOM, 0, 0);
    }

    /**
     * 日期对话框
     */
    public void dateDialog() {
        Calendar c = Calendar.getInstance();
        DatePickerDialog dialog = new DatePickerDialog(mContext,
                new DatePickerDialog.OnDateSetListener() {

                    @Override
                    public void onDateSet(DatePicker dp, int year, int month,
                            int dayOfMonth) {
                        showToast(year + "-" + (month + 1) + "-" + dayOfMonth);
                    }
                }, c.get(Calendar.YEAR), c.get(Calendar.MONTH),
                c.get(Calendar.DAY_OF_MONTH));
        dialog.show();
    }

    /**
     * 时间对话框
     */
    public void timeDialog() {
        Calendar c = Calendar.getInstance();
        new TimePickerDialog(mContext,
                new TimePickerDialog.OnTimeSetListener() {

                    @Override
                    public void onTimeSet(TimePicker arg0, int hourOfDay,
                            int minute) {
                        showToast(hourOfDay + ":" + minute);
                    }
                }, c.get(Calendar.HOUR_OF_DAY), c.get(Calendar.MINUTE), true)
                .show();
    }

    /**
     * 设置对话框的标题+图标+按钮
     *
     * @param title
     */
    private void setButton(String title) {
        builder.setTitle(title).setIcon(R.drawable.ic_launcher)
                .setPositiveButton("好", new positiveListener())
                .setNeutralButton("中", new NeutralListener())
                .setNegativeButton("差", new NegativeListener());
        // .setCancelable(false);//设置点击空白处,不能消除该对话框
    }

    /**
     * @author:Jack Tony
     * @tips : 监听器
     * @date :2014-7-25
     */
    private class positiveListener implements DialogInterface.OnClickListener {
        @Override
        public void onClick(DialogInterface dialog, int which) {

            // dialog.dismiss();//设置对话框强制退出
            showToast("好");

        }
    }

    private class NeutralListener implements DialogInterface.OnClickListener {
        @Override
        public void onClick(DialogInterface dialog, int which) {
            showToast("中");
        }
    }

    private class NegativeListener implements DialogInterface.OnClickListener {
        @Override
        public void onClick(DialogInterface dialog, int which) {
            showToast("差");
        }
    }

    private void showToast(String msg) {
        Toast.makeText(mContext, msg, 0).show();
    }
}
